

8 Best Open Source Data Recovery Software to Use in 2026
 1.5K
1.5K
 1
1


Data recovery software making it easy to restore files from a device, if you are on the lookout for the best data recovery software, don’t miss out open source programs, especially when you don’t need to scan or restore a large amount of data.
Unlike proprietary data recovery tools, open source programs are free, but still offer many of the same features that expect from a paid tool, even offer more customization, because the source code are open and can be modified by an expert. In this guide, we will list 8 best open source data recovery software.
 Cisdem Data Recovery for Windows and Mac
Best Data Recovery Software in 2026
- Recover data lost under various situations: deletion, formatting, corruption, app crash, system glitch, etc.
- Restore files from different kinds of internal and external storage devices
- Restore 1000+ files: video, audio, photo, document, archive, email, etc.
- Repair damaged videos, images and documents
- Recover unsaved Office documents (Word, Excel, PowerPoint), WPS, PSD, etc.
- Quickly find file with filter tool
- Preview files before recovery
- Save scanning process
 Free Download Windows 11/10/8/7
 Free Download macOS 10.15 or later
1. TestDisk
Advantages:
- Recover partition and sector
- Recover documents, videos, photos, music, etc.
- Repair boot sector
- Locate backup
- Support various operating system, file systems and storage devices
Disadvantages:
- Don’t have a GUI, not user friendly
- Cannot recover all the deleted files
- Last update was in 2024
TestDisk is an open source data recovery software designed to recover lost partitions and repair disk or file system on Windows, macOS, Linux.
In terms of features, TestDisk offers all the solutions that individuals need for data recovery: recover deleted partition, recover boot sector from backup, recover deleted files on FAT, exFAT, NTFS and ext2/ext3/ext4, repair boot sector, fix tables and MFT, locate backup SuperBlock.
Aside from the features on offer, TestDisk also boasts in its flexibility. It works on DOS, Windows, macos, Linux, FreeBSD, NetBSD, OpenBSD and SunOS operating systems. That’s to say, you can make the most of TestDisk regardless of the device you use. Its flexibility is also shown in terms of supported external storage devices. For the reason of its excellent support of different file systems, you can even restore deleted files from flash memory cards, digital cameras and other portable devices, as long as you can connect them to your computer and access to these devices.
However, as other open source programs, TestDisk is command based and doesn’t come with a user-friendly GUI, you have to use the up/down arrow keys to select, there may be errors in the recovery process and you may have to redo the steps to run through a complete recovery process. In addition, the latest official version is released on Feb 22, 2024, you can find updated codes on GitHub with enhanced performance, but you need to know the commands and codes first.
How to Use TestDisk for Data Recovery?
- Download and install TestDisk on your Windows or Mac.
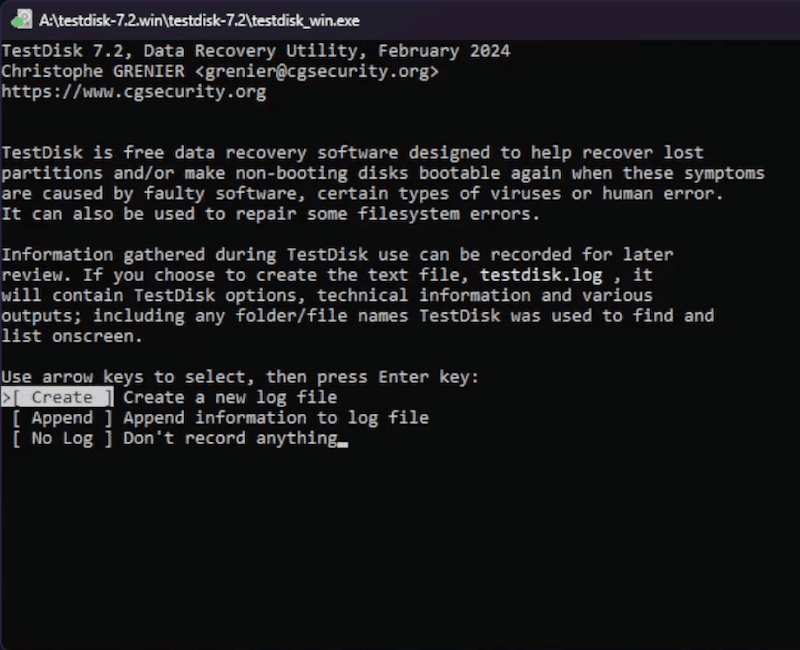
- Select Create use arrow keys on your keyboard and press Enter.
![testdisk01]()
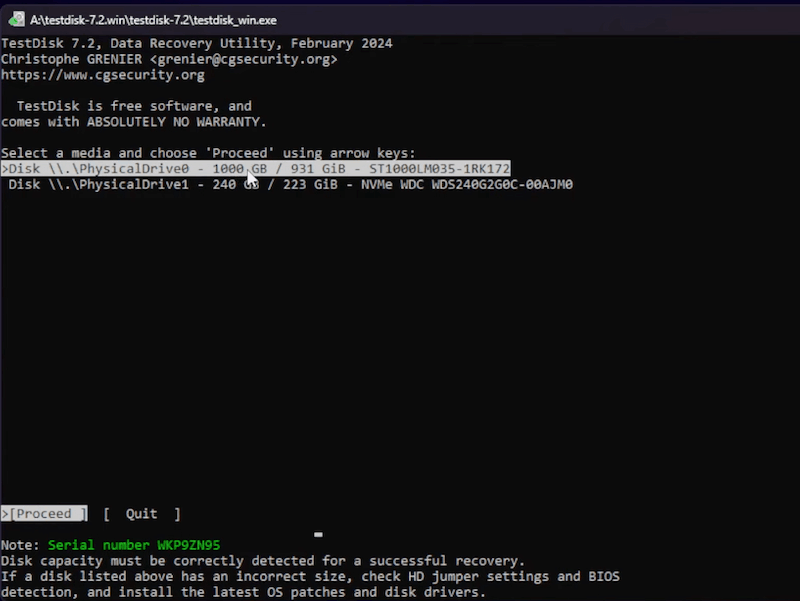
- Select the disk where you want to recover deleted files, press Enter.
![testdisk02]()
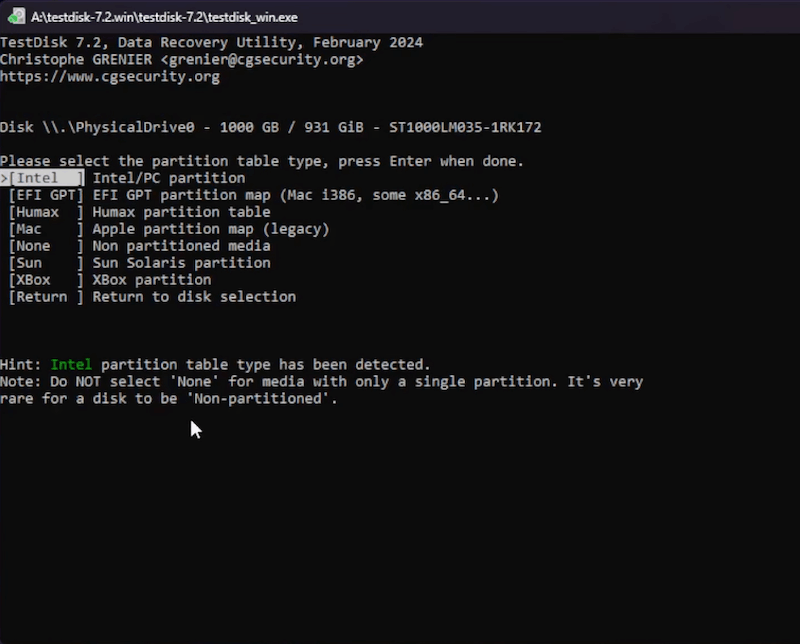
- Select a partition table type, press Enter.
![testdisk partition]()
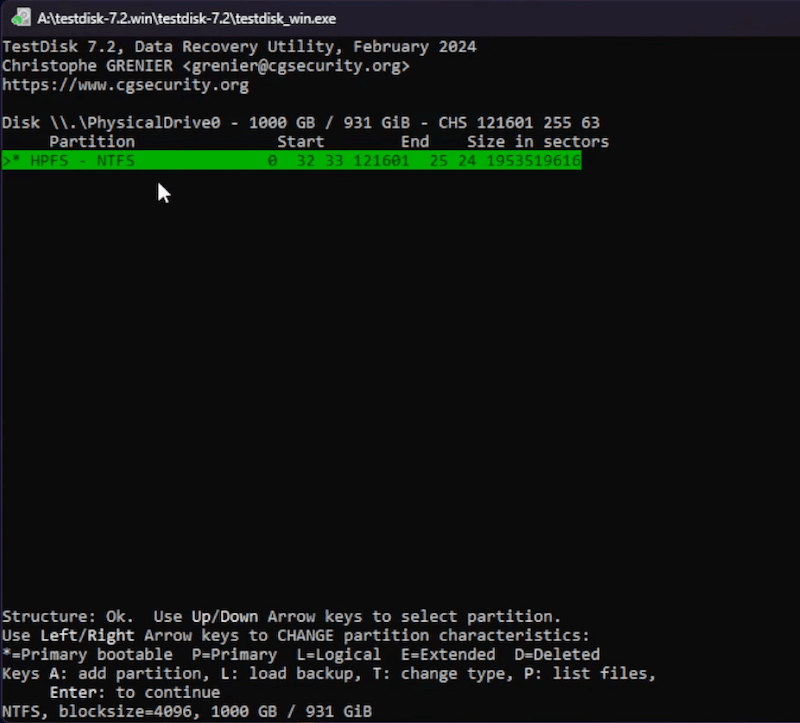
- Select Analyse and press Enter.
![testdisk04]()
- Select Quick Search and press Enter.
- Choose partition and press Enter.
![testdisk06]()
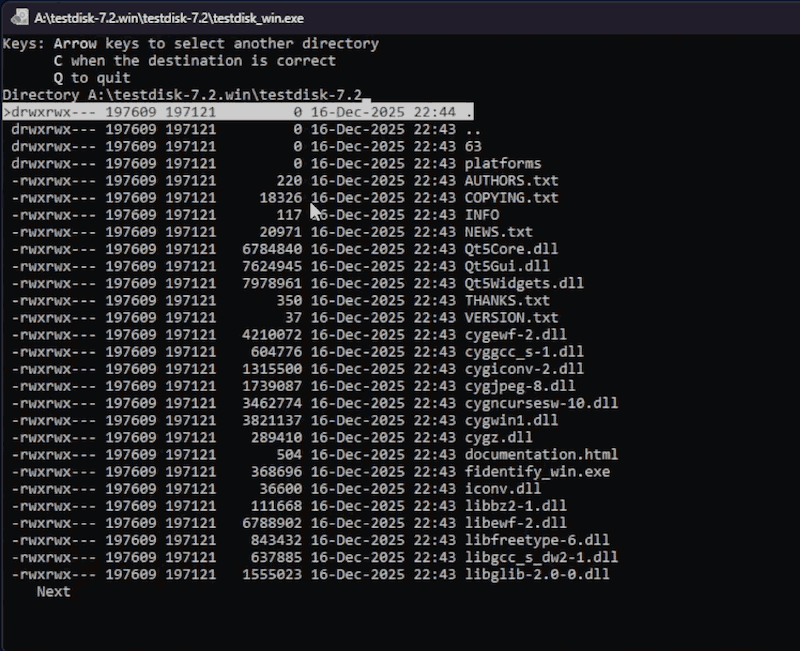
- Type B to list all the files.
- Press C to continue and copy the selected files to recover.
![testdisk07]()

2. PhotoRec
Advantages:
- Recover documents, videos, photos, audios, 400+ file types
- Work on damaged and formatted drive
- Support recovery on hard disk, digital camera and other storage devices
- Have a GUI
Disadvantages:
- Cannot recover all the deleted files
- Last update was in 2024
PhotoRec (Photo Recovery) is the companion of TestDisk, users can download these 2 tools in the same package. TestDisk is used to recover partitions and lost files on different filesystems, while PhotoRec recovers more files than TestDisk.
In terms of features, PhotoRec can recover documents, photos, videos, audios and 400+ file types, from internal and external hard disk, digital camera, USB and so on. It supports damaged or formatted drive recovery as well, because it will ignore the file system.
Like TestDisk, PhotoRec also has an excellent flexibility to recover files across macOS, Windows, Linux, etc. But PhotoRec is more user-friendly than TestDisk. A GUI vesion is available for its Windows edition, it's called QPhotoRec, allowing users to choose in a window instead of using arrow to select among a lot of commands.
How to Use PhotoRec for Data Recovery?
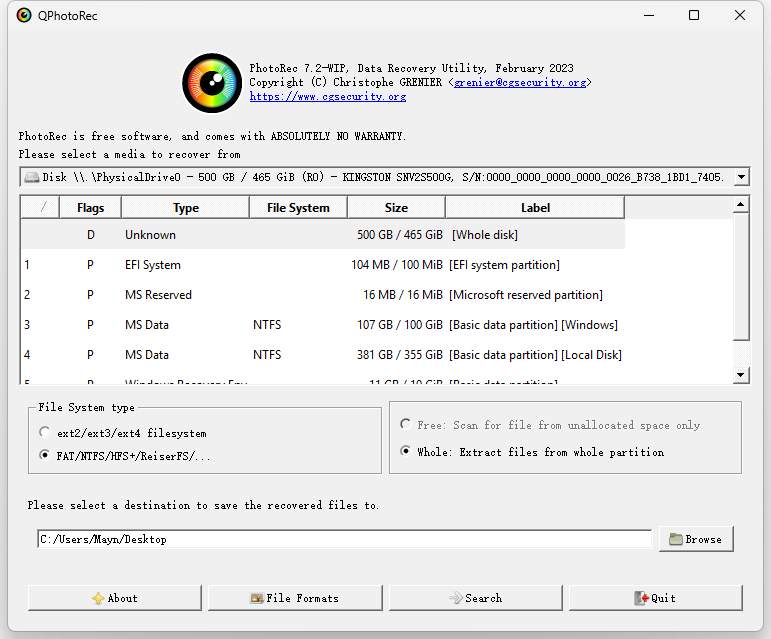
- Install and run the QPhotoRec on your Windows.
- Choose a media to recover, also select the partition, file system, scanning mode, destination for recovered files.
![photorec01]()
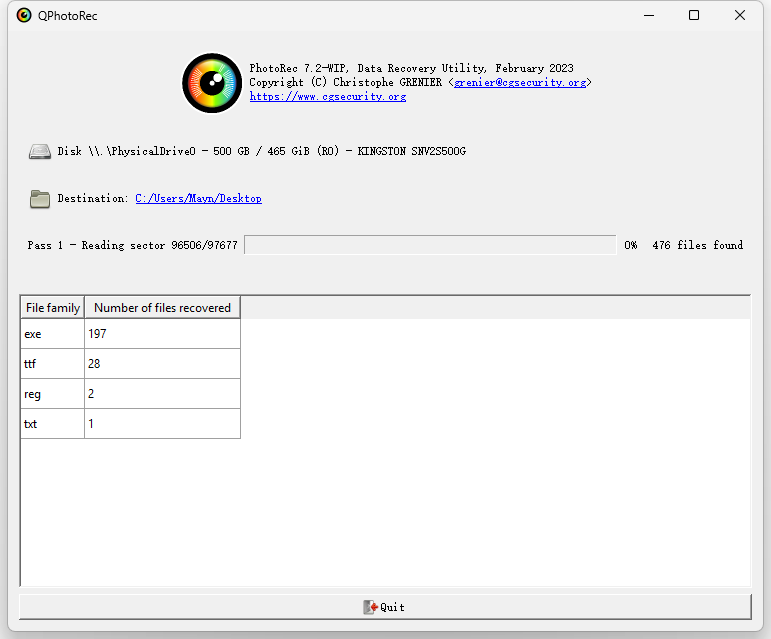
- Click Search to start the scanning.
![photorec02]()
- After the scanning, check the recovered files in the destination folder.
3. Recuva
Advantages:
- User friendly
- Recover documents, photos, videos, audios, etc.
- Analyze damages and contents
- 2 scanning modes
- Preview files before recovery
Disadvantages:
- Recover files without original file names
- Unstable recovery rate
- Only for Windows
Another open source data recovery software that is worth your consideration is Recuva. Perhaps most impressively, a number of Windows users have picked this tool for its user-friendly GUI, which is easy to navigate and do the recovery.
Other strengths of Recuva include its rich features to rescue your data, it help users to recover a vast collection of files, analyze damages and contents, preview files before recovery. It offers both quick and deep scan to find or recover your file as many as possible.
But it is only available on Windows, it has no plan for macOS development. The free version is open source and free, but if you want a high recovery rate or recover files from virtual disk, you can pay $24.95 to get the Pro version.
How to Use Recuva for Data Recovery?
- Download and install Recuva on your Windows PC, in the Welcome interface, click Next.
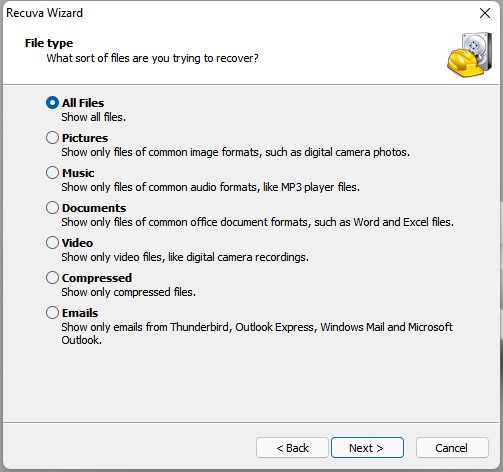
- Choose the file type you want to recover and click Next.
![recuva01]()
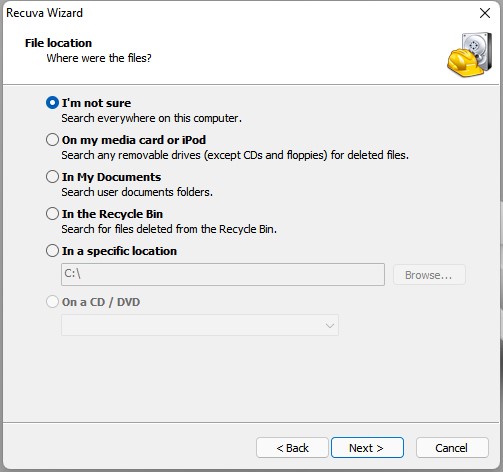
- Choose file location and click Next.
![recuva 02]()
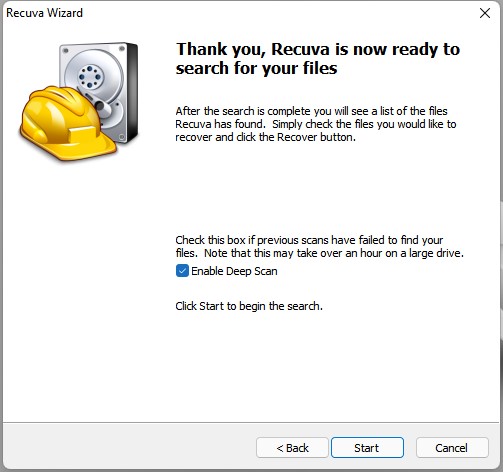
- Click Start to scan the files on selected drive.
![start scan recuva]()
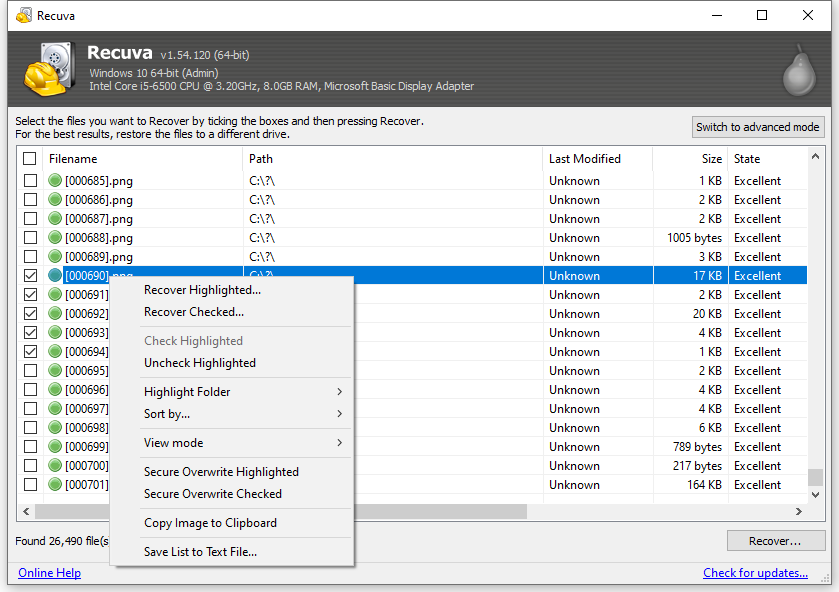
- Preview the files under advanced mode and select the files you want to restore.
- Click Recover button or right click Recover Highlighted or Recover Checked.
![recuva03]()
4. Time Machine
Advantages:
- Back up and recover files
- Pre-installed on each Mac
- Restore previous versions of a file
Disadvantages:
- User have to backup files first, it cannot restore files without a backup
Time Machine is a native backup and recovery software that comes in macOS, which was first introduced to Mac users in its Leopard version. Users just need to back up the files to an external hard drive and set up the Time Machine to automatically back up files on a basis of an hour, a day or a week.
With Time Machine, you can go back to look for any back up copies, which makes it possible to recover a deleted or previous file from its backup. Backup files are displayed in timeline, you can preview each version before selecting a file to recover. Time Machine may sound complicate to first time users, but it is actually very simple to use, as long as you have connected a storage device and set up the backup, you will be able to restore data easily by entering the Time Machine.
How to Use Time Machine for Data Recovery?
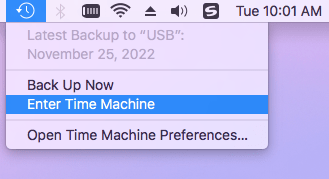
- Click Time Machine icon in the menu bar and Enter Time Machine.
![recover with time machine 01]()
- Use the timeline to select a backup file and click Restore.
![recover with time machine 02]()
5. Windows File Recovery
Advantages:
- Absolutely safe and reliable to use
- Recover recently and permanently deleted files
- Support a lot of file types
- Support all storage devices, filesytems
Disadvantages:
- Type commands and characters to go through a recovery process
- Run into errors from time to time
- Only for Windows users
There is no doubt that opting for a native built-in open source in your system brings a lot of advantages. Mac users have Time Machine, while Windows users have Windows File Recovery. It was released in 2020 by Microsoft, currently available for Windows 10 and later. It is a command-line app to restore documents, photos, videos and more from hard disk, camera, SD card and so on.
This open source data recovery tool comes with two scanning methods to search files on your Windows: Regular and Extensive. The Regular is designed to recover recently deleted files from NTFS drives using Master File Table, and the Extensive is designed to restore files from all file systems.
It doesn’t have a GUI, you need to open the app in your shell tool, type commands, characters and press Enter to go step-by-step. In case you have any trouble going to the next step, you have to check the typed commands carefully or refer to its official documentation to make it right. So, yes, it is not easy to use.
How to Use Windows File Recovery for Data Recovery?
- Download and launch Windows File Recovery from Microsoft Store.
- Enter Windows File Recovery in the search box, and then select it.
- Allow the tool to make changes to your device by clicking Yes.
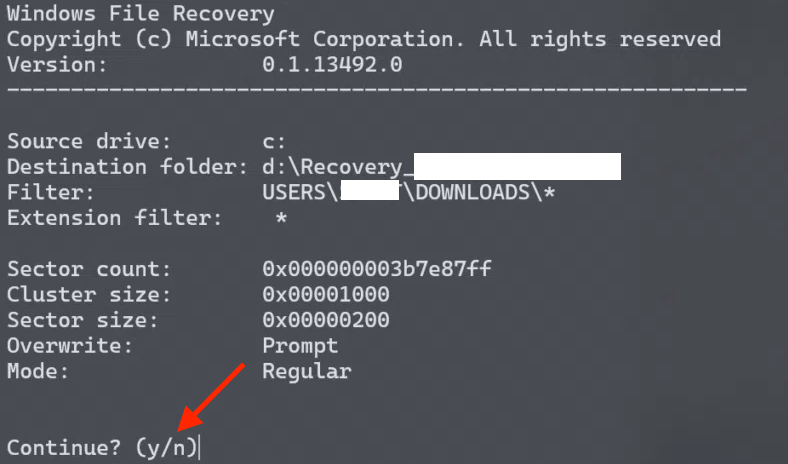
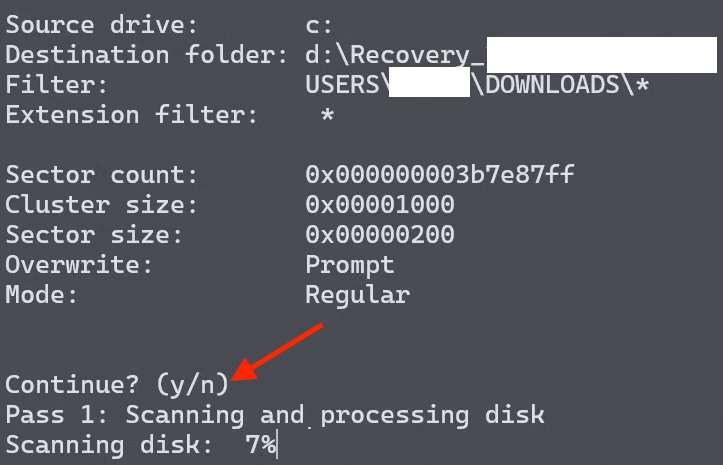
- Enter the command: winfr source-drive: destination-drive: [/mode] [/switches]
- Choose a recovery mode: Regular or Extensive. Enter the command line as follows:
Winfr C: E: /regular /n \Users\<username>\Documents\
Winfr C: E: /extensive /n \Users\<username>\Pictures\*.JPEG /n\Users\<username>\Pictures\*.PNG. Then Continue by clicking y.![windows file recovery01]()
- Enter y to start the recovery.
![windows file recovery02]()
Also, you can refer to the official documentation to recover your files.
6. WinfrGUI
Advantages:
- User friendly
- Recover recently and permanently deleted files
- Support a lot of file types
- Support all storage devices, filesytems
Disadvantages:
- Won’t recover all files
- Only for Windows users
If you find Windows File Recovery helpful but difficult to use, there is a GUI version for this tool, it is WinfrGUI. It does exactly the same thing as Windows File Recovery, but in a graphical user interface. There is no need to enter commands, you just need to go through the recovery process by clicking on icons and buttons.
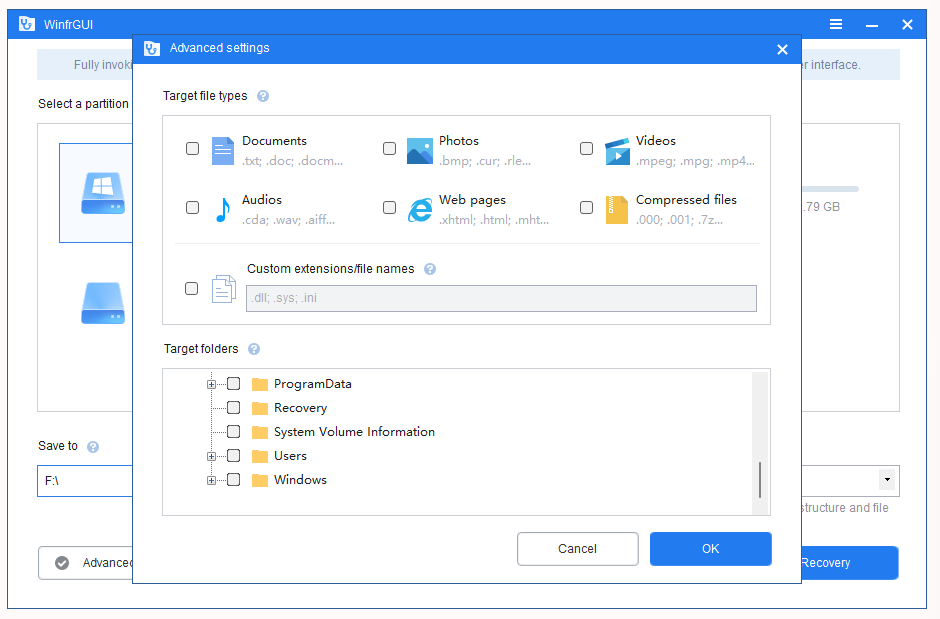
How to Use WinfrGUI for Data Recovery?
- Download and install WinfrGUI on your Windows.
- Select a partition to scan, also select destination for recovered files and scanning mode. Also you can configure advanced settings.
![winfrgui01]()
- Click Start Recovery.
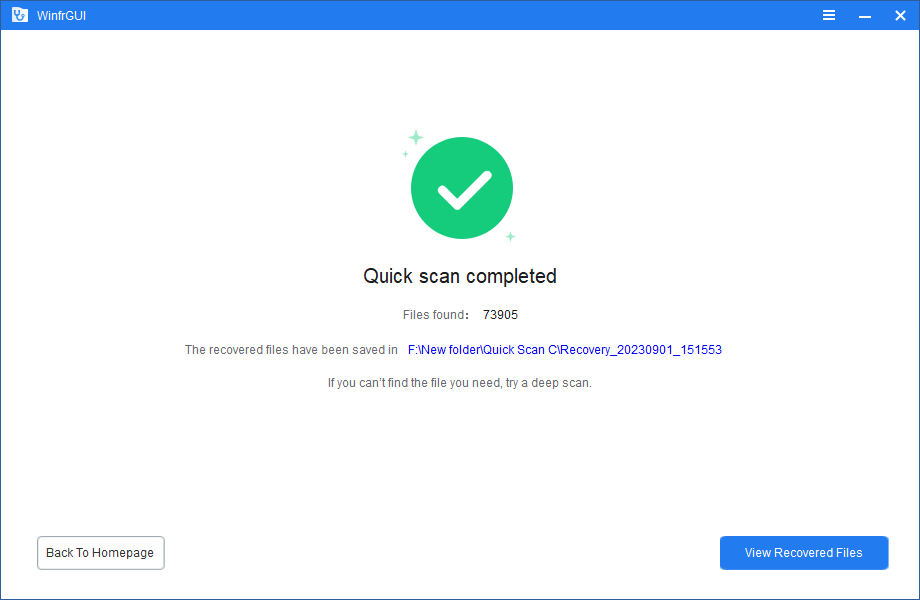
- Once the scanning finishes, view the recovered files.
![winfrgui02]()
7. Wise Data Recovery
Advantages:
- User friendly
- Scan files fast
- Recover 1000+ file types
- Offer portable versions
Disadvantages:
- Only Windows version is free to use, but allow recovering data 2GB only
- Won’t find out and recover all wanted files
Although it didn’t make it as one of our best data recovery recommendations, Wise Data Recovery is still worthy of note here thanks to its simple interface and fast scanning speed. It has both Windows and macOS versions, but only the Windows version can be used for free, allowing users to restore data up to 2GB.
Wise Data Recovery also deserves a mentions on its excellent support of file types, file systems, storage device. There is also one thing that sets Wise Data Recovery apart from others, it has a portable version, which allows users to restore files without installing it and writing to your hard drive.
As if this free version isn’t enough, there Pro version for 1 PC or 3 PCs to recover unlimited numbers of recoverable files, also to enjoy premium technical support from its team.
How to Use Wise for Data Recovery?
- Download and install Wise Data Recovery on your Windows.
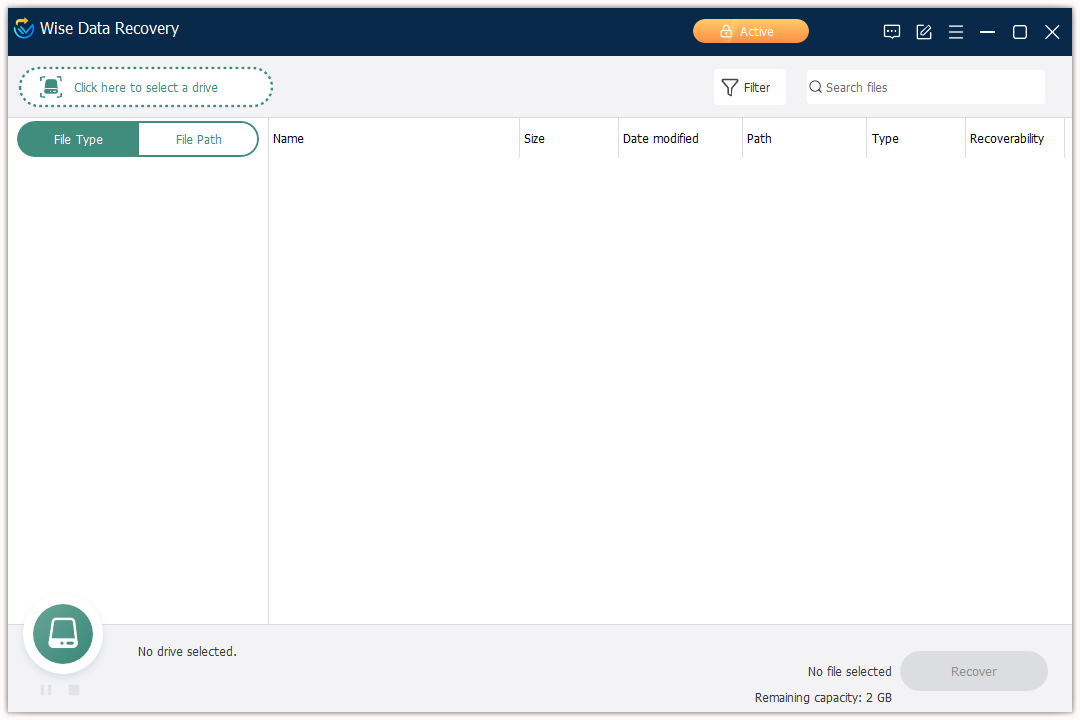
- Select a drive to scan the files.
![wise data recovery 01]()
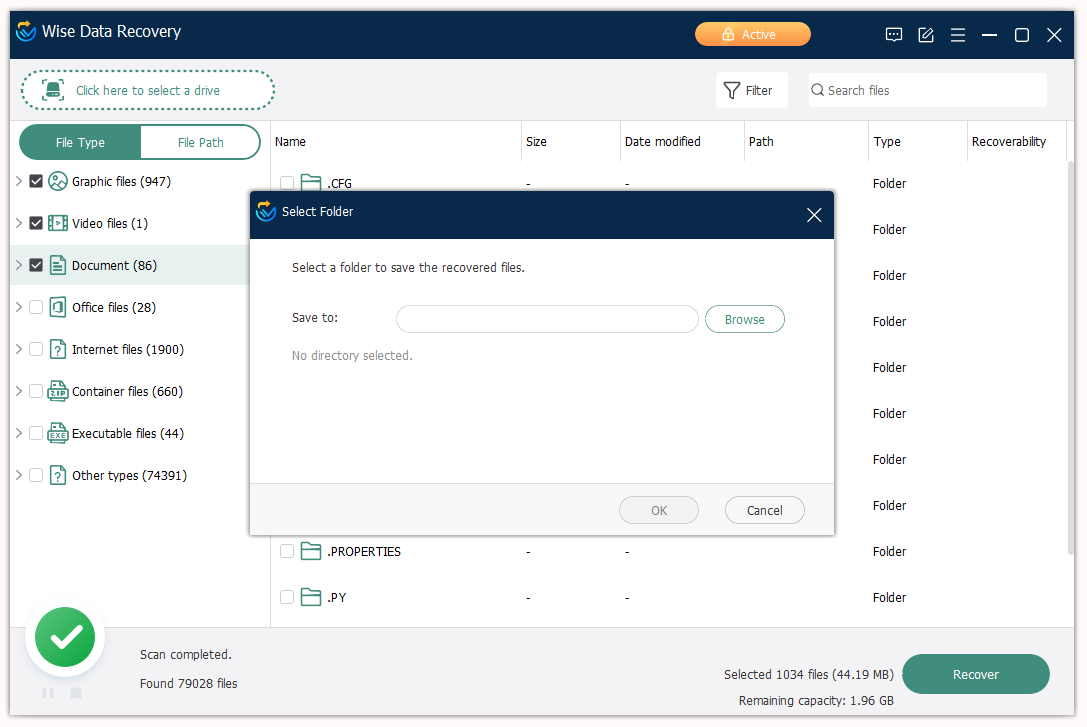
- In the File Type, check the recoverable items in each folder according, you can double click a picture to preview.
![wise data recovery 02]()
- Select the files you want to restore and click Recover. Choose a location to save the recovered files.
![wise data recovery 03]()

8. SoftPerfect
Advantages:
- Easy to use
- Scan specific files
- Recover most file types and storage media
Disadvantages:
- Update discontinues
- Only work on Windows
- Cannot find and recover any files sometimes
First of all, SoftPerfect doesn’t claim to be an open source that is geared towards all Windows users, it has Windows version only, but the tool has been discontinued with update since December 2018. It can work well on Windows XP, 7, 8, but there are glitches when running on latest Windows 10 or 11. This is the reason why SoftPerfect is selling other data recovery tools on its website.
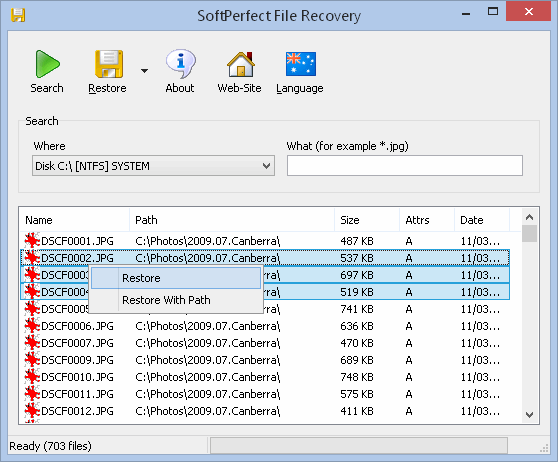
In terms of features, SoftPerfect works with FAT and NTFS, recognizes most storage devices, including hard drive, digital camera, USB, SD card, etc. Its Restore comes with 2 options, recover files to specified location or restore with path. And with simple interface, SoftPerfect recovers specific files quickly.
How to Use SoftPerfect for Data Recovery?
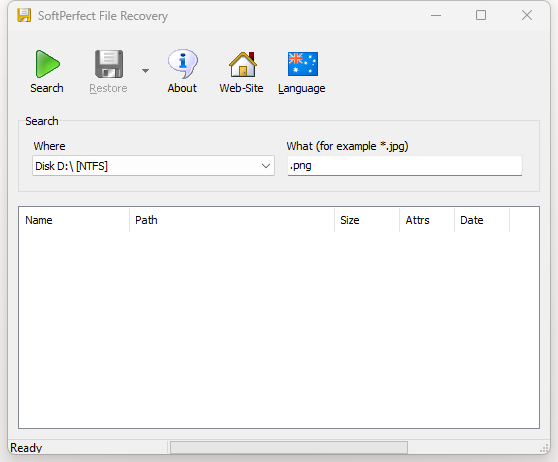
- Download and install SoftPerfect on your Windows.
- Select where to scan and what kind of files you want to search.
- Click Search to scan the drive.
![softperfect]()
- Select the files you want to recover and click Restore button.
![softperfect scan]()
Which One is Right For You?
Of course, we have to device whether open source data recovery software is right for us, there are benefits for use, but it often comes with simple interface, even doesn’t have a GUI. If you have decided to run an open source tool on your Windows or Mac, check the pros and cons first, then look at the steps we list for you to see if you can catch how it works even when encountered with some problems.

Zoey shows a great interest in what she does. Although not long with Cisdem, she has possessed a professional understanding of data recovery.

JK Tam is the lead developer at Cisdem, bringing over two decades of hands-on experience in cross-platform software development to the editorial team. He is now the lead technical approver for all articles related to Data Recovery and DVD Burner.
Nicola Vallee
I don't expect that PhotoRec has a GUI version, thanks for the informative list, really helpful to me.