

[2026] 10 Fixes for Uninitialized Disk on Mac, External Drive Incl.
 30.7K
30.7K
 1
1


We always put a hard drive in the system to store or back up important files, no matter it is an internal hard disk or an external SSD/USB drive. When a hard drive is installed and connected properly, we can easily access the files on it, but what if the drive malfunctions, for example, becomes uninitialized on Mac? How does this happen and how to get it solved? Don't worry, we have the fixes for you, even when it leads to data loss and you want to recover data from an uninitialized hard drive on Mac, be it Apple APFS format or not.
Quick Highlights
- Uninitialized disk with means a new external hard drive that is not activated, or a drive that can be recognized by the Mac, but the data on it cannot be read and Mac deems the risk as not accessible.
- There are a lot of reasons causing uninitialized disk, the main ones are: connection issues, file system corruption, bad sectors, physical damages, virus attack, conflict with 3rd party software.
- Extracting data from the uninitialized disk is an important step to prevent data loss during the fix.
- There are 10 fixes for uninitialized disk on Mac: eject and reconnect hard drive, remove peripheral devices from Mac, restart Mac, try on another Mac, scan virus/disable anti-virus app, run First Aid, restore with Disk Utility, format, reinstall, upgrade or downgrade macOS, contact support.
What Does Uninitialized Disk Mean on A Mac?
When an internal or external disk shows up as “Uninitialised” in Disk Utility on a Mac, there are 2 meanings.
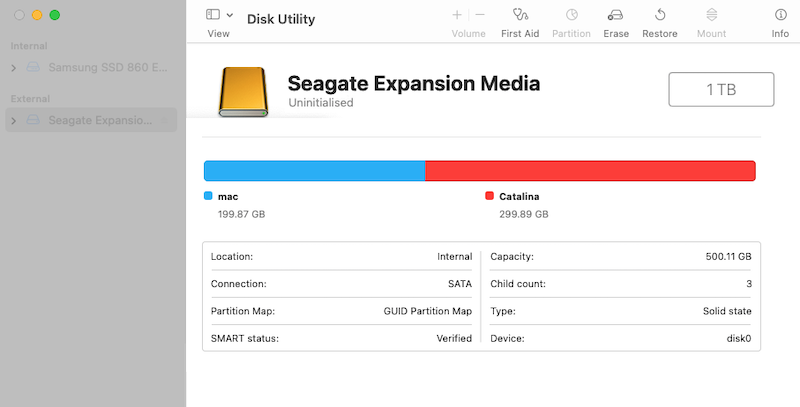
For 1st time user of a brand new external hard drive, you will be required to initialize the disk for use, if your Mac shows it as uninitialized when connecting, it means your new external hard drive is not activated and not ready for use, your Mac needs to use its own language to assign a starting value to the variable of this external hard drive. In this case, you just need to follow the instruction from the disk initialization wizard.
For users who have initialized the hard drive before, uninitialized hard drive means your Mac can recognize the disk, but cannot read your disk anymore and deems this risk as not accessible. This is also the main case when talking about uninitialized hard drive on a Mac. This can be caused by different reasons, keep reading to find out how this comes out.
Why Is My Hard Drive Showing up as Uninitialized?
Reasons to cause uninitialized hard drive on Mac may vary, but basically fall into several types. Here are the likely reasons:
- Connection issue: Improper or loosen connection will lead to uninitialized disk on Mac, and this is always one of the commonest reasons. Therefore, disconnecting and reconnecting is often tried as the first step to resolve this issue.
- File system corruption: when the internal structure of the disk becomes inconsistent, partition might lose and the disk will be inaccessible, this can be caused by hardware or software failures, sudden shutdown, boot up issues, etc.
- Bad sectors: data on a disk that has bad sector is unreadable as well, this can be caused by firmware issue, physical damage, sudden power off, etc.
- Physical damages: other physical damages to the disk, such as too high or too low temperature, dirt, scratch, drop, water dipping, etc. can also cause uninitialised disk.
- Virus Attack
- Conflict with 3rd party software
To fix uninitialized internal or external hard drive that is caused by different reasons, here we list 10 solutions, you can choose the one according to you need.
Important: Extract Data from Uninitialized Disk on Mac before It’s Gone
But before your disk dies with the data on it, we should extract the data from it first when it is still can be recognized on your Mac. Because it is not guaranteed that an uninitialised disk will be fixed 100% successfully, and the data might be lost forever if anything done wrong, not all of us is tech-savvy after all.
We recommend using Cisdem Data Recovery to back up your data from the uninitialised disk. Actually, it is a dedicated data recovery program for Mac users, helping users restore 200+ file types from all kinds of internal and external disks. It not only recovers lost data from uninitialized disk, but also creates backup from a problematic disk to prevent data loss.
Why Cisdem Data Recovery for Mac?
- Create disk backup and load the disk image to recover files when the data is lost.
- Recover files from uninitialized, formatted and deleted external hard drive
- Get files back from external and internal hard drive
- Support recovering 200+ types of files: video, audio, image, document, etc.
- Repair damaged videos and photos
- Preview files before recovery
- Restore files to local drive or cloud
- High recovery rate
- Easy and fast
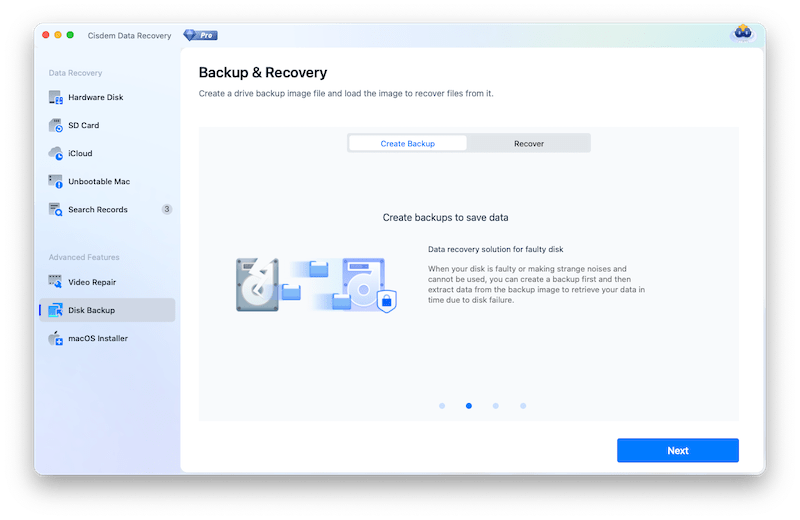
How to extract data from an uninitialized disk on Mac?
- Download and install Cisdem Data Recovery to your Mac.
-
Run the progam, connect the uninitilized disk to your Mac.
-
Go to Disk Backup and click Next.
![create disk backup01]()
-
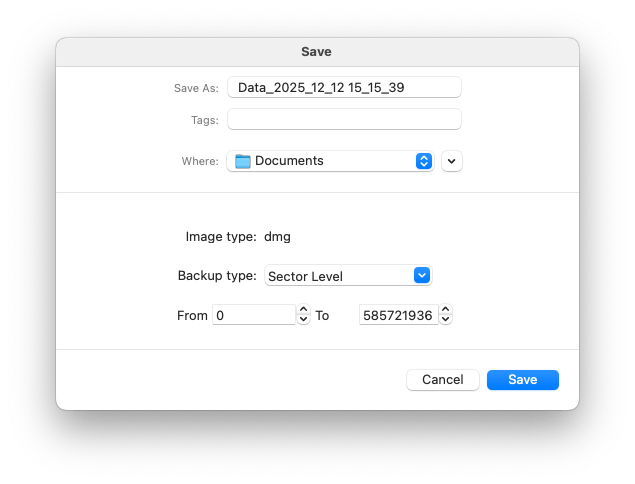
Then select the uninitialized disk, click Create Backup.
-
Choose the location to save the backup image file. Click Save to start extracting data.
![create disk backup02]()
-
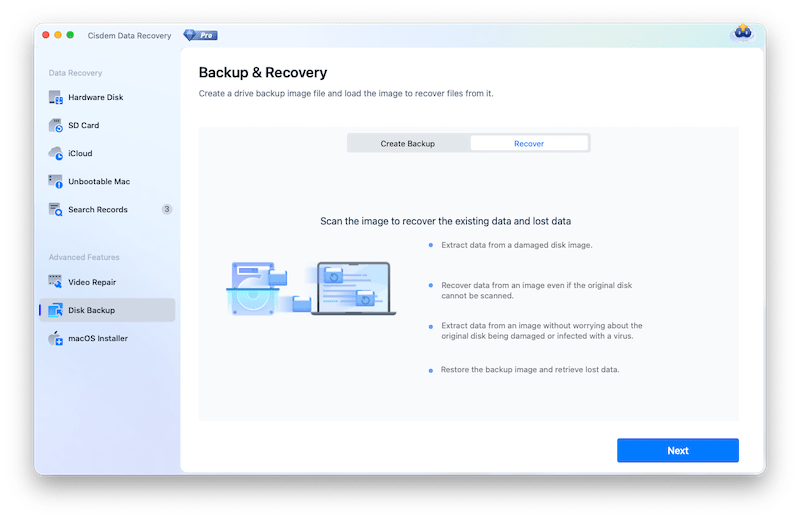
(Optional) If the uninitialized disk cannot be fixed and you lost the data, go to Disk Backup > Recover, select the disk image file to restore the data from your uninitialized drive on Mac.
![create disk backup 03]()
How to Fix Uninitialized Hard Drive on Mac?
Now, you’ve backed up the files on the uninitialized hard drive to a safe place, we can be relieved to fix the uninitialized disk on our Mac, with one of the following solutions.
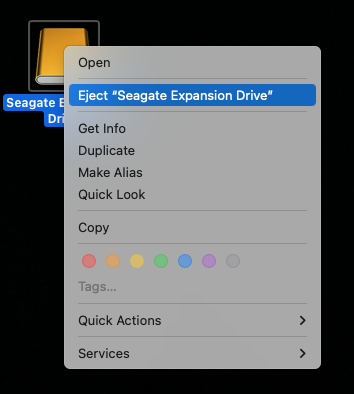
#1 Eject and Reconnect Hard Drive
Your Seagate or WD uninitialized hard drive may be caused by connection issues, you are recommended to ejecting the disk properly first. Right click on the hard drive, and click Eject, you will be able to remove the disk from your Mac safely.
Then reconnect your external hard drive to Mac. If it is a SD Card, you are recommended to remove it from the card reader, then re-plug it to the card reader and connect the reader to your Mac again.
If the problem persists, change a USB port or use another USB cable, to make sure it is connected properly with a good-condition port/USB.
#2 Remove Peripheral Devices from Mac
We may connect many wireless accessories or peripherals to our Mac, but sometimes, these peripheral devices just ruin our Mac’s sleekness or create conflicts that possibly makes the hard drive uninitialized on the Mac.
If your Mac is connecting to many peripheral devices that you don’t use for now, remove them safely by going to System Preferences or choose the device to Eject.
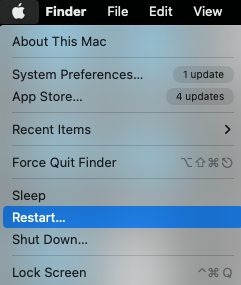
#3 Restart Mac
When errors happen, no matter it is on your Mac, Windows PC, iPhone or Android phone, you will be recommended to restart your device as the first aid, since restarting is the most magical method to put everything back to normal again.
You just need to click the Apple icon > Restart, and reboot your Mac. Then unplug the (external) hard drive from your Mac, wait for about 10 seconds, turn on your Mac. Finally, plug the hard disk to your Mac again. You can repeat this to check if it works.
If this doesn’t work, you can reboot your Mac in recovery mode and check if the hard drive shows up as initialized in Disk Utility, especially for your internal hard drive, because this helps diagnose and fix the problems of a Mac’s internal storage device. Here is how:
- For Intel-based Macs: Click on Apple icon > Restart, then immediately press and hold Command + R, enter password and click Next.
- For Apple Silicon Macs: Click on Apple icon > Shut Down, press and hold power button until you see the Options button, click Continue, enter password and click Continue.
#4 Try on Another Mac
Still fail to make the disk initialized on your Mac by restarting Mac or reconnecting the disk? If you have another Mac, you can connect the external disk to this Mac and check the disk can be initialized on this Mac.
For internal hard drive that cannot be initialized on Mac, you need to take out the disk from the Mac first, then put it into another Mac and check if it can be initialized or not.
#5 Scan Virus/Disable Anti-virus App
As we mentioned in the 2nd part, virus attack may lead to uninitialized disk, no matter there is virus attacking your Mac or not, you can scan virus with an anti-virus program on your Mac to make sure there is no harm from outside, trying to weaken your Mac.
As for anti-virus program, you can try following:
- Kaspersky
- Norton
- ESET
- Bitdefender
- Avast
Or if you’ve enabled anti-virus application on your Mac, you are recommended to disable it temporarily, in order to avoid any conflicts with the hard drive.
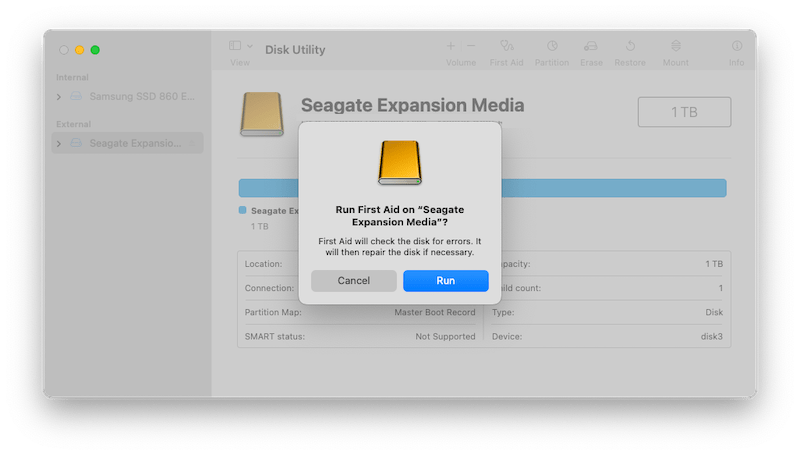
#6 Run First Aid
If the disk itself is faulty, we need to repair it. Disk Utility is the free macOS program designed to manage all devices on a Mac, including both internal and external hard drive. It allows users to view, analyze, partition, repair and erase a drive with ease. Here is how we can use Disk Utility to diagnose a drive and repair automatically:
- Go to Applications > Disk Utility, run the program.
- Choose your external hard drive name.
- Click on First Aid > Run, repair the external hard drive on your Mac.
![fix with disk utility 02]()
- Then check if the hard drive can be shown as initialized on your Mac.
Surely, you can use an 3rd party disk repair tool to fix this issue if Disk Utility is not helpful in your case, such as TestDisk, Drive Genius.
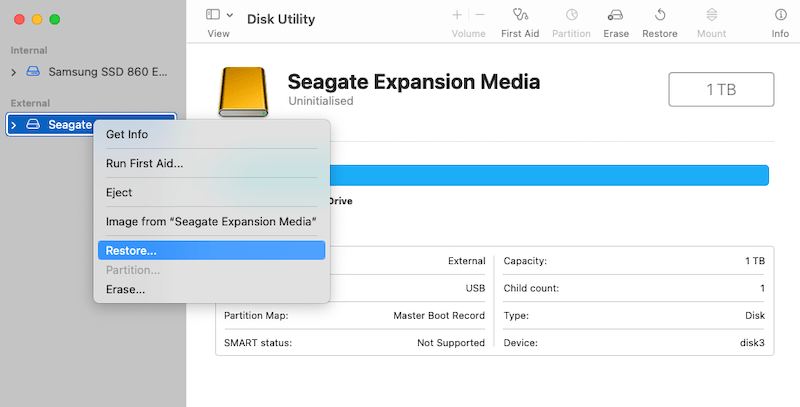
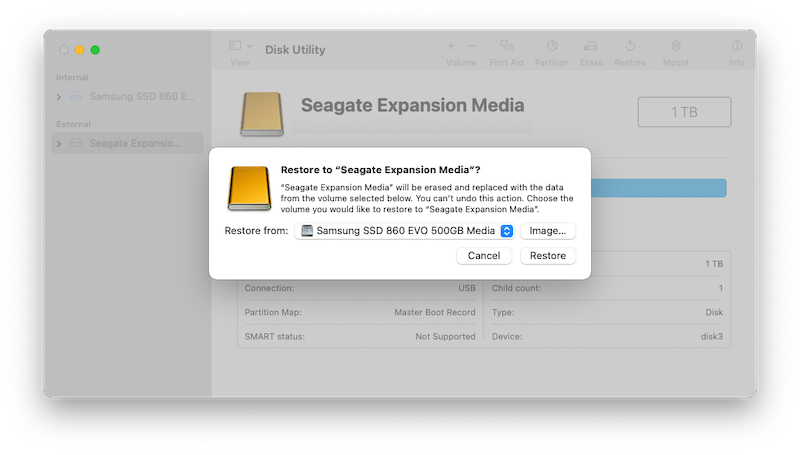
#7 Restore with Disk Utility
Have a copy of those files on the uninitialised disk? Then you can re-initialize the disk with data restored from a selected backup. This Restore feature is also built in the Disk Utility tool. However, this action is irreversible, make sure you choose the correct volume to restore from.
- Open Disk Utility.
- Select the uninitialized disk, right click on it and choose Restore.
![restore uninitialized disk 01]()
- Select the volume where you want to recover data from, click Restore.
![restore uninitialized disk 02]()
- Then check back in Disk Utility to see if the disk is initialized now.
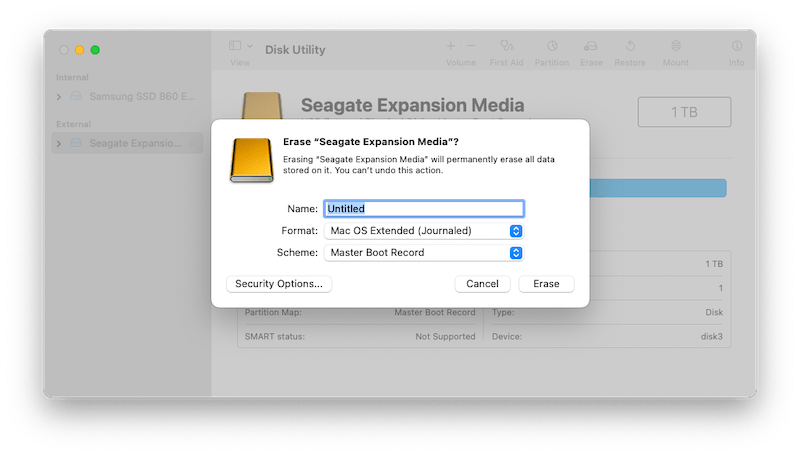
#8 Format
If above listed methods all fail to fix your uninitialized external hard drive on Mac, maybe it is time to format it. To format the disk means erasing the data from your disk, but formatting doesn’t mean deleting files permanently, they just become invisible and inaccessible, but still live on the disk until new data overwrites them.
Though we recommend using Cisdem Data Recovery to extract your data on the unintialized disk first, if you decide to format first, Cisdem is also capable of recovering files from a formatted hard drive.
Steps to Fix Uninitialized Hard Drive with Formatting
- Go to Disk Utility, run the program.
- Choose your external hard drive.
- Click Erase, choose name and format for your disk.
![fix with formatting]()
- Then click Erase.
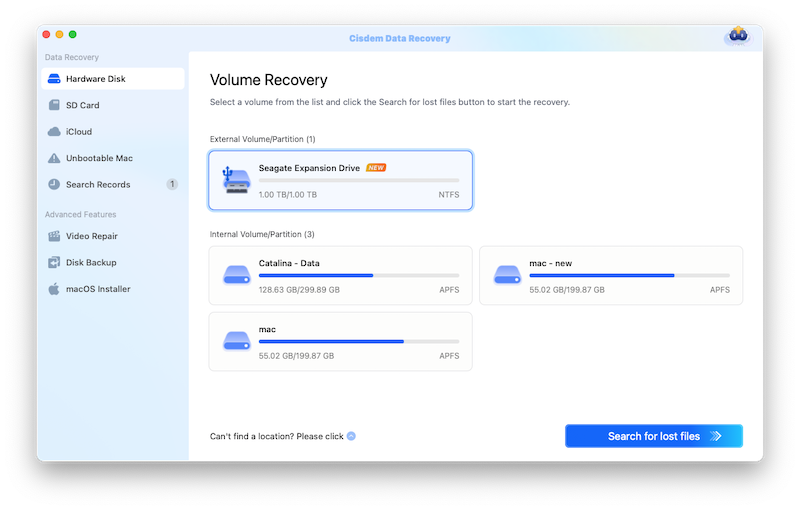
- Download and install Cisdem Data Recovery to your Mac.
 Free Download macOS 10.15 or later
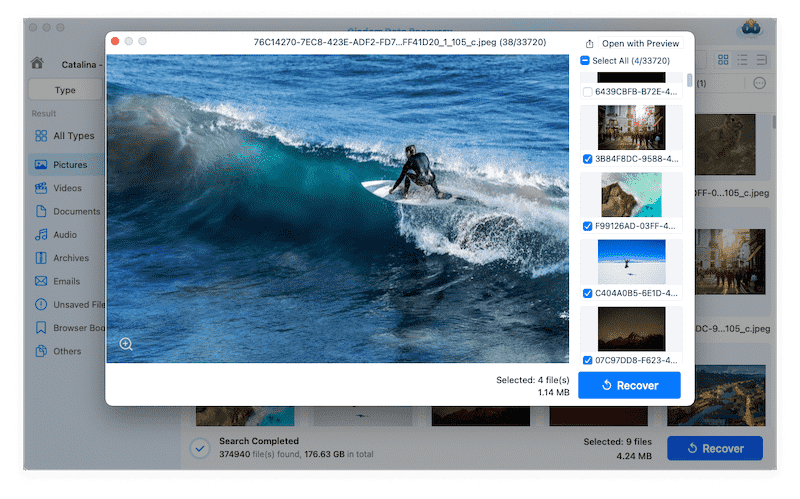
 - Go to Hardware Disk and choose the hard disk where you want to recover files from.
![recover from uninitialized disk mac02]()
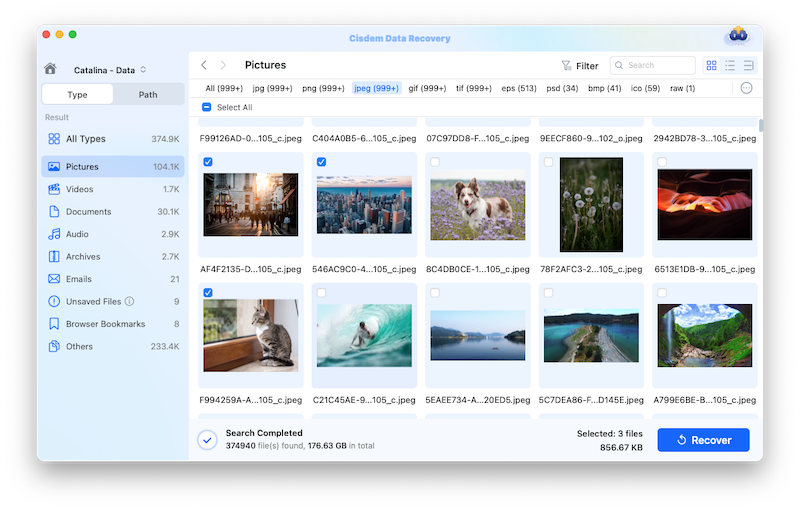
- Click Search for lost files to start scanning your hard drive, use the filter to find files quickly.
![recover data from uninitialized disk mac 03]()
- Preview and recover files from your uninitialized external hard drive on Mac.
![recover data from uninitialized disk mac 04]()
#9 Reinstall, Upgrade or Downgrade macOS
If the uninitialized external hard drive happens just after you upgrade or downgrade macOS, that may be the problem, the working environment has changed. In this case, you may need to reinstall macOS, upgrade or downgrade to original macOS version, get back the files from your external hard drive first, then install your preferred macOS.
Fix Uninitialized Hard Drive with OS Reinstallation
- Press Power button.
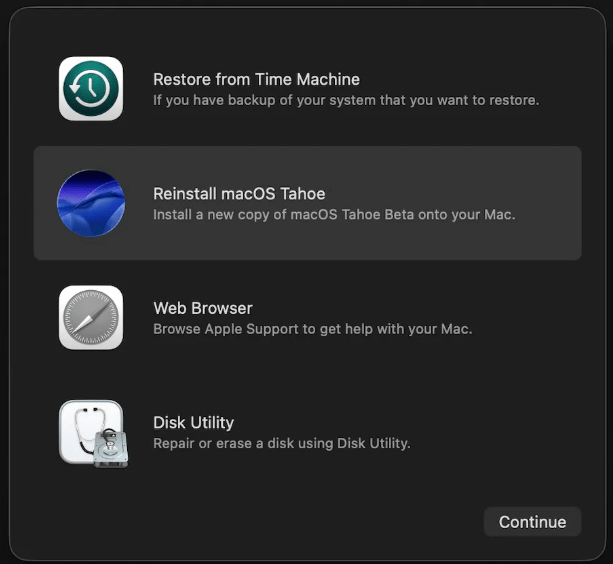
- Once you hear the sound, press and hold Command+R.
- In the macOS utilities interface, choose Reinstall macOS and click Continue.
![reinstall to fix]()
- Choose hard drive, click Install and wait for the installation to finish.
Fix Uninitialized Hard Drive with OS Upgrade
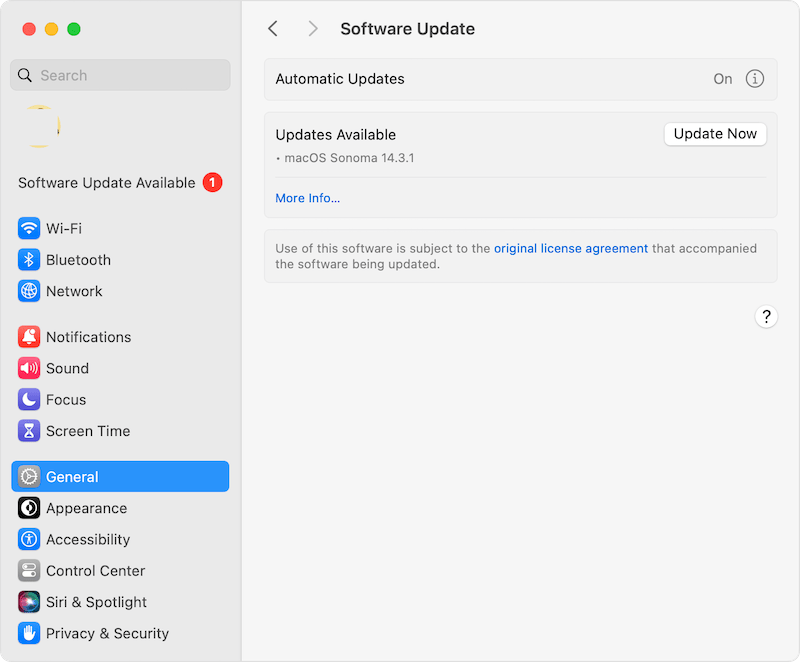
A macOS update might remove all the system issues and let a hard drive show up normally.
- Go to Settings > General.
- Click “Update Now”.
![mac update]()
- Download and install the latest macOS.
- Restart your Mac and plug your external hard drive for check.
Fix Uninitialized Hard Drive with OS Downgrade
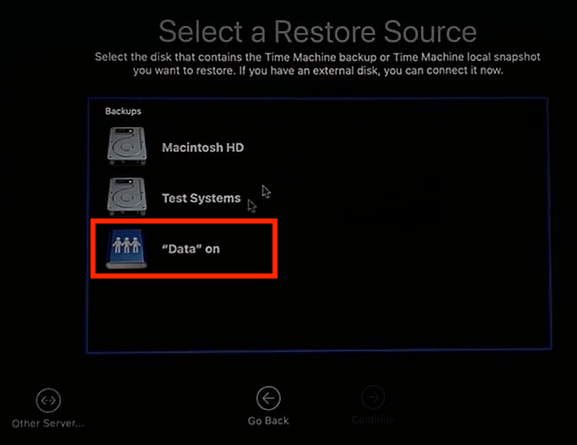
If this problem happens after a macOS update, you can revert your macOS to the previous version, by using Time Machine backup.
- Connect the Time Machine backup drive to your Mac.
- Click Apple icon > Restart.
- Once you hear the startup sound, press and hold Command+R until the Apple logo appears.
- Choose Restore from a Time Machine Backup, click Continue.
![downgrade macos 01]()
- Choose your Time Machine backup disk.
![downgrade macos 02]()
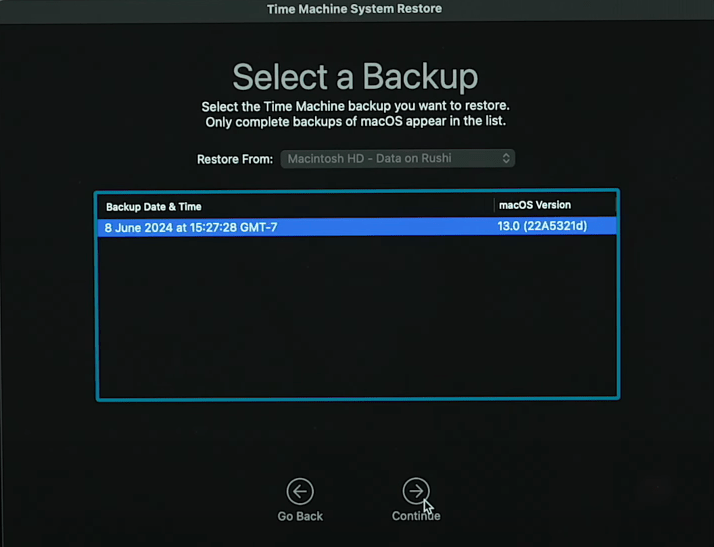
- Choose the Time Machine backup to restore and follow the onscreen instructions.
![downgrade macos 03]()

#10 Contact Support
Or, if the issue of uninitialized external hard drive is caused by physical damages of the disk, like loose or malfunctioned small elements in the hard disk, then you should contact the supplier of your hard drive first, especially when your hard drive is still within the expiry date. If you are using Seagate or Western Digital or other famous brands of hard drive, it is quite easy to get contact with their support.
Just visit their official website, grab the contact information and have a call, or find out your receipt and contact as instructed on the file.
Conclusion
If your hard drive is still in its life circle, fix 1 to fix 10 should have worked, but if failed, you just need a new one to replace this uninitialized hard drive. Before disposal, use Cisdem Data Recovery to save the files into your Mac or other storage devices, then buy yourself a new and better external hard drive.

Connie Yu has been a columnist in the field of data recovery since 2011. She studied a lot of data loss situations and tested repeatedly to find a feasible solution tailored for each case. And her solutions are always updated to fix problems from the newest systems, devices and apps.

JK Tam is the lead developer at Cisdem, bringing over two decades of hands-on experience in cross-platform software development to the editorial team. He is now the lead technical approver for all articles related to Data Recovery and DVD Burner.
Peter
The most comprehensive tutorial I have ever seen. Thanks for solving my problem. The other day my Mac seemed to be attacked by virus, then the computer couldn't read one of my USB flash drive as usual. After reading this page, I got it through successfully.