

How to Find and Delete Duplicate Photos in Windows 10: Free Methods Included
 46.5K
46.5K
 1
1


What to Know
• Microsoft offers two ways to help users find duplicate photos in Windows 10, but neither is efficient for removing duplicates.
• There’s still a way to remove duplicate photos from your computer easily, quickly, and reliably.
• This article covers all these three ways. Compare them to find the one that best suits your needs!
Duplicate photos, which are exactly identical (regardless of file names), can take up storage space and cause disorganization. Therefore, you may want to remove them.
You might also want to manage similar photos, including photos that look the same to the naked eye but have different sizes or formats, and those that look alike.
This article will show you three methods to find and eliminate duplicate photos on your Windows 10 computer. And the first method can handle both identical and similar images. For each method, I talk about the pros and cons and provide step-by-step instructions.
 Cisdem Duplicate Finder
Find & Remove Duplicate Photos with Ease
- Identify duplicate images, videos, documents, audio files, and all other files
- Detect similar images
- Support computers, external storage devices, cloud drives, and more
- Find duplicate files in folders, drives, Microsoft Photos, and iTunes, supporting scanning one or multiple locations at once
- Display duplicate photos for you to preview side by side
- Automatically select all but one file for deletion in each set of duplicates, enabling you to remove all duplicates at once
- Allow you to adjust selections manually, or choose from 8 rules (e.g. Select Newest, Select low-quality)
- Easy to use for everyone
- Very customizable, letting you take control


Method 1. Find and delete duplicate photos automatically in Windows 10
Cisdem Duplicate Finder is an easy-to-use duplicate file finder. It can help you remove unwanted duplicates from your photo collections.
Pros
- Powerful duplicate detection: It supports all image formats (such as JPEG, JPG, PNG, GIF, TIFF, WebP, and even camera RAW formats). And it can quickly find all the duplicates in locations of your choice with 100% accuracy.
- Similar image detection: It helps you manage redundant versions of your photos.
- Side-by-side image preview: You can easily view duplicate photos before deletion.
- Safe mass deletion: The auto duplicate selection feature enables one-click removal, while various selection rules and manual adjustments provide flexibility. You can choose from three removal methods, including moving duplicates to the Recycle Bin (for easy recovery when needed).
- Enough customization: Enough customization options give you full control over the entire process, from scanning for duplicates to removing them.
Cons
- Not free: It’s a paid app. (Luckily, the free trial lets you do everything except final deletion. If you are happy with the scan results and user experience, you can upgrade to a paid version.)
Test Results
It took 1 second to scan 1,841 photos and found all 139 sets of duplicates. With similar image detection enabled, it found 53 groups of similar photos in addition to the duplicates, taking 1 minute and 7 seconds.
Steps
Step 1. Install the duplicate photo finder
Download and install Cisdem Duplicate Finder. Open the app.
 Free Download Windows 10 or later
Step 2. Add folders to scan for duplicates
You can add one or multiple folders or drives where you think duplicate photos exist using drag and drop or the Add button (+).
To locate duplicates in Microsoft Photos, add the source folders.
(You can also scan OneDrive, Dropbox, an external hard drive, or other storage.)
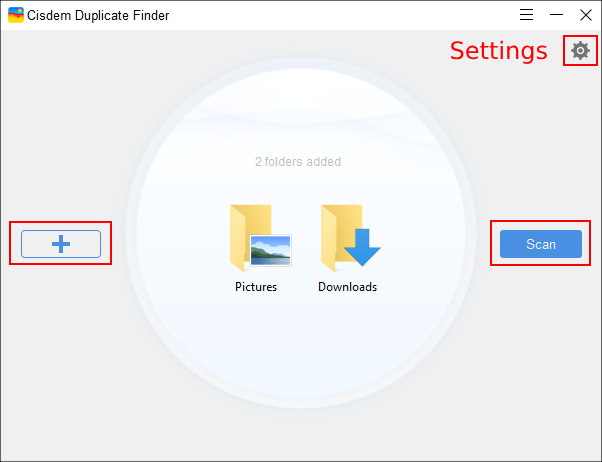
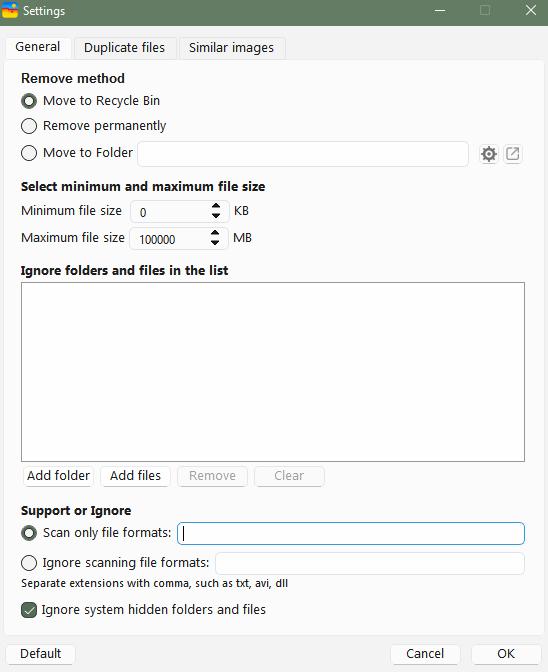
Step 3. Optionally, customize settings
You can configure settings to meet your needs. For example, to find both identical and similar photos, go to Settings > Similar images and enable similar image detection.
You can also exclude folders/subfolders and files from the scan by location, file size range, and more.
Step 4. Start scanning
Click Scan to start comparing photos and identifying duplicates.
Step 5. View scan results
When the scan is complete, the results window will appear. The Image tab displays all the found duplicate photos and similar photos.
There are three view modes, allowing you to preview photos side by side and see photo information.
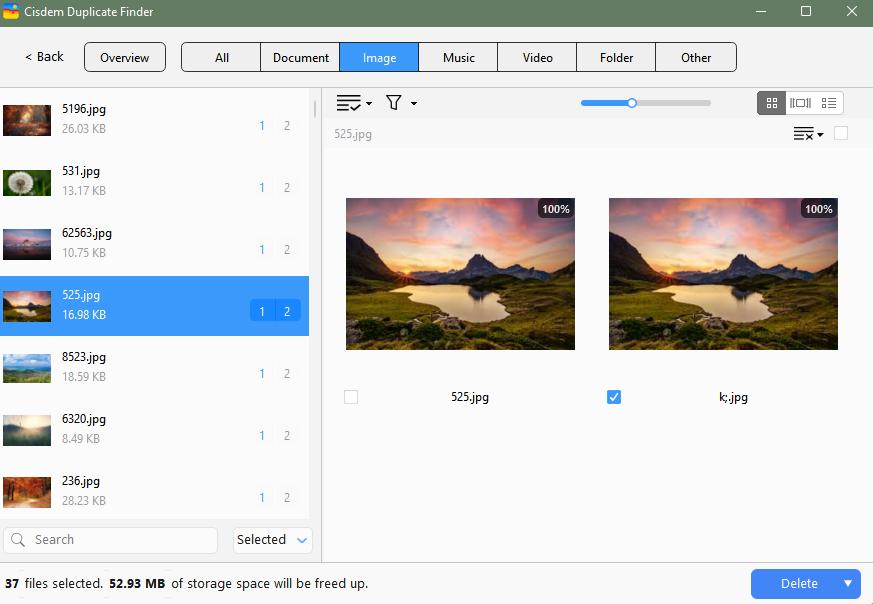

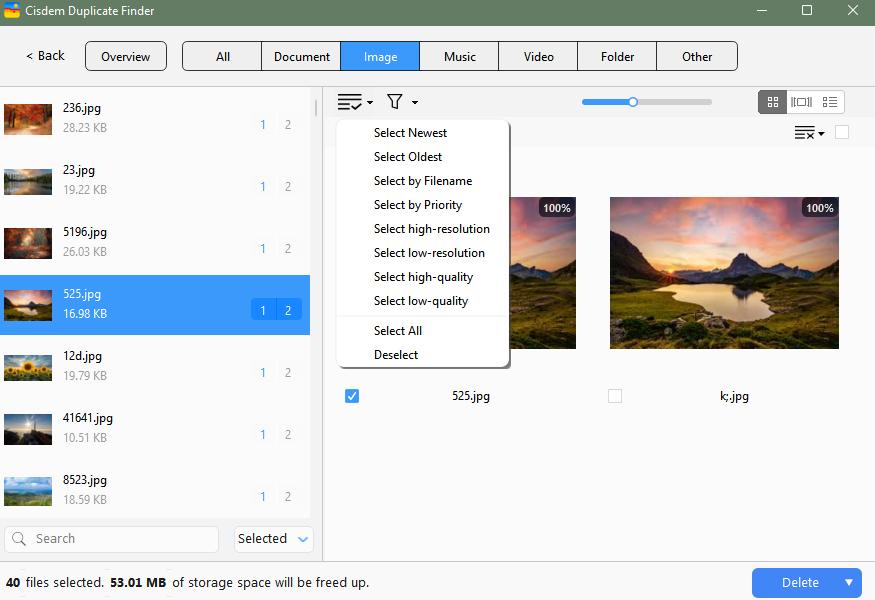
Step 6. Select unwanted duplicates for deletion
In each set of duplicate photos, the app automatically selects all but one item for removal. You can select or deselect files by hand. (Auto selection doesn't apply to similar photos.)
Also, there are rules for mass selection. On the left side of the results window, highlight the sets to which you want to apply a rule. Click the List icon ![]() and choose a desired rule.
and choose a desired rule.
Step 7. Delete all duplicate photos at once
Once all unwanted duplicates are selected, click Delete and confirm the deletion.
Method 2. Manually delete duplicate photos with the help of Microsoft Photos
Microsoft Photos (or simply Photos) is a photo viewer and manager by Microsoft. Its built-in duplicate detection, which is not widely known, can help you get rid of duplicate photos completely for free. The removal process is completely manual though.
Pros
- Built-in to Windows 10: If for some reason it isn’t included in your Windows 10, you can get it for free from the Microsoft Store.
- Automatic duplicate detection: The detection is completely automatic and works in the background.
- Convenient image viewing: Since the app is a photo viewer, it’s very handy to view duplicate photos found by the said detection.
Cons
- Limited detection capability: The built-in duplicate detection only finds photos that are exactly the same, which means it will miss duplicate photos with different names.
- Manual removal of duplicates: You need to go through the detected duplicates and manually delete the unwanted item(s) in each set of duplicates.
Test Results
I used the same photo collection containing 1,841 photos to test Method 1 and Method 2. Duplicate detection was completed when Microsoft Photos finished loading photos from the source folder. It found 20 sets of duplicates, missing 119 sets. (If duplicates in your photo collection have the same file names, this method will effectively find them. However, if your duplicates have different names, this method will miss them, as in the test.)
Steps
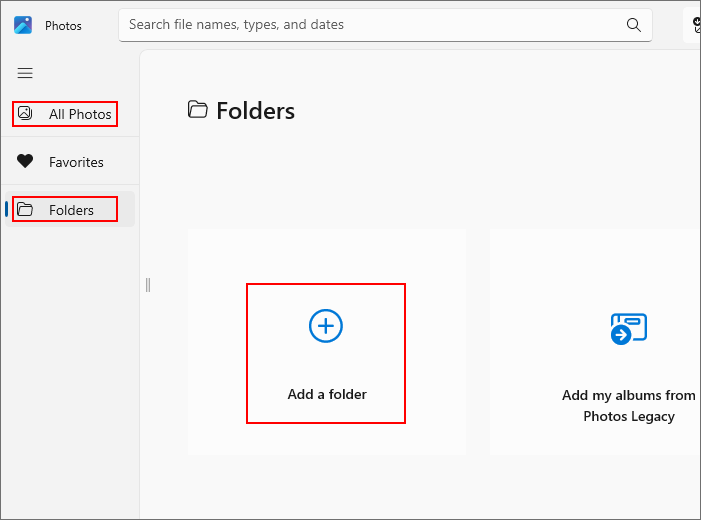
Step 1. Optionally, add folders to Microsoft Photos
In the navigation bar on the left, go to Folders. Click Add a folder to add the folder from which you want to remove duplicates. You can add multiple folders.
The built-in detection will quickly look for duplicates in the added source folder(s).
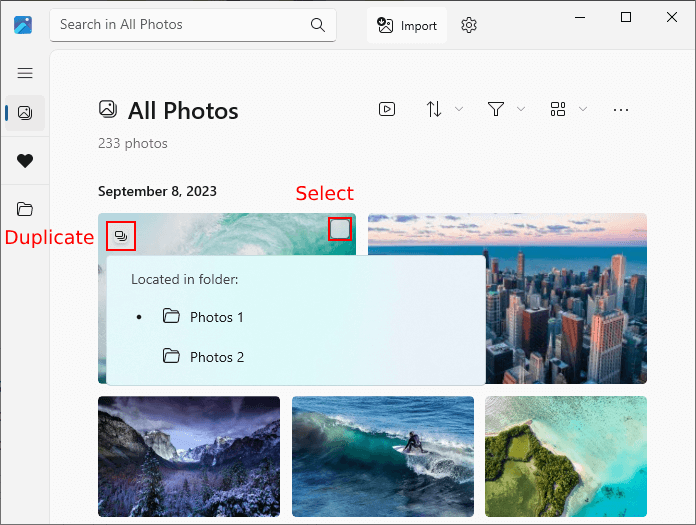
Step 2. Select duplicate photos for elimination
The thumbnail of a detected duplicate will display a Duplicate icon in the top left corner. In the navigation bar, go to All Photos. There, browse through your photos to select all photos with this Duplicate icon.
Trick
The Duplicate icon is small. If your Microsoft Photos uses a light theme and your photos are light colored, you may find it difficult to spot those Duplicate icons. In such a case, you can go to Settings and select the Dark theme. This will make Duplicate icons appear dark and easier to identify.
(As for same photos with different names, you need to manually look for them. Then select unwanted duplicates for deletion.)
Step 3. Remove duplicates
Click the Trash icon in the top right corner of Microsoft Photos to delete selected items. In the message that appears, click Delete.
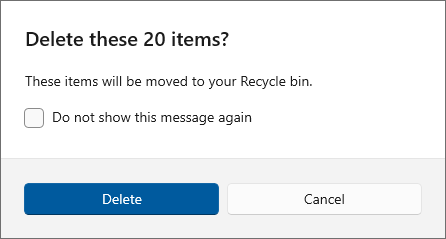
The deleted duplicate photos will go to the Recycle Bin, and they will disappear in both the Photos app and the source folder(s).
Method 3. Scan for and remove duplicate photos with Microsoft PC Manager
Microsoft PC Manager (or simply PC Manager), which is a PC cleaner and optimizer, is another free solution provided by Microsoft for managing duplicate photos. Since it came out in 2024, it’s still not very popular. Hopefully my article will help more users discover it.
Pros
- Available for free: Every Windows 10 user can get PC Manager from the Microsoft Store and use it for free.
- Quick duplicate detection: PC Manager’s built-in duplicate file finder can quickly find duplicate photos and other common duplicates.
- Smart selection feature: There’s a Smart select feature that automatically selects duplicates for mass deletion, helping simplifying the removal process.
Cons
- No image preview: PC Manager doesn’t have a preview feature. This means users can’t easily see what duplicate photos will be removed. I think the lack of a preview feature is a big drawback for a photo deduplication solution.
- Limited detection capability: In my tests with different photo collections, this method only found some (ranging from 69% to 73%) of the duplicate photos.
- Little customization: For some users, the lack of flexibility can be a downside. This method doesn’t allow you to scan for duplicates in a specific folder. Instead, you are allowed to scan only your entire PC or specific drives like Disk (C:). And, you can’t exclude folders or files from the scan. (I don’t recommend scanning system and app folders like C:\Program Files, since this may end up deleting duplicates essential for system or app performance.)
Steps
Step 1. Install Microsoft PC Manager
Install Microsoft PC Manager on your computer. Open the app.
Step 2. Scan for duplicate photos
Choose Storage on the left, navigate to the Duplicate files section, click the dropdown menu to choose All disks or a specific drive like C:. Now click the right arrow icon to start scanning for duplicates.
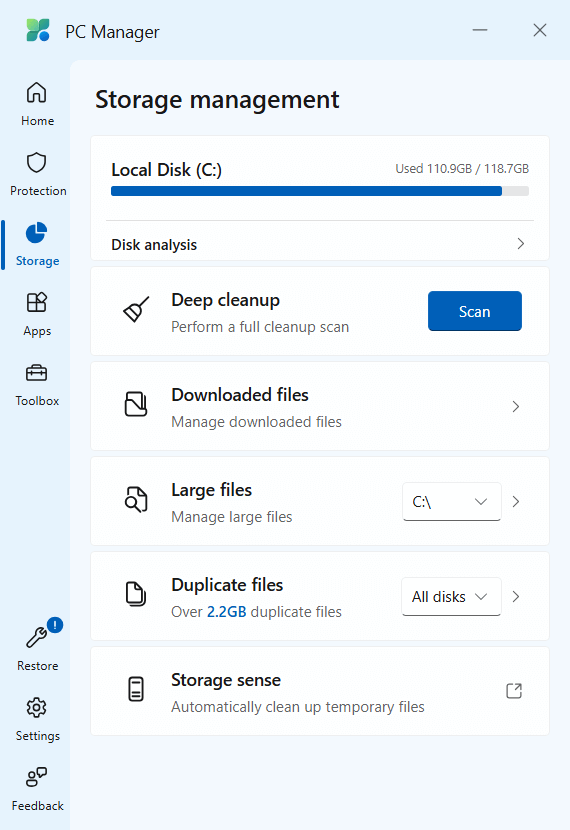
Step 3. View duplicates
After the scan is done, you will see the scan results, which are categorized by file type. Click the Picture type to see the found duplicate images.
(Unlike with the first two methods, you can't sort, search, or preview duplicates.)
To check a duplicate photo, you need to hover your mouse over the file and click the Open folder icon that appears. This will open the photo in File Explorer so that you can view the photo.

Step 4. Select unwanted duplicates
You can go through the results and manually select duplicates for deletion. Or, you can click Smart select, which will select all but one photo for deletion in each duplicate set.
If you go with Smart select, I recommend browsing through the selection to make sure that items in important folders (like system folders or your backup folders) are not selected.
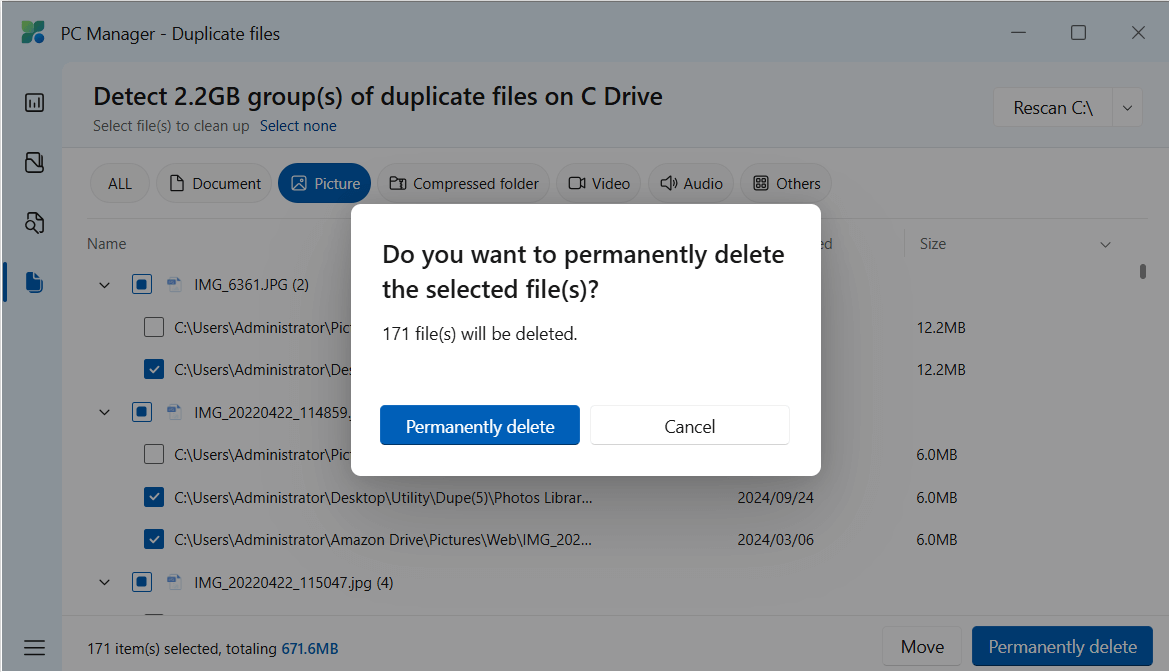
Step 5. Delete duplicates
In the bottom right corner, choose Move (or Permanently delete) to move selected duplicates to the Recycle Bin or a specific folder (or to completely eliminate them).
FAQ
Does Windows 10 have a duplicate file remover?
Windows 10 has a built-in app called Microsoft Photos (as in method 1), which can identify duplicate photos for users to remove. However, the removal process is entirely manual.
Also, although Microsoft PC Manager (as in method 2) doesn’t come with Windows 10, it’s a native duplicate file finder and remover developed by Microsoft.
In summary, the answer is yes.
Why do I have duplicate photos in Windows 10?
There can be various reasons. For example, duplicate photos are often caused copying and pasting photos or importing/downloading the same photos more than once.
Same photos that are different in sizes or formats can be caused by resizing photos or importing both the raw version and the JPEG version of the same photo from the camera or phone.
(Visually alike images can be caused by taking photos in burst mode, taking photos of the same scene from slightly different angles or distances, or slightly editing photos, such as cropping or rotating photos.)
How do I delete duplicate photos in File Explorer?
It’s possible to manually look for and delete duplicate photos using File Explorer. However, I don’t recommend this method since it’s inefficient. Here’s a brief guide if you still want to try it.
1. Open the folder in which you want to find duplicate photos.
2. Optionally, use advanced query syntax to set the current File Explorer to display only image files.
3. Sort photos in an order (such as by name or size) that make it relatively easy for you to spot potential duplicates.
4. Compare photos by visual content and file information to identify duplicates.
5. Select one or multiple unwanted duplicates, right-click, and choose Delete. Continue deleting the rest.
(I used to include this method in the article. I removed it in favor of recommending the method involving Microsoft PC Manager.)

With a passion for tech and writing, Sarah joined Cisdem, where she focuses on creating articles about using utility tools to enhance file management and simplify contact management.

Adrian Li is Cisdem’s Chief Engineer and serves as the editorial advisor for Duplicate Finder and ContactsMate. His work and insights have been featured in leading tech publications such as Fossbytes, TUAW, Redmond Pie, SafetyDetectives, and BestForAndroid.
Nancy Weller
Would be better if it had a filter option "with duplicate locations only" so you didn't have to scroll through all the photos. I realize most people may be looking for similar photos too and would need all photos, but it would be nice to have the choice.