

How to Find and Bulk Remove Duplicates in Google Photos 2026
 44.2K
44.2K
 4
4


Duplicates in Google Photos not only take up storage space but also make photo viewing less enjoyable.
After lots of searching and testing, I've found several methods to find and delete duplicates in Google Photos. In this article, I will share these methods, along with some insights and tips. Whether you have a large, medium, or small photo collection, I will walk you through an easy, efficient, and reliable process.
 Cisdem Duplicate Finder
Google Photos Duplicate Finder & Remover
- Find identical photos, videos, documents, audio files, and other file types
- Find similar photos, allowing you to set the similarity level for comparing photos
- Work with Windows PC, Mac, Google Photos, Google Drive, OneDrive, and more
- Offer 3 view modes, with side-by-side image previews
- Help you bulk delete unwanted photo versions with 8 selection rules (e.g., Select Newest, Select Low-Quality), and manual adjustments
- Easy to use for everyone
- Customizable, letting you take control


4 facts to know about the duplicates in Google Photos
Knowing these facts can help you find and get rid of duplicates more effectively.
- Google Photos has a built-in feature that automatically detects exact duplicate photos and videos (exactly identical, regardless of file names) during upload. Therefore, your account generally doesn't contain exact duplicates.
- Your Google Photos account may contain non-exact duplicate photos (referred to as duplicate photos for the rest of the article for simplicity). They look the same to the naked eye but may be different in, for example:
- File formats: one photo in JPEG format, and the other in RAW or HEIC
- File sizes: one photo in 5.7 MB, and the other in 18.7 MB
- Resolutions: one photo in 2,712 × 4,072, and the other in 5,424 × 8,144
- Metadata: one photo with a location, and one without the information
- Your account may also have similar photos. They look alike but are not the same, such as burst most photos, edited versions of the same photo, or slightly different photos of the same scene.
- In general, it's a good idea to keep only your preferred version of a photo, such as the version with a smaller file size or the best smile.
Automatically find duplicate photos in Google Photos and bulk delete them
Applies to: Windows, Mac
This method requires a computer and can be suitable for small (like 20 GB), medium (like 50 GB), or large photo collections (like 500 GB).
It uses a duplicate file finder called Cisdem Duplicate Finder. This tool helps you automatically detect duplicate and similar photos in your Google Photos, displays them side by side for preview, and provides auto-selection rules to help you easily bulk select unwanted photo versions for quick deletion. Manual review and selecting/deselecting are also needed to make sure preferred and redundant photos are handled as desired.
Let's first do the preparation (download) and then start handling the duplicates.
Steps: Complete the preparation
1. On your computer, sign in to Google.
2. Go to https://takeout.google.com/settings/takeout.
3. Click Deselect all.
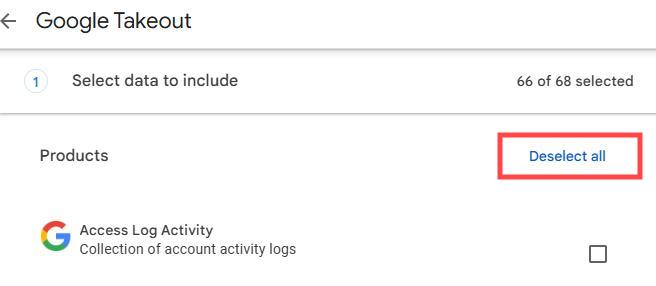
4. Scroll down to find Google Photos. Select the checkbox next to it.
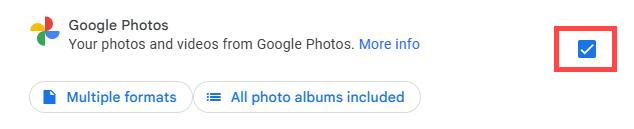
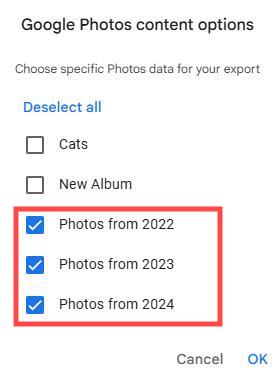
5. Click All photo albums included and deselect all the albums created by you. Only select year albums. Click OK.
6. Scroll down. Click Next step at the bottom.
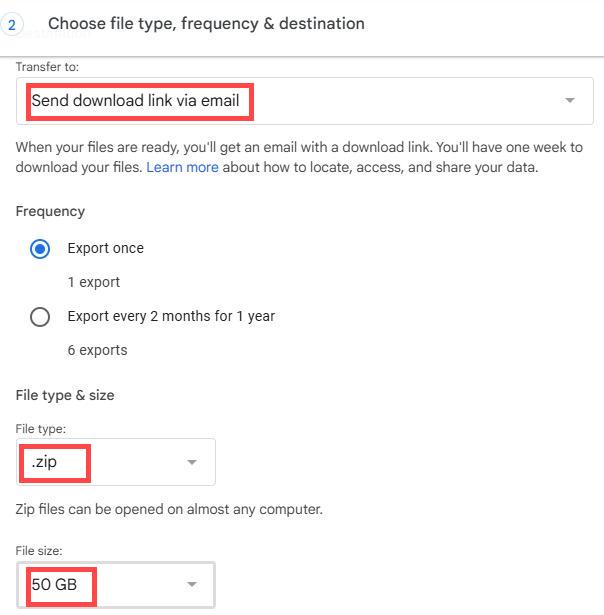
7. Under Destination, choose Send download link via email as Delivery method.
8. Configure settings. It’s recommended to download all your Google Photos files to a single ZIP file. So select .zip and 50 GB here.
9. Click Create export.
10. Enter your email. Find and open the message from Google Takeout. Click Download your files.
Then unzip the ZIP file on your computer. The unzipped folder will be automatically named Takeout. In the Takeout folder, you will find a folder called Google Photos. All your Google photos are there.

Steps: Find and delete duplicates in Google Photos
Now, all your Google Photo files are on your computer. You can start finding the duplicates in them.
1. Download and install Cisdem Duplicate Finder on Windows PC or Mac. Open this tool.
 Free Download
 Free Download
2. Drag the above-mentioned Takeout folder into the tool.
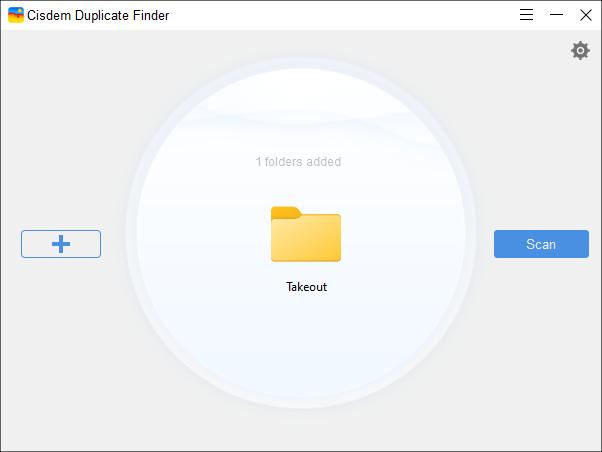
3. Create a folder on your desktop and name it Duplicates.
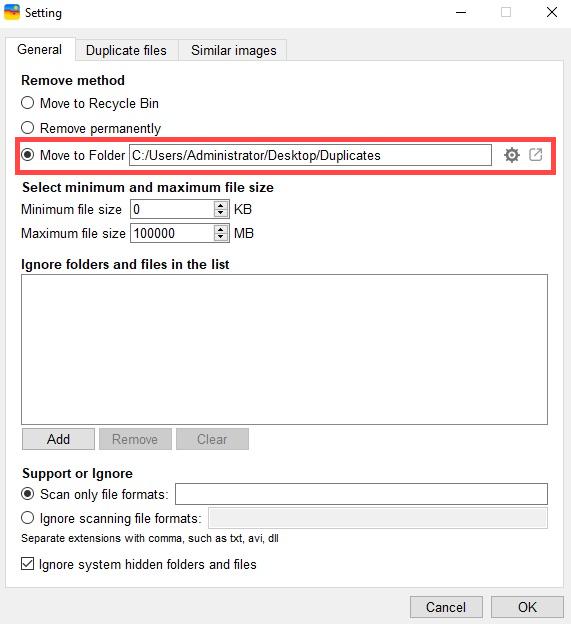
4. Click the gear icon ![]() to go to the tool's settings.
to go to the tool's settings.
Under the General tab, select Move to Folder and then select the folder named Duplicates.
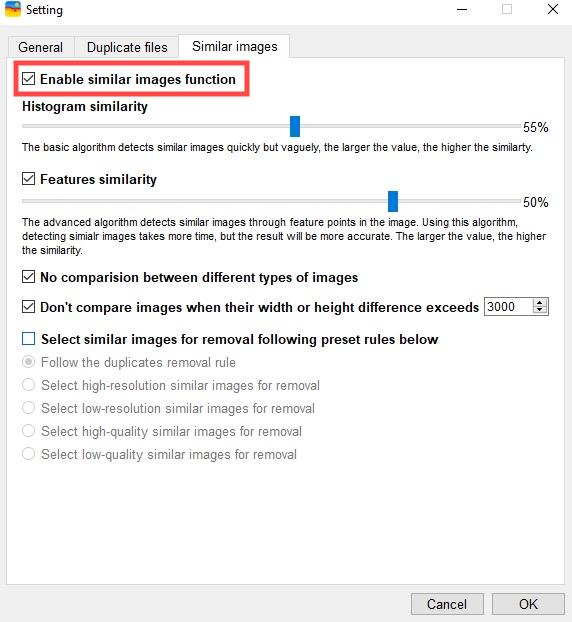
Under the Similar images tab, select the Enable similar images function checkbox.
5. Click Scan.
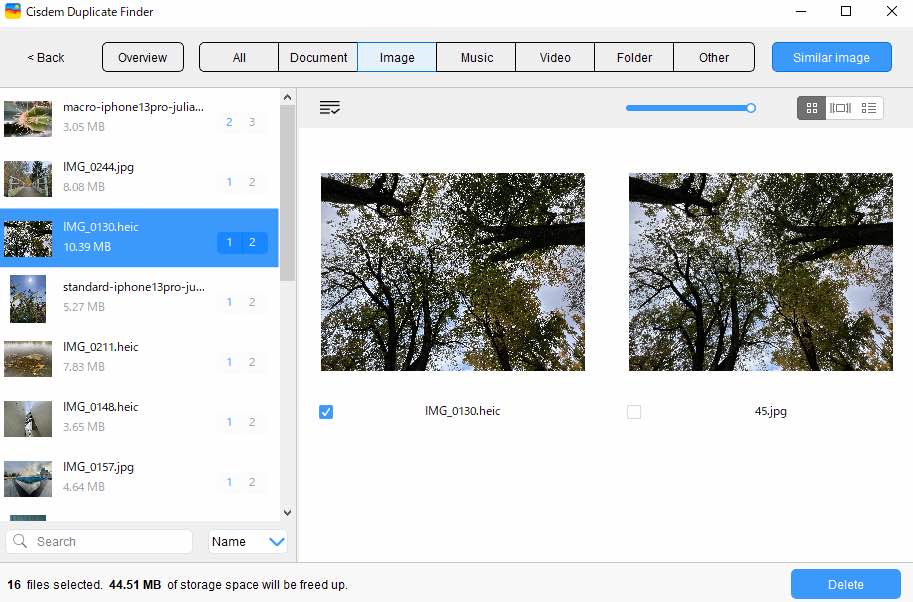
6. When the scan is complete, the Image tab will list all the duplicate and similar photos found in your Google Photos for viewing. (There are three view modes to choose from.)
In each group of duplicate or similar photos, manually select the redundant version(s) for removal. Or, you can choose a desired selection rule (e.g., Select Newest, Select Low-Resolution) and apply it to your chosen groups (highlighted in blue).
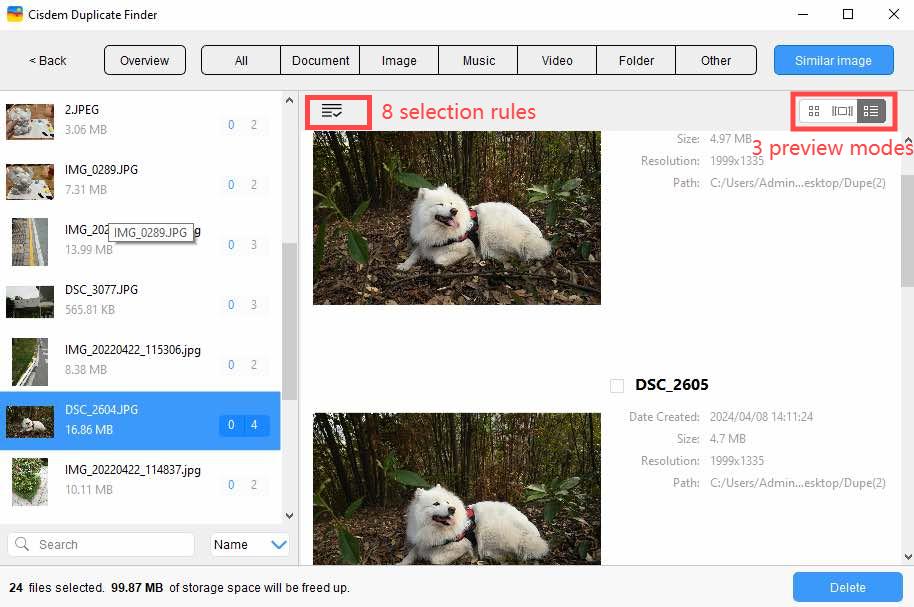
7. Click Delete in the bottom right corner to delete all selected files. Confirm the deletion.
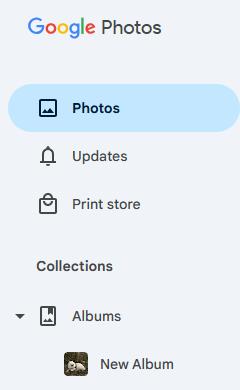
8. Go to https://photos.google.com/. Create a new album and name it New Album. Open New Album and drag the Duplicates folder on your computer’s desktop into this album.
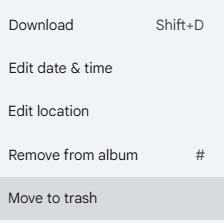
9. Select all photos in New Album, click the 3-dot icon, and choose Move to trash.
Now the duplicates in Google Photos are deleted.
You can find the deleted duplicates in Google Photos’ Trash. Note that items in the Trash will be permanently deleted after 60 days.
Prefer a visual walkthrough? Here's a video tutorial made by me that covers the entire preparation and duplicate handling process.
Manually find and remove duplicates in Google Photos
If you have a small or medium photo collection and prefer a built-in solution, this part can be helpful.
Google Photos makes it easy to view and manage photos, which also makes it possible to manually detect duplicates. Instead of covering the general manual process, I'll show you how to use three Google Photos features to help simplify the task.
1. Use the Stack similar photos feature
Applies to: Android, iPhone, and iPad
This is the most helpful of three features. According to the official feature description, it works by comparing visual similarity and capture time, which is proven to be true by my tests. My tests show that the feature can find duplicates and very similar photos.
Here are some types of photos it may likely miss.
- Loosely alike photos
- Different formats of the same photo (e.g., one in JPEG, and the other in HEIC)
- Identical photos taken by different cameras or devices
Below are the steps.
1. Open the Google Photos app on your phone or tablet.
2. In the Photos tab, tap the three-dot icon on the right.
3. On the Photos view screen that appears, turn on Stack similar photos.
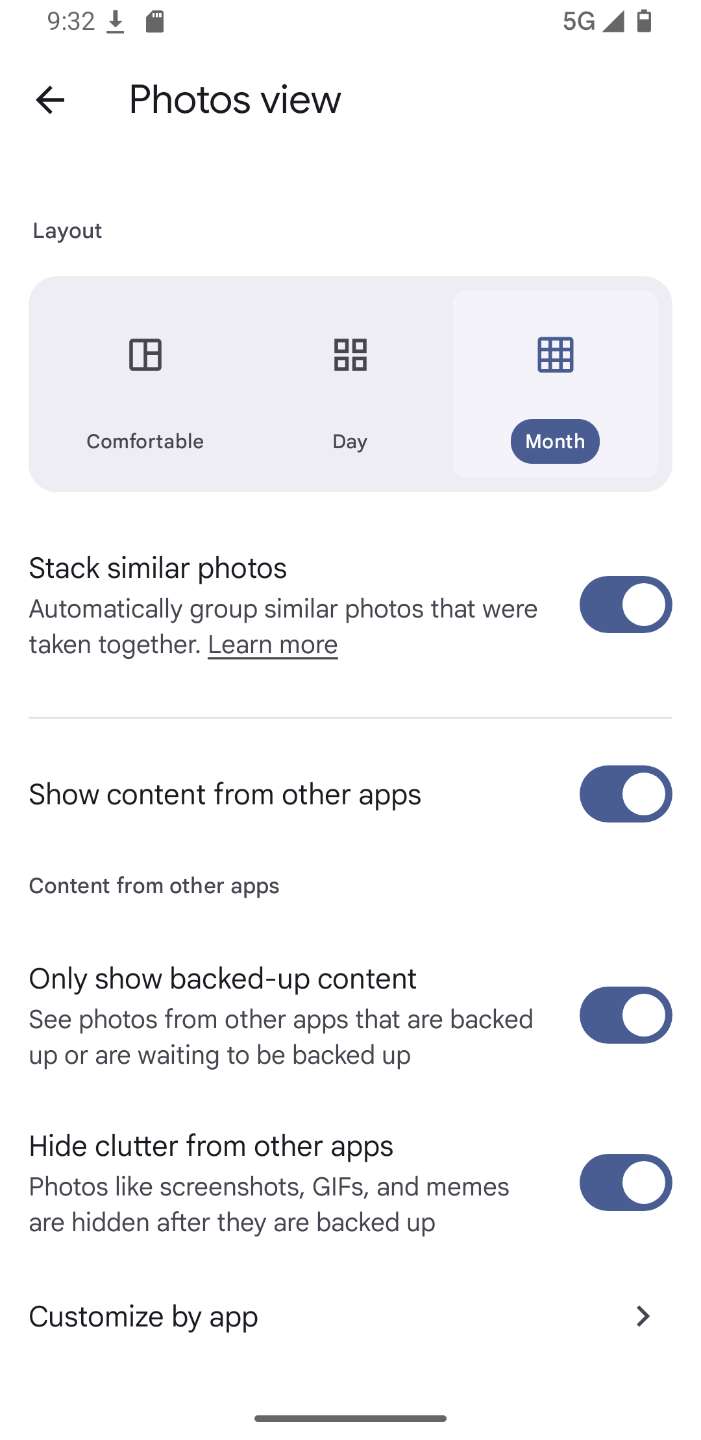
You may see stacks of similar photos soon or hours later, depending on the import time and library size.
4. Browse through your photos to spot those stacks (labelled by a small white Stack icon).
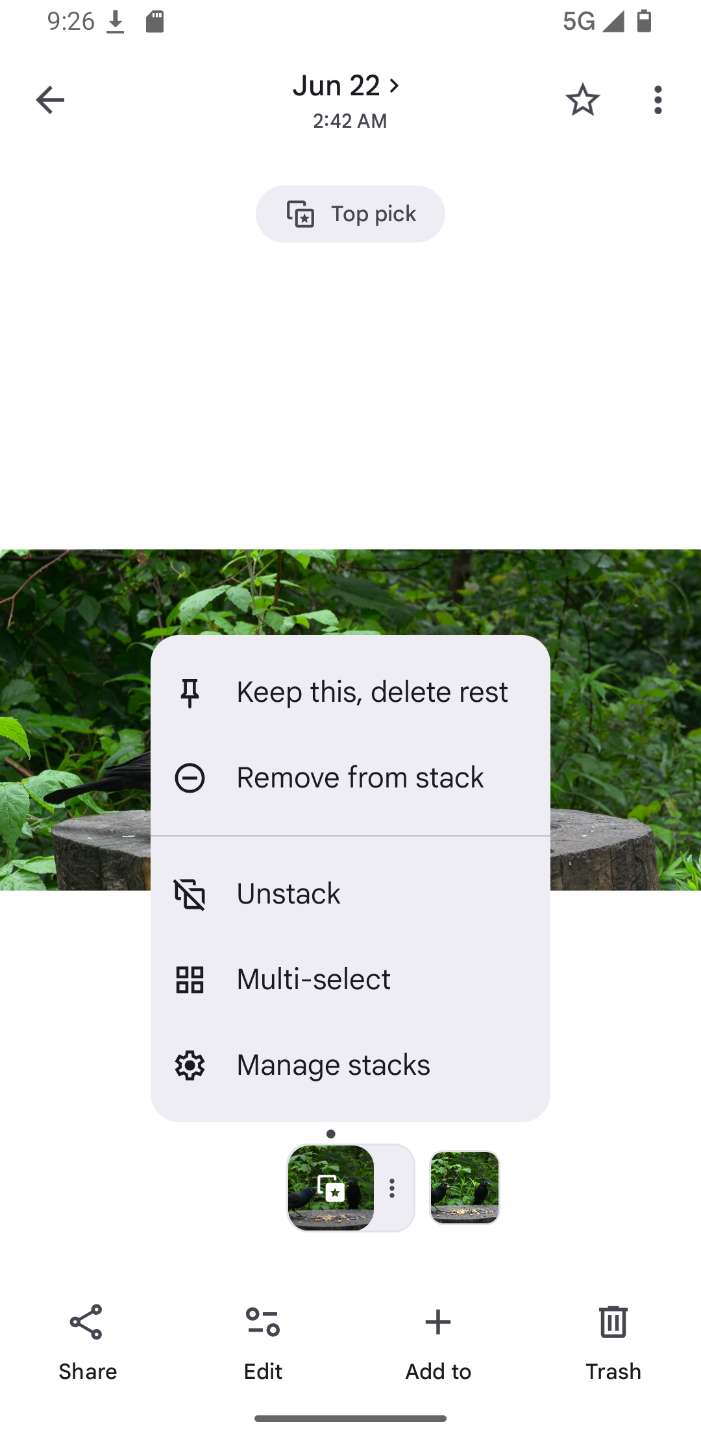
Tap a stack to open it, and you will be presented with the best version (Top pick) chosen by Google Photos.
In each stack, you can manually move unwanted versions to the Trash. Alternatively, tap the three-dot icon next to the top pick and select the Keep this, delete rest option.
Just handle each stack like this, and then start manually handling duplicates that this feature fails to find.
2. Use Map View in Google Photos
Applies to: Android, iPhone and iPad
Map View is a feature in the Google Photos app that lets users see where the photos were taken. You can also use this feature to find some duplicate photos that were taken at the same place. Here’s how:
1. Open Google Photos app on your phone.
2. Click Collections > Places > Your map.
3. On the map, browse the locations you've taken photos.
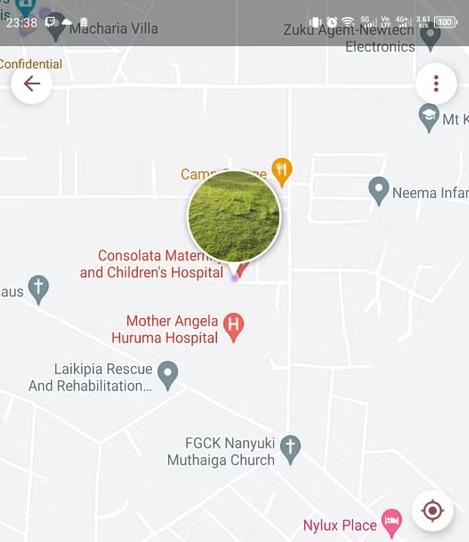
4. Select a location that have the most photos or you think are most likely to have duplicate photos. The photos will be arranged from oldest to newest based on the date they were taken, which can help you easily spot duplicate photos in Google Photos.
5. Scroll through the photos. When you find a duplicate photo that you want to get rid of, long-press on it and click Delete at the bottom.
Previously, Google Photos website offered a feature similar to Map View called "Explore". But as of January 30, 2024, this feature has been officially removed. If you still want to manually find duplicate photos in Google Photos website, the following method can help you.
3. Use the Search feature in Google Photos
Applies to: Windows, Mac, Android, iPhone and iPad
The Search feature can’t help you directly find all duplicate photo in Google Photos. But you can use it to search for photos by object, location, keyword, date, file type, etc., which can make it easier for you to find duplicates. Here’s how:
1. Open your browser. Visit https://photos.google.com/. Sign in with your account.
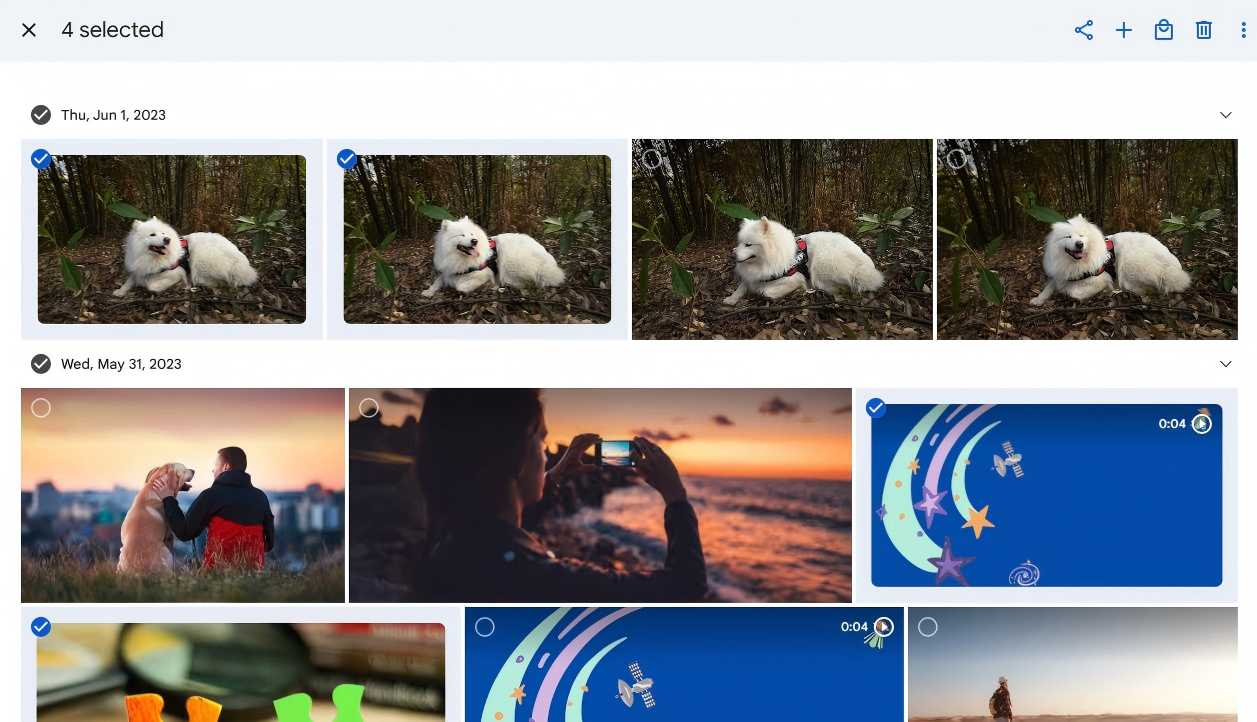
2. Click Photos. In the top search bar, enter keywords such as “screenshots”, “New York”, “forest”,”2025”, etc to filter the photos according to your needs. Google Photos' powerful search algorithms can help you quickly locate the images you're looking for.
3. Scroll through the photos. Hover your mouse over the unwanted duplicate photo. Click the check mark icon to select it.
4. Viewing photo information can help you decide which duplicates to delete. To view photo information, click on the photo then click the Info icon in the upper right corner.
![]()
4. When you finish selecting, click the Trash icon in the top right corner.
5. Read the pop-up message and click Move to trash.
The deleted files will be kept in Trash for 60 days. You can also choose to permanently delete them right away.
FAQs
Does Google Photos supports sorting photos by size?
Some users are looking for ways to sort photos in Google Photos by size. This helps find duplicates faster. And some users want to prioritize deleting duplicates with larger file sizes to recover more space. Unfortunately, Google Photos doesn’t provide this feature currently. If needed, you can use the Google Photos duplicate finder that I covered in method 1. Let it sort all found duplicates by size, or automatically select the largest files in each group of duplicates for you to remove.
How to avoid duplicates in Google Photos?
Below are several tips to help you avoid duplicates in Google Photos and keep you photos library clean and organized.
- Disable the Backup & Sync feature. If the Sync & Backup feature is enabled, there may be instances that photos get synced multiple times. Sometimes, you edited a photo and Google Photos automatically upload it again. Multi-device syncing of Google Photos can also cause this issue. The best way to handle this is to manually upload photos every time.
- Check your local device photo library before uploading. Before uploading photos to Google Photos, check your local device photo library. Delete your unwanted, or duplicate photos to ensure only valuable files are uploaded. If you edited a photo, remember to delete the original.
- Use Google Photos duplicate finder. Browse your Google Photos regularly to identify and manually delete duplicate photos. Or using professional Google Photos duplicate remover like Cisdem Duplicate Finder to scan and automatically delete duplicates from Google Photos.
Is it safe to use a third-party duplicate finder to remove duplicate photos in Google Photos?
This depends on the tool you choose. Ensure the tool is free from viruses or malware, and download it only from its official site. I think desktop apps generally perform better and are more secure.
Conclusion
Why is Google Photos duplicating my pictures? There can be several reasons, such as backing up photos from different devices. Google Photos does a good job of detecting duplicates during upload, but it doesn’t offer a built-in solution to easily deal with the existing duplicates. You can remove the unwanted duplicates manually or with the help of tools. The methods described in this article are different, and you can choose the method that suits you best. After you remove duplicates in Google Photos, precious storage space will be freed up, and photo browsing will be more enjoyable.

With a passion for tech and writing, Sarah joined Cisdem, where she focuses on creating articles about using utility tools to enhance file management and simplify contact management.

Adrian Li is Cisdem’s Chief Engineer and serves as the editorial advisor for Duplicate Finder and ContactsMate. His work and insights have been featured in leading tech publications such as Fossbytes, TUAW, Redmond Pie, SafetyDetectives, and BestForAndroid.
Geoffrey
I read somewhere that someone developed an extension for this, but I've never tried it myself. Maybe you could check it out.
Brett
I wish there was an easier way, but it looks like the method you shared is the best option so far. Thanks for sharing!
Le Sud
Thank you, although the process was a bit complicated, it really helped me eliminate all duplicate images and videos from Google Photos!
Cindy Picciano
Rosa, thanks for your instructions. While they are quite detailed, I still have questions. I did the Takeout, and got three takeout zip files. I was only able to open one, and then I no longer had space on my Mac drive to open the other two; therefore I cannot merge them into one folder. Help?