

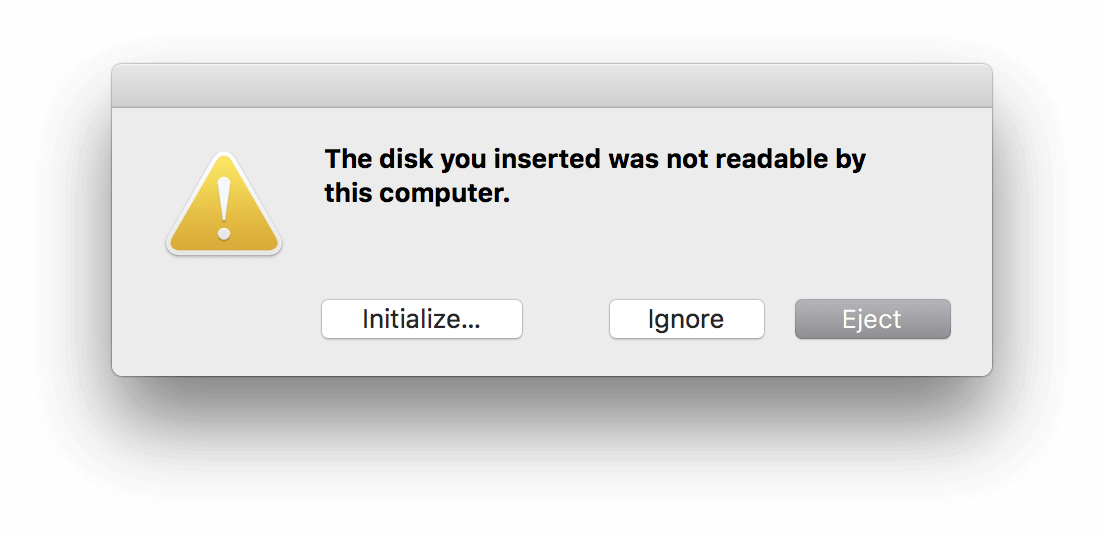
Best Fixes for The Disk You Inserted was Not Readable by This Computer on Mac
 5.8K
5.8K
 0
0


If you are seeing a Mac error message reading "The disk you inserted was not readable by this computer", don’t worry. It’s a common error and can be easily fixed.
The error can happen regardless of macOS versions, storage device types or brands. It can also occur on printers, phones, CDs, etc. This article will show you how to fix the error “The disk you inserted was not readable by this computer” on Mac without losing the data from your storage device.
 Best Data Recovery for Mac and Windows
Recover Lost Data from Hard Disk (Internal and External)
- Restore lost, deleted and formatted data
- Recover data from both internal and external hard disk
- Recover 200+ files: video, audio, photo, document, archive, etc.
- Repair corrupted videos, images and documents file
- Apply both quick and deep scan to find the most files
- Quickly search files with filter tool
- Recover files to local drive or to cloud platforms
 Free Download macOS 10.15 or later
  Free Download Windows 11/10/8/7
 Common Causes of The Disk Not Readable Error on Mac
The error “The disk you inserted was not readable by this computer” can be caused by a number of reasons. Knowing the causes can help you choose a solution that best suits your situation. Below are some of the common causes and scenarios for this error.
- Incompatible file system
- File system errors
- Disk unable to mount properly
- Corrupted disk
- Outdated USB firmware
- Operating system upgrade
Quick Fixes for The Disk You Inserted was Not Readable by This Computer on Mac
The Mac error “The disk you inserted was not readable by this computer” can happen to data storage devices that are in use and the brand new ones. If you see this error message after you connect a brand new external hard drive or SD card (or a different storage device) to Mac, there’s an easy quick solution that can help you out.
When you get “The disk you inserted was not readable by this computer” error message, you are given three choices: Initialize, Ignore and Eject. The options “Ignore” and “Eject” are pretty easy to understand, but won’t help fix the problem. Basically, we need to initialize. This part will show you 2 reliable solutions to fix the disk error with initialization.
Solution 1. Repair Unreadable Disk Using First Aid
First Aid is designed to detect and repair disk directory damage. It has been incorporated into Disk Utility and can be found under the First Aid tab. It can be used to fix system crashes and some disk problems.
- Step 1. Click Initialize, and Disk Utility will open
- Step 2. From the left-side panel, select the unreadable drive.
- Step 3. Click First Aid.
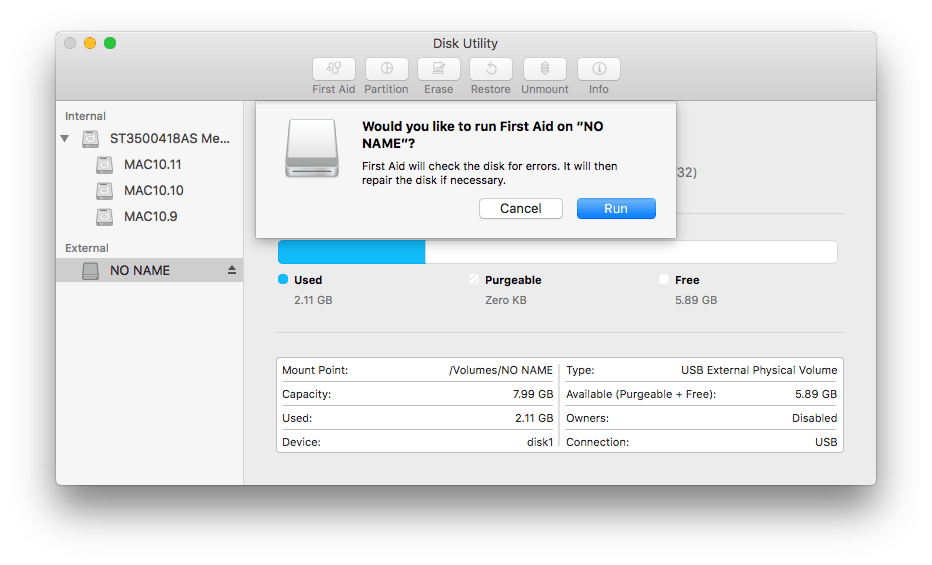
- Step 4. If the “Would you like to run First Aid” dialog box appears, click Run.
If you are told that the disk is about to fail and are asked to replace the disk, then this solution won’t work in your situation. Just jump to solution 2.
After the repair is finished, properly eject the disk in question, remove it and then plug it into your Mac again. If the error occurs again, try other solutions provided in this article.
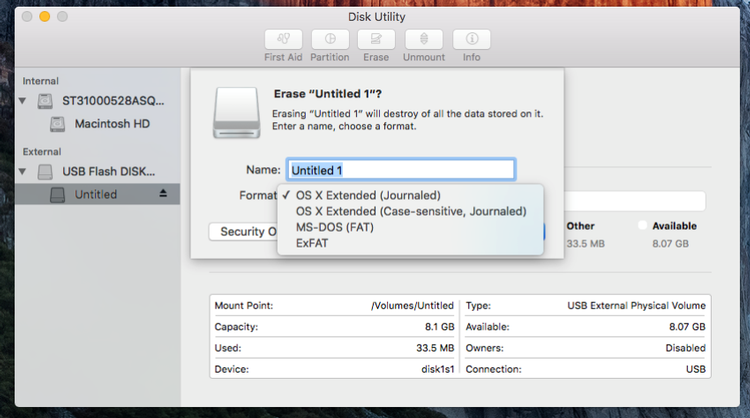
Solution 2. Erase the Disk and Recover Data
If the problem still exists, then you will have to erase the disk, which will fix the error “The disk you inserted was not readable by this computer” in most cases. However, erasing will delete all the files. What if you have some important files stored on it and there is no backup? Don’t worry. This solution is here to help.
Step 1. Erase the Disk
- 1. Click Initialize, which will open Disk Utility.
- 2. Select the unreadable drive from the left-side panel. Click Erase.
- 3. A dialog box will appear. Give the drive a name and select Mac OS Extended (Journaled) as the file system. Click Erase.
![erase disk using disk utility mac]()
After the process is finished, your Mac should read the disk properly without problem. And the message “The disk you inserted was not readable by this computer” should not appear again. The next thing to do is to get the data back.
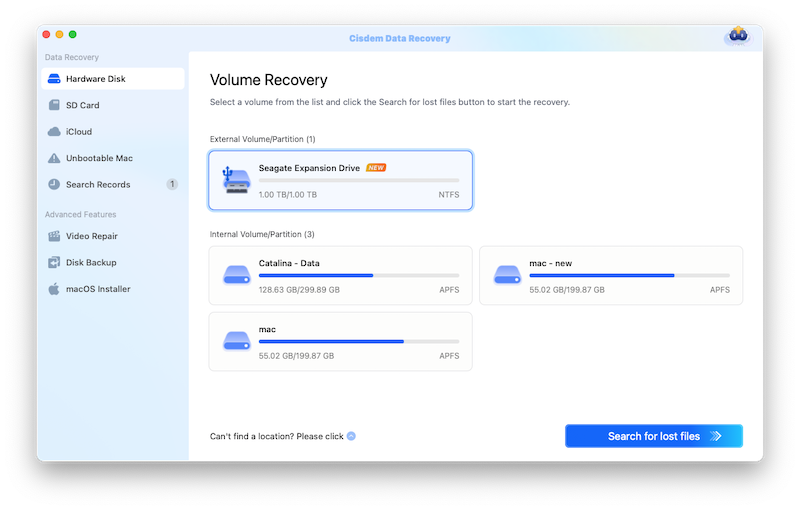
Step 2. Recover Your Data from Erased Disk
The instructions below will show you how to recover the erased data. To get back the erased files, we need a reliable Mac data recovery app. The app we use is Cisdem Data Recovery for Mac , which can recover erased, deleted, formatted or corrupted data from Mac’s internal hard drive, external hard drive, memory card, USB flash drive, digital camera and more. Also, it supports a wide variety of file formats, such as photos, audios, videos, documents, emails, archives and more.
- Download and install Cisdem Data Recovery for Mac;
Free Download - Select the disk that has been erased.
Go to Disk Data Recovery, select the disk that has been erased.![select a recovery solution]()
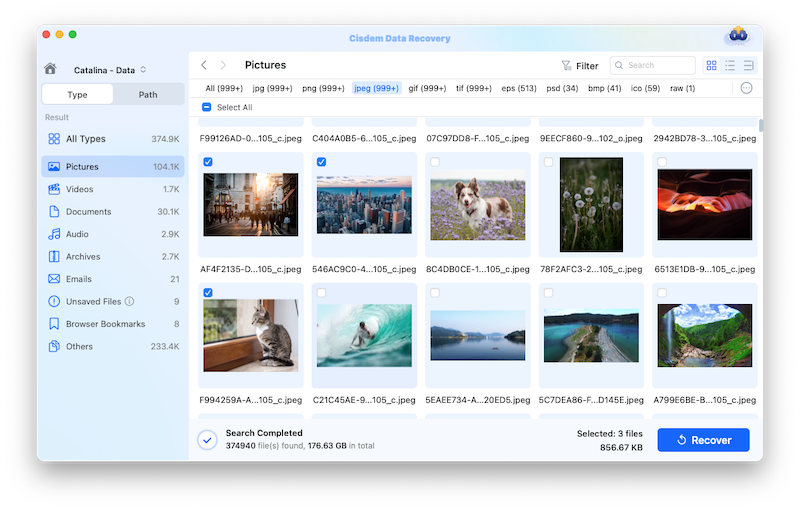
- Scan and preview.
Click Scan. During the scan, real-time scan results will be provided. You can preview all the found files by double clicking on it, also you can use the filter to find specific files quickly.![scan disk and preview]()
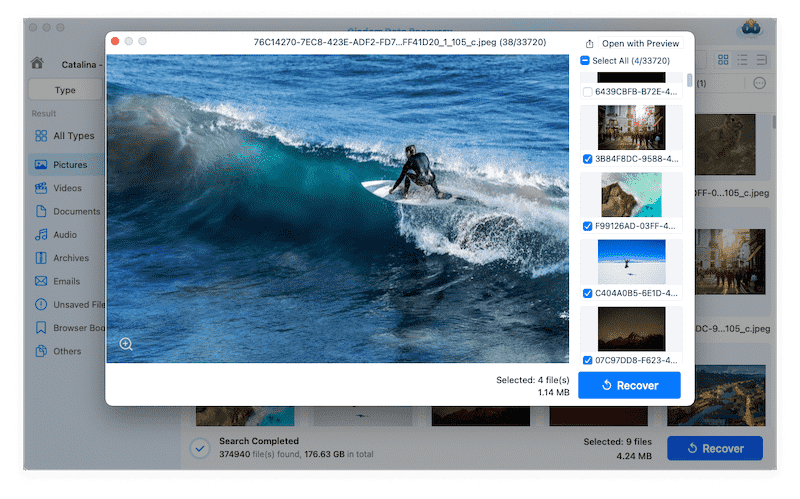
- Start recovering.
Select all the files that you want to recover and click on Recover. Cisdem Data Recovery for Mac will start recovering data erased from your drive.![recover erased disk 03]()
Other Fixes for The Disk Not Readable Error on Mac
There are also other ways to fix the error “The disk you inserted was not readable by this computer” on Mac. Some of them are incredibly easy.
#1 Use Command Prompt
To use this method, you need a Windows PC where you can find Command Prompt, command-line interpreter. When you enter the commands, make sure that you enter them correctly. If you are not familiar or confident with Command Prompt, you can simply skip this part.
- Step 1. Connect the drive to a Windows computer. Here we will take Windows 10 as an example.
- Step 2. Right-click on Start and select Disk Management. Check out if the drive appears in Disk Management. If not, just skip this method. If yes, continue with the next steps.
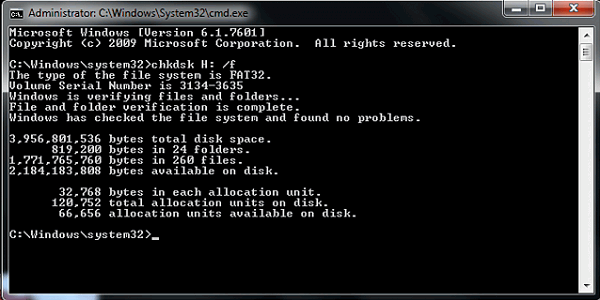
- Step 3. From the taskbar, enter command or cmd in the search field. Click Command Prompt.
- Step 4. Type chkdsk H: /f. Replace H with your own drive letter. Press Enter. This command will start analyzing the drive and then fix any error it finds.
![]()
Once the process is done, properly remove the drive from PC, plug it into your Mac and see if you still get “The disk you inserted was not readable by this computer” error message.
#2 Change the File System/Format the Card
If the disk not readable error is caused by incompatible file system, then changing the file system to APFS (Mac computers’ default file system) may fix it. However, if you use the drive on both macOS and Windows, please choose a file system that is well supported by both operating systems, such as ExFAT.
- Step 1. Open Finder. From the top menu bar, select Go > Utilities > Disk Utility. You can also open Disk Utility in a way you prefer.
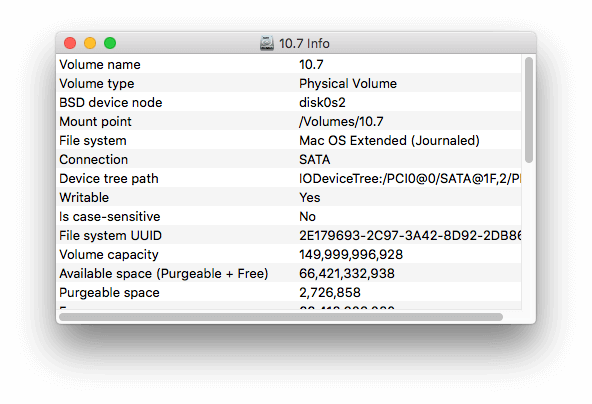
- Step 2. From the left-side panel, right-click the unreadable disk, select Get Info and see if the file system is supported by Mac. Check out this Wikipedia table to find a list of macOS supported file systems.
![disk utility get info]()
- Step 3. If the drive’s file system is compatible with Mac, then there is no need to change the file system. Just skip this method. If it’s incompatible, continue with the next steps.
- Step 4. Click Erase. From the Format dropdown list, select Mac OS Extended (Journaled) or ExFAT according to your need. If the drive is used for Time Machine, please select Mac OS Extended. Click Erase.
Note: Erasing will delete all the data on the drive. If there’s a backup, you can perform erasing with no worries. If not, you can use Cisdem Data Recovery for Mac to restore the erased data.
Tips to Avoid Disk Errors on Mac
- Eject before you unplug your external storage device
- Don’t remove an external drive or SD card during data writing or transferring
- Format a hard drive to the compatible file system
- Keep your drive free from water and dust
- Prevent the storage device from overheating
- Avoid physical damage
- Have a backup of your data
- Don’t overload your hard drive
Conclusion
“The disk you inserted was not readable by this computer” along with other disk errors on Mac are common. Sometimes the error just occurs out of the blue. But don’t panic. You can fix the error using the solutions recommended in this article. Also, always remember to backup the files that are important to you.

Connie Yu has been a columnist in the field of data recovery since 2011. She studied a lot of data loss situations and tested repeatedly to find a feasible solution tailored for each case. And her solutions are always updated to fix problems from the newest systems, devices and apps.

JK Tam is the lead developer at Cisdem, bringing over two decades of hands-on experience in cross-platform software development to the editorial team. He is now the lead technical approver for all articles related to Data Recovery and DVD Burner.