

How to Find Screen Recordings on Mac (OS 27 Golden Gate Supported)
 30.6K
30.6K
 6
6


“I recorded an online tutorial on my MacBook Pro using Command + Shift + 5 and chose to save the video to my Desktop. After the recording finished, I closed the preview window immediately, trying to move it to my USB. But when I checked my Desktop, there was no trace of the video. It seemed like the recording never got saved or was accidentally deleted before transferring. Where and how should I find back the recording, it is important for my new group project.”---A College Student
It is annoying that leaving a screen recording unsaved or mistakenly deleting, especially it takes you a long time and a lot of efforts to finish the recording. Rather than starting the recording over again, you can just sit down, use a shortcut, a native macOS tool, or a dedicated app, to find and recover screen recordings on Mac.
 Cisdem Data Recovery
Quickly Find Screen Recordings on Mac
- Scan and find QuickTime screen recordings on Mac
- Also find screen recordings created by other 3rd party recording programs
- Quickly search a screen recording file by name, size, date, etc.
- Recover (QuickTime) screen, audio and movie recordings without losing quality
- Repair screen recordings, mp4, avi, mkv and various videos
- Also restore unsaved, deleted, corrupted files under different scenarios
- Restore deleted or lost files under different scenarios
- Support recovery on 200+ file types: videos, audios, images, documents, archives, etc.
- Additional features: iCloud/unbootable Mac recovery, disk backup, file preview, search records, etc.

Where Do Screen Recordings Go on Mac?
Well, this depends on which program you are using to record the screen, is it the built-in QuickTime Player or 3rd party screen recording apps?
Where Did QuickTime Sreen Recordings Go on Mac?
For QuickTime Player users, the defaulted location is Desktop, but you can choose to save a QuickTime screen recording to Documents, Mail, Messages or other locations. Across all macOS versions, QuickTime Player has the AutoSave feature to store screen recordings automatically, that’s to say, a recording in process will be automatically saved in the defaulted folder (~/Library/ScreenRecordings/), until you save the recordings later. And the AutoSave location is a bit different according to macOS versions. And you can check this table:
| Scenarios | Where Do Screen Recordings Go on Mac? |
|---|---|
| When Left Unsaved | On macOS Catalina and earlier: ~/Library/Containers/com.apple.QuickTimePlayerX/Data/Library/Autosave Information/ On macOS Big Sur and later: ~/Library/ScreenRecordings/ |
| When Finished | On macOS Catalina and earlier: Selected location On macOS Big Sur and later: Desktop (defaulted), Documents, Mail, Messages, other selected locations |
| When Deleted | Trash Bin |
| When Emptied Trash | Still in original partition until there is new data overwrites the recording |
Where Did 3rd-Party Sreen Recordings Go on Mac?
For 3rd party screen recorder users, the recordings are usually saved under the Movies folder or user account, such as ~/Movies/recorder name/ or ~/recorder name/), and there is no autosave feature for most of 3rd party recorders. And you can check following table:
| Scenarios | Where Do Screen Recordings Go on Mac? |
|---|---|
| When Left Unsaved | (If AutoSave Available)~/Movies or to Cloud |
| When Finished | ~/Movies/recorder name/ or ~/recorder name/ or a preferred location |
| When Deleted | Trash Bin |
| When Emptied Trash | Still in original partition until there is new data overwrites the recording |
How to Find Screen Recordings on Mac under Different Scenarios?
You are recommended to check the Desktop first if you cannot find a screen recording, basing on the knowledge where did your QuickTime screen recordings go on your Mac in the first part. If failed, there are 9 ways to find, from basic to advanced, also support the latest macOS Golden Gate beta version.
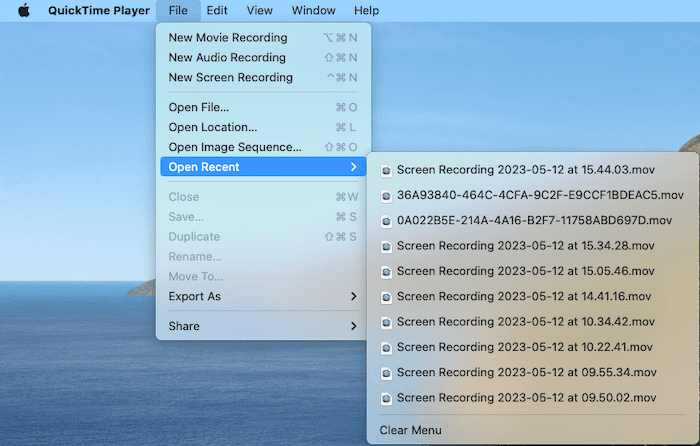
#1. Check Recent List
Don’t know where to find the recordings? Both QuickTime Player and 3rd party recorders enable users quickly search a recording on your Mac, via the recent list from the menu bar.
- Run QuickTime app or other recorders on your Mac.
- Go to File > Open Recent, then select the screen recording that you need, open it.
![open recent]()
- Go to File > Save or Save As to find back your recording on Mac.
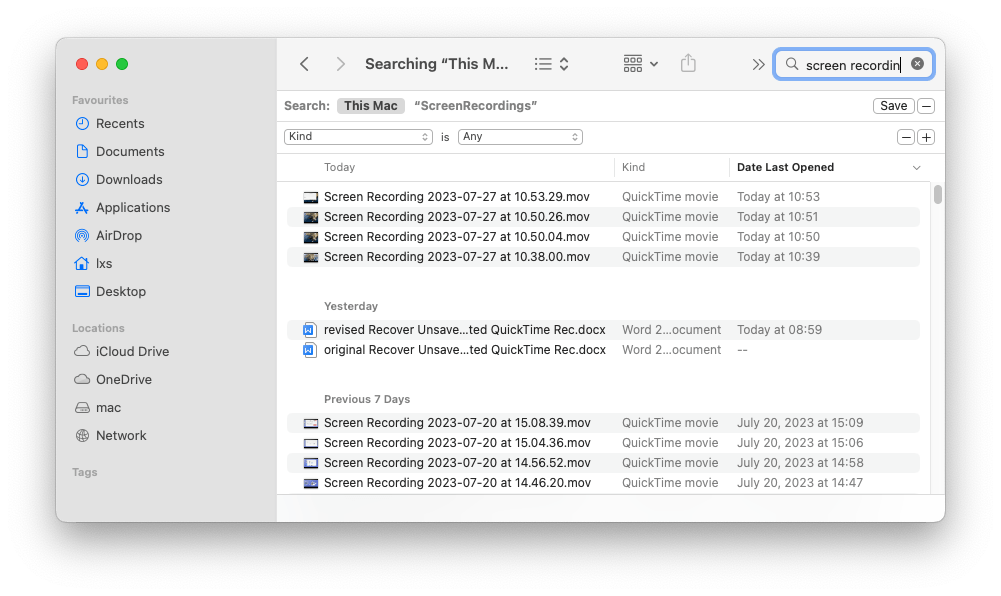
#2. Search on Mac
You may have realized that unsaved QuickTime screen recordings will be saved in file name starting with "unsaved" on macOS earlier than 10.15, or “screen recording” on macOS 10.15 or later. Therefore, we can search and find a screen recording according to file name, by using Spotlight. Also, for other screen recorders, the file name is much likely to come with a date and saved in MP4 format, just try searching those videos with spotlight feature too.
- Open Finder app, press Command + F to bring up the spotlight tool, and go to This Mac.
- Enter the keyword "Screen Recording" into the search box, all the recordings will be listed.
![find screen recording mac]()
- Preview the files and find back to your preferred location.
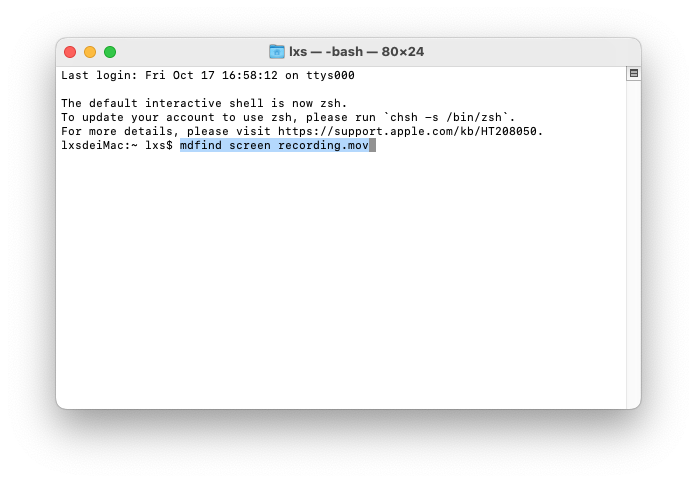
#3. Find Recordings on Mac via Terminal App
Alternatively, there is another way to search and locate a screen recording on Mac, via Terminal, if you remember the file name.
- Open Terminal app.
- Type “mdfind file name.mov”, then press Enter.
![find recording terminal 01]()
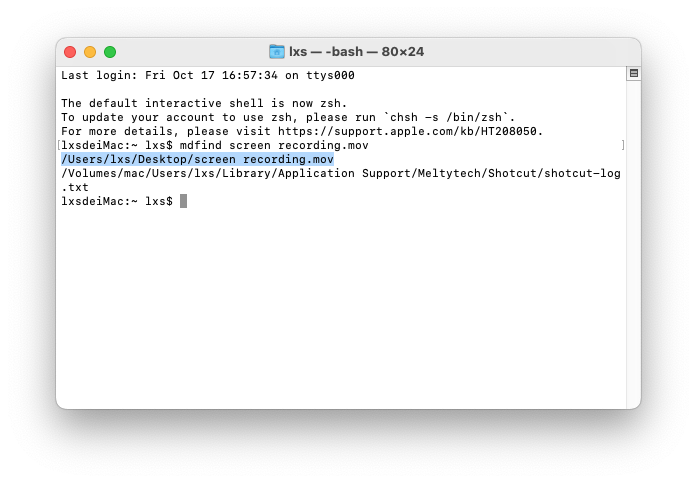
- Terminal will show the location where you saved the screen recording on your Mac.
![find recording terminal 02]()
#4. Find Screen Recordings from AutoSave Location
According to the 1st part, macOS QuickTime Player can auto save a screen recording in the defaulted location. If your recordings are missing, check this autosave location. For the reason that QuickTime autosave location on Big Sur and later is different from the location on Catalina and earlier, so the steps will be different as well.
How to Recover Unsaved QuickTime Recordings with AutoSave on Big Sur or Later?
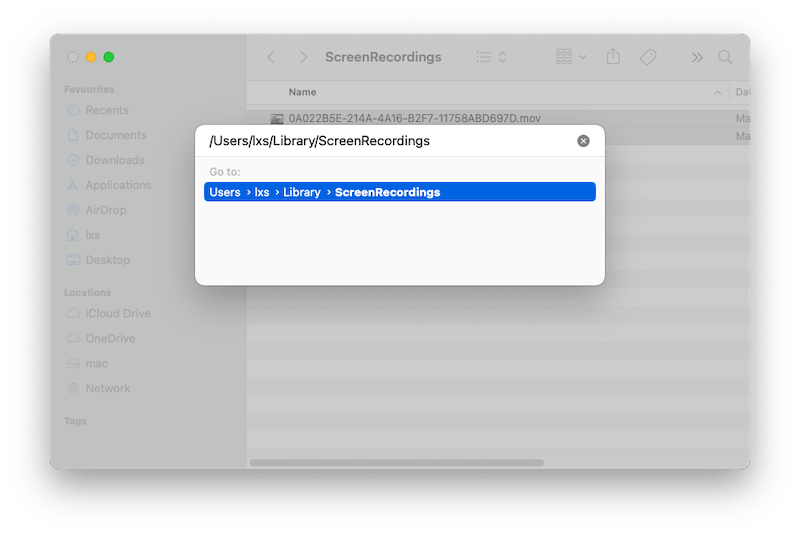
- Click on Apple icon, visit Go > Go to Folder.
- Then copy and paste ~/Library/ScreenRecordings/ as following, press Enter.
![recover from autosave 01]()
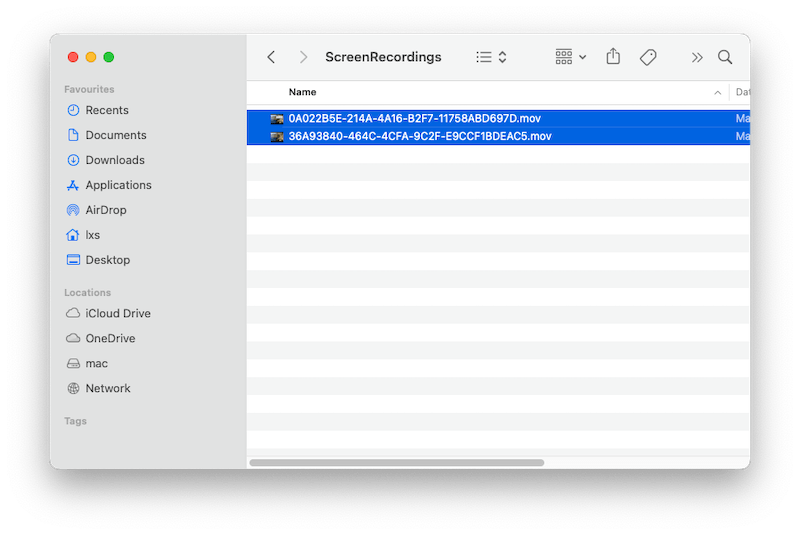
- Open the unsaved QuickTime Player screen recordings or copy the files to another location if necessary.
![recover from autosave 02]()
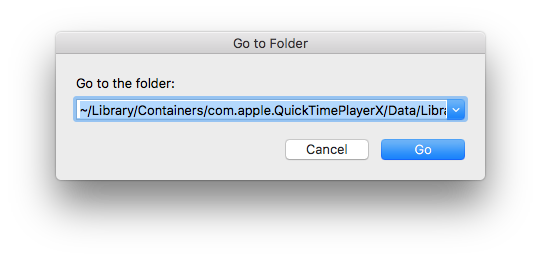
How to Recover Unsaved QuickTime Screen Recordings with AutoSave on Catalina and Earlier?
- Click on Apple icon, visit Go > Go to Folder.
![recover unsaved quicktime autosave01]()
- Then copy and paste "~/Library/Containers/com.apple.QuickTimePlayerX/Data/Library/Autosave Information/" as following, click Go.
![recover unsaved quicktime autosave02]()
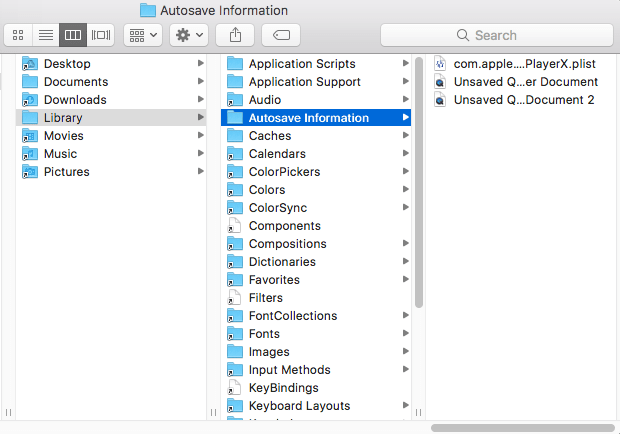
- Now, you will find the AutoSave Location of QuickTime screen recording files.
![recover unsaved quicktime autosave03]()
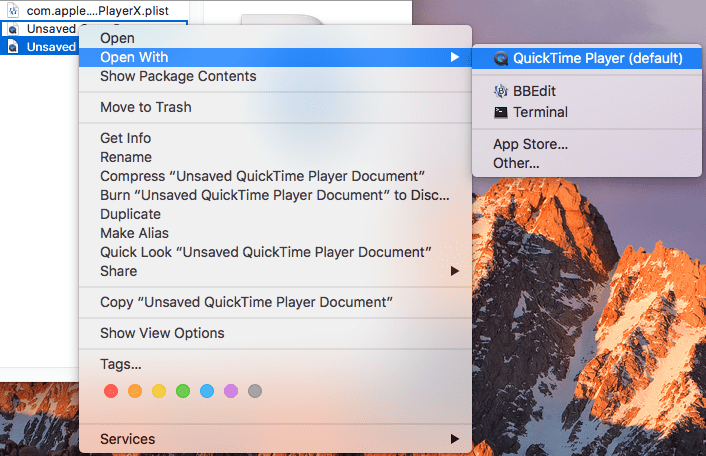
- Right click on the recording file, Open With > QuickTime Player.
![recover unsaved quicktime autosave04]()
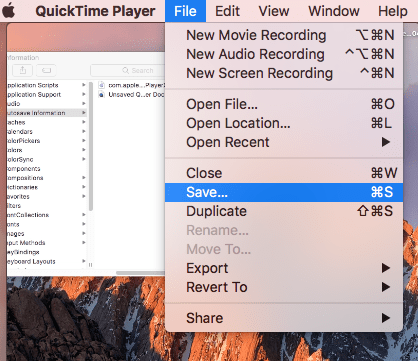
- Go to File > Save.
![recover unsaved quicktime autosave05]()
- Rename the QuickTime recording file, click Save to recover the unsaved QuickTime screen recordings to your Mac.
![recover unsaved quicktime autosave06]()


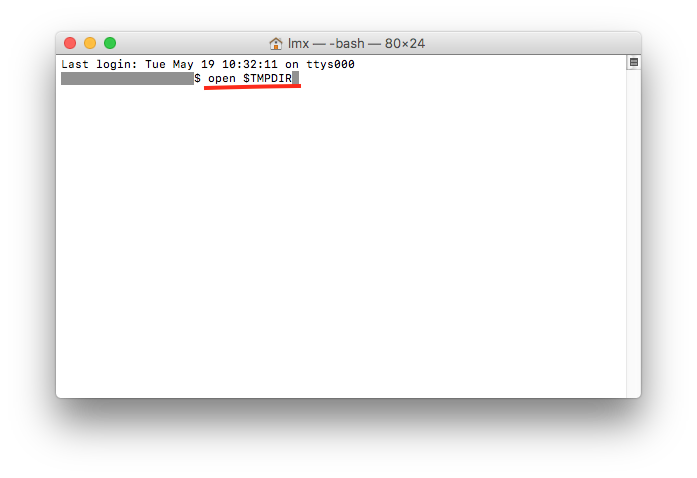
#5. Find Screen Recordings from Temporary Folder
Another method to find unsaved or disappeared recordings is searching in Temporary folders. The temporary folder is created on a Mac to store the temporary files that are used by macOS and the apps you’ve installed
It is again a matter of luck, but basing on my successful experience to find back my unsaved files before, you are recommended to have a go.
- Go to Finder > Application, run Terminal.
- Then input "open $TMPDIR" and press Enter to run the command line.
![recover unsaved quicktime tem01]()
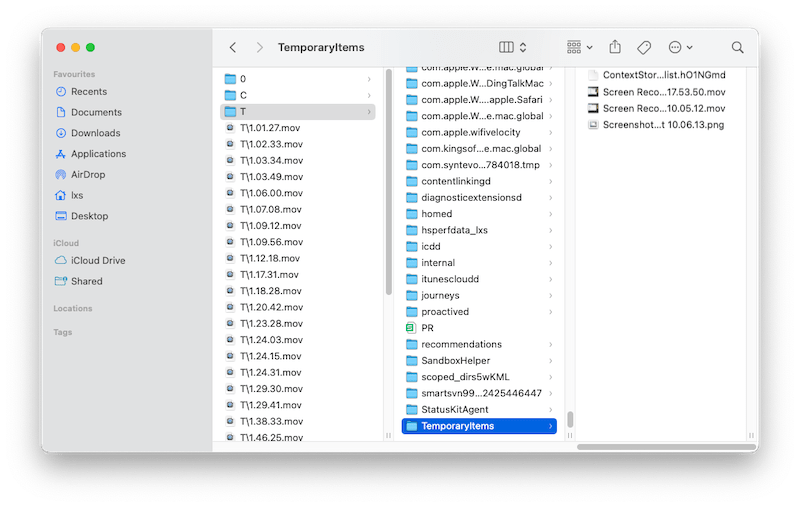
- You will be navigated to the Temporary folder, go to TemporaryItems and check if your unsaved QuickTime or other recordings located there.
![recover unsaved quicktime tem02]()
- Select and open the temporary recording file, then save to a designated folder.
#6. Recover from iCloud Backup
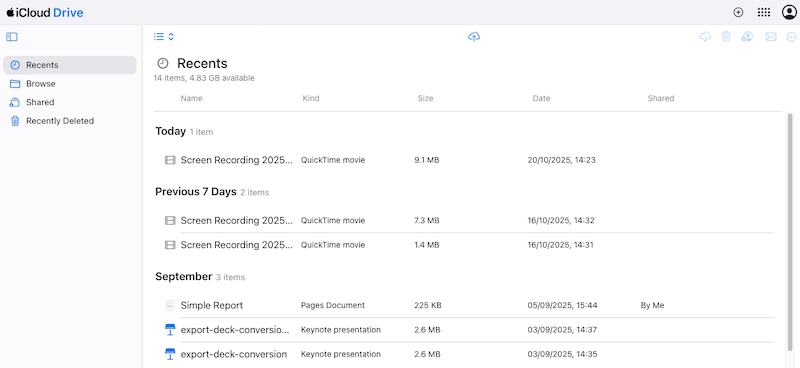
And don’t forget to check up your iCloud Drive, maybe you’ve set up to save the screen recordings to iCloud Drive on your Mac. Then you just need to log into your iCloud and browse the recent files to find your screen recordings.
- Go to www.icloud.com, sign in with your iCloud account.
- Then go to iCloud Drive > Recents.
![check icloud backup02]()
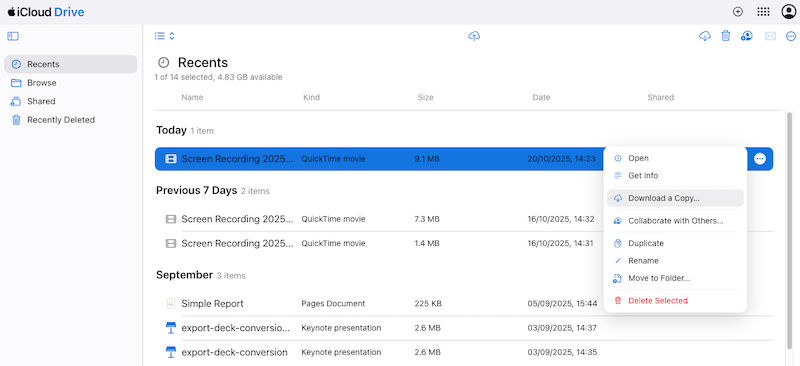
- Select the screen recording backup file, click on “...” icon and choose Download a Copy.
![check icloud backup03]()
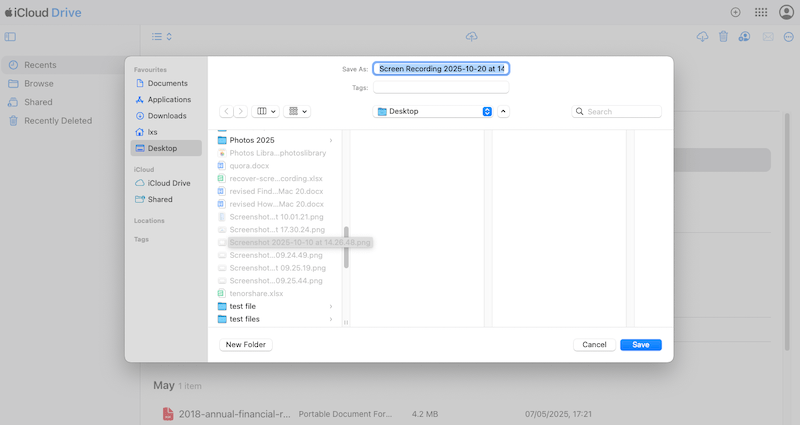
- Choose an output location to save the recording to your Mac.
![check icloud backup04]()
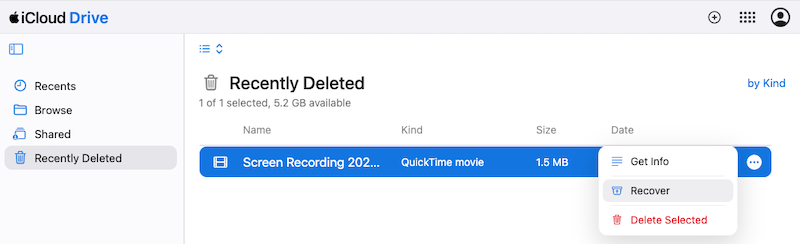
- (Optional) If you cannot find the recordings from iCloud Drive library, check the Recently Deleted folder to restore first, then download the copy to your Mac.
![recover from icloud]()
#7. Find Unsaved or Deleted Screen Recordings with Cisdem Data Recovery
If you want to find or recover an unsaved, disappeared or even a damaged screen recording on Mac, here is the easiest way, using a professional file scanning and recovering tool.
Cisdem Data Recovery is an ideal choice, which is designed to scan and recover 200+ types of files, including QuickTime recording videos/audios, screen recordings created by other tools, MP4, AVI, M4V, MKV, MP3, WAV, WMA, DOCX, DOC, XLSX, XLS, PPTX, PDF, JPG, PNG, GIF, ZIP, RAR, EXE, etc.
Cisdem applies to different situations, no matter your files are mistakenly deleted, formatted, corrupted or lost due to virus attack, system crash, partition loss, hard drive damage, mount failure or other human errors, no matter the files are stored on internal hard drive or external hard drive. In addition, it allows users to preview the files before finding them back.
In my case, Cisdem Data Recovery took about 24 minutes to finish the scanning, and found back 5010 videos. I browsed all the recoverable recordings, some were deleted 4 years ago when I just started using this Mac, and I could preview them, this is really amazing. Also, I recognized that there was no need to finish the scanning and wait for long, because in the first several minutes, Cisdem has already found out the missing files.
Steps to Recover Unsaved, Disappeared or Corrupt Screen Recording on Mac
- Download and install Cisdem Data Recovery onto your Mac.
 Free Download macOS 10.15 or later
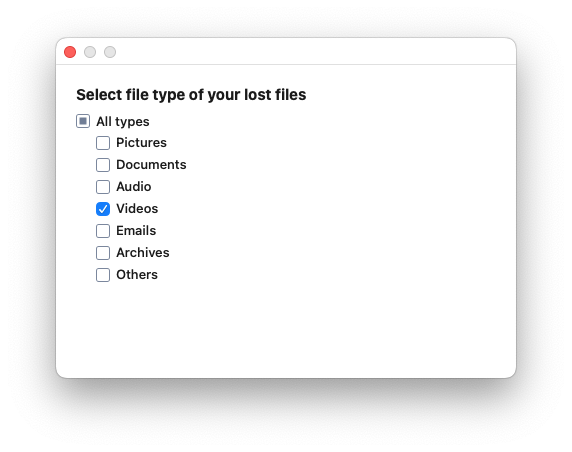
 - Click on Cisdem Data Recovery app menu from Apple’s menu bar, go to Preferences, select Videos to find and recover screen recordings on your Mac.
![recover recording cisdem01]()
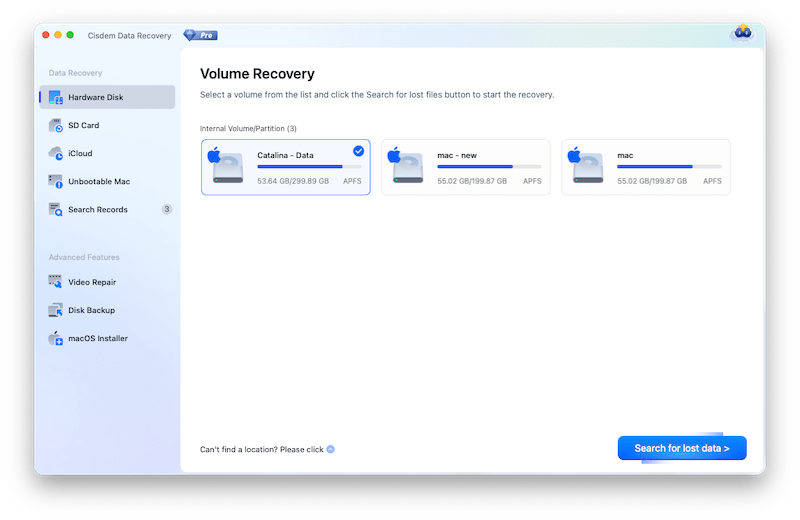
- Go to Hardware Disk and choose the hard drive where you lost the QuickTime or other screen recordings.
![recover recording cisdem02]()
- Click Search for lost data, Cisdem will scan all over the selected drive.
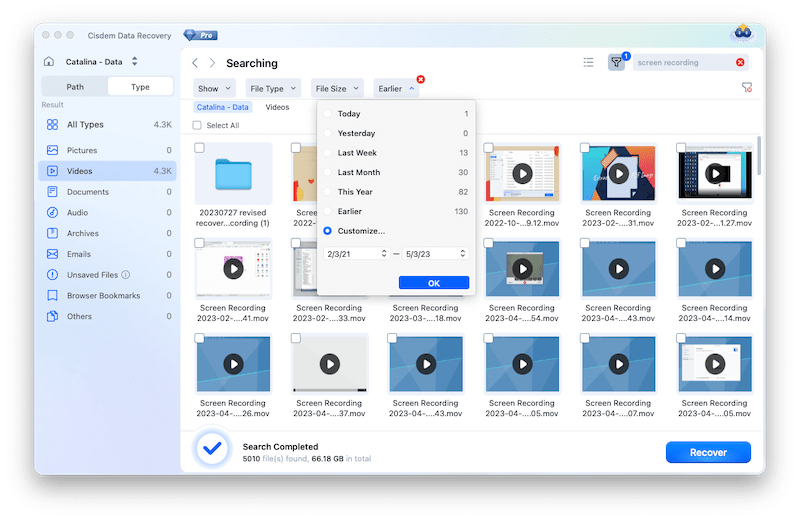
- Go to Type > Videos > MOV or MP4. All the recoverable files will be showed up, you can enter keyword into the search box to quickly find the missing recording, or use the Filter tool to find by size, date, etc.
![recover recording cisdem04]()
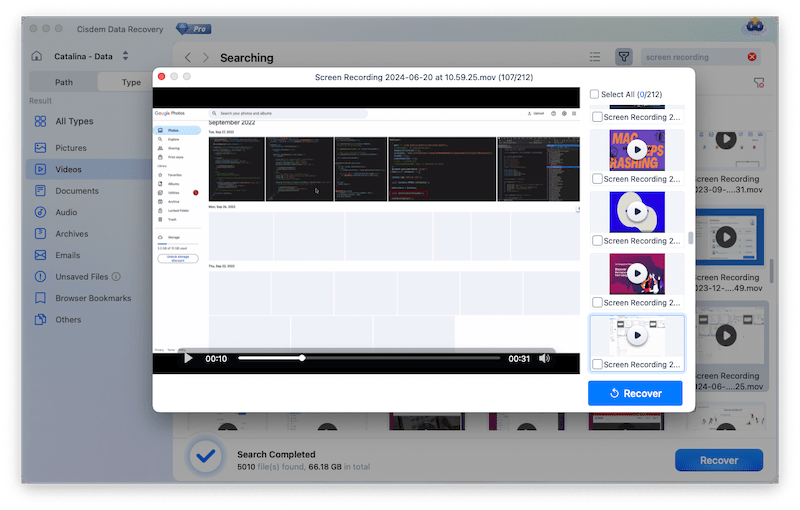
- Then double click on the found QuickTime or other screen recordings to preview, select and click Recover to restore them to local drive or Cloud.
![recover recording cisdem05]()
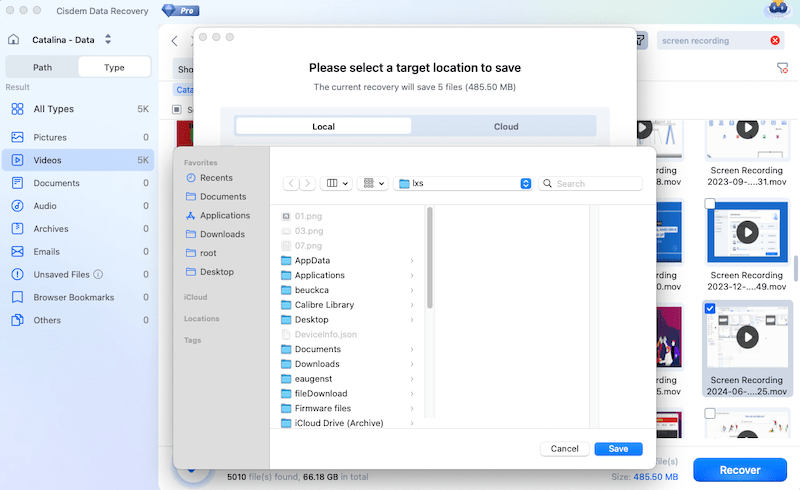
- Finally, select a place to save the recovered screen recordings.
![recover recording cisdem06]()
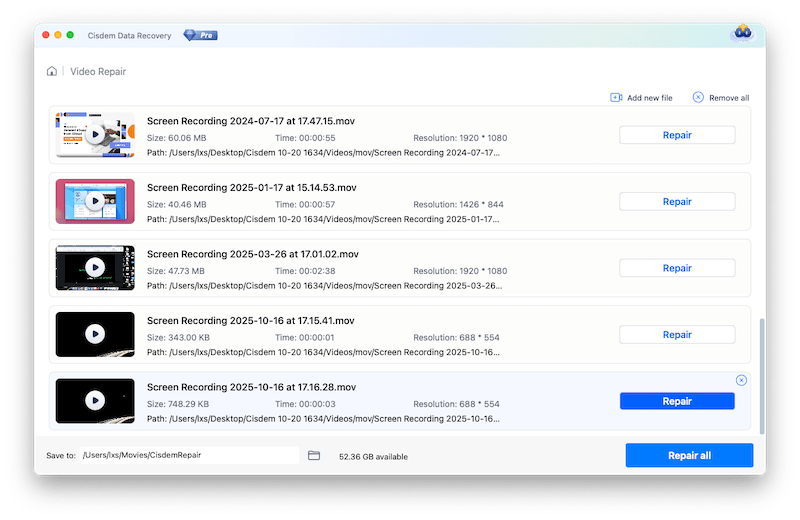
tips: in the case that the recovered screen recording file is corrupted, you can use the Video Repair tool to add your file and repair them all.
Also, you can watch this video to find and search screen recordings on Mac using Cisdem:
#8. Restore Screen Recordings from Time Machine Backup
In the case that you’ve set up Time Machine backup on your Mac and backed up the recordings to an external hard drive, we can also easily find the screen recordings via the Time Machine backup and here is how.
- Connect the Time Machine backup drive to your Mac.

- Then Enter Time Machine.
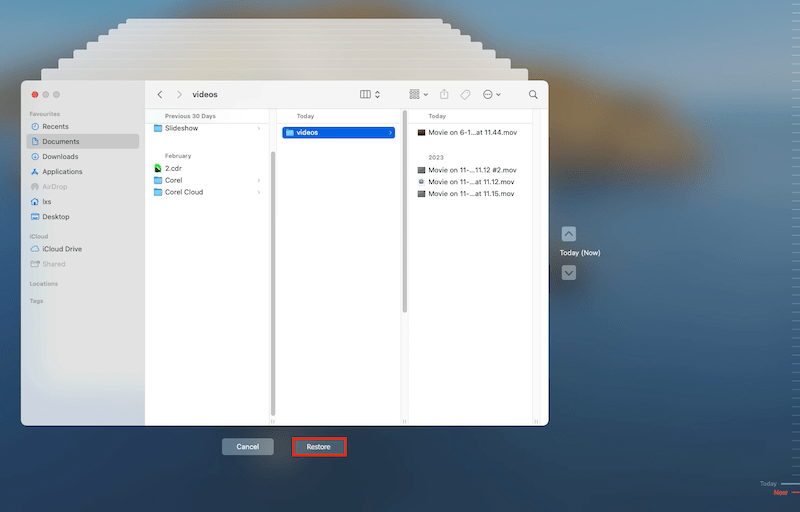
- Go to the folder that stores the screen recordings.
- Then select the screen recording file you want to recover, you can browse all version and choose one to Restore.
![recover recording time machine 02]()
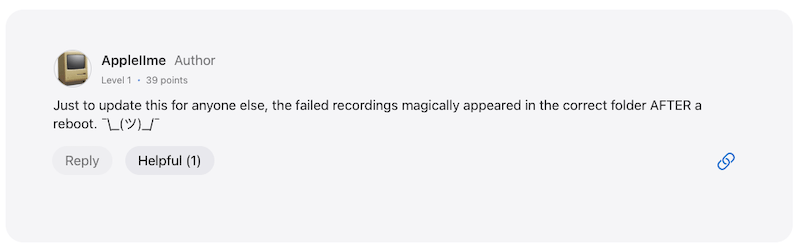
#9. Reboot to Show up Disappeared Recordings on Mac
The last but not the least important method to recover unsaved QuickTime recordings is to reboot the app or your Mac, it sounds weird, but sometimes it just works like a magic, as some Mac users have restored unsaved QuickTime files successfully with a reboot.
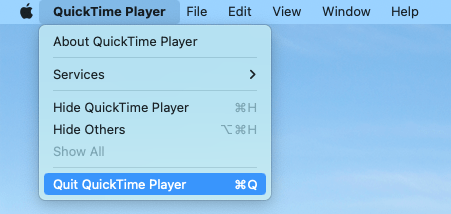
Reboot QuickTime Player App
- Click QuickTime Player on the menu bar.
- Choose Quit QuickTime Player.
![reboot02]()
- Open the QuickTime app again, go to File > Open Recent, or check the defaulted folder where you stored the screen recordings.
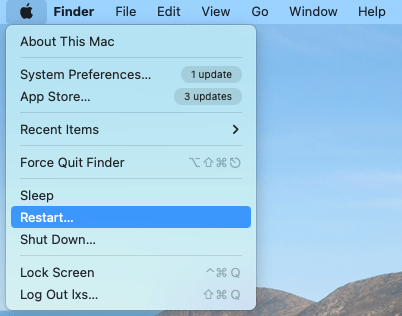
Reboot Mac
- Click Apple icon.
- Choose Restart.
![reboot03]()
- Open the QuickTime app again, go to File > Open Recent, or check the defaulted folder where you stored the screen recordings.
FAQs about Screen Recording on Mac?
1. How are screen recordings saved on Mac?
For QuickTime Player users, no matter you use shortcut to record, or launch the app to record, once you click the Stop button, the recordings will be saved to Desktop, if you don’t choose another location. At the time when a preview window opens, the screen recording is also displayed on Desktop.
For 3rd party recorders, users are allowed to configure preferences to choose a save location. Similarly, there is a control toolbar appears on the screen for you to start and stop a recording. Once finished, the recording will be auto opened for preview, with file saved in the selected location.
2. Where does QuickTime save screen recordings?
The defaulted location is Desktop, but you can choose other locations such as Documents, Mail, Messages, others.
If the screen recording is left unsaved, it will be auto saved in ~/Library/ScreenRecordings/ on macOS Big Sur or later, and in ~/Library/Containers/com.apple.QuickTimePlayerX/Data/Library/Autosave Information/ on macOS Catalia and earlier.
3. How to access screen recordings on Mac?
First of all, in most cases, screen recordings are saved to Desktop, you just need to log into your account and go to Desktop to access the recordings.
Also, you can search and access the screen recordings with Spotlight tool (click on Finder app and press Command +F), by typing file extension .mov, or .mp4, because most of the screen recordings are saved in MOV or MP4 format.
4. How to recover deleted screen recordings on Mac?
The deleted screen recordings will be moved to Trash bin and kept there until you empty the trash bin, if haven’t purged it, you can put back the deleted screen recordings to original folder.
- Open Trash Bin app.
- Find and select the deleted recording files, right click Put Back.
If the recordings are permanently deleted from your Mac, or you cannot find any backup, Cisdem Data Recovery can be also used to recover screen recordings for you. You can check back method #7 to retrieve your files.
5. Why did my screen recording not save on Mac?
QuickTime or other recorders keep unsaving your recordings? Here are the reasons why and fixes that get it solved.
- Outdated Recording App or macOS: outdated app or system will run into performance issues. If your recording app doesn’t work properly, check if there is an update, if the problem persists after an update, maybe it is time to update your macOS to the latest one too.
- Not enough space on Mac for created recordings: a screen recording is never small in size, we need to leave enough space for a newly created recording video.
- High CPU on Mac: when one or several heavy programs run on your Mac and use high CPU, it becomes harder to other applications working properly. Therefore, we should quit those Apps that use high CPU as many as possible.
- Multitasking: if you want to avoid unsaved recordings, we’d better focus one task at one time, to gear your recorder up for current recording task.
- Interrupted Sharing: When you set up the recordings to be shared, once the recording finishes, these apps will be auto launched for sharing. But if you quit, the recording won’t be saved due to such an interruption. So, you are always recommended to save the recordings to Desktop or other folders first.
6. Why Do Screen Recordings Disappeared on Mac?
Started recording on your Mac, but the screen recordings just disappeared? Here are the possible reasons why can’t find the QuickTime or other screen recordings on your Mac.
- The recording is incomplete or interrupted: when you Mac runs out of space, QuickTime Player or other screen recorders crash during the recording, the file won’t be finished or saved.
- Save recordings inappropriately: QuickTime Player allows users saving the recordings to apps like Mail or Messages. If the initializing of these apps is interrupted before a successful send , the screen recordings will disappear.
- Accidental deletion: you might have deleted the screen recordings mistakenly, by moving the videos with other unwanted files to trash Bin and emptied.
- Buggy screen recording software: a poorly optimized screen recorder may fail to save your recordings due to permission, compatibility, encoding, or writing issues.
Summary
Under different scenarios (e.g. unsaved, deleted, disappeared), the screen recordings may be stored in different locations on your Mac. To find your screen recording that is disappeared or deleted, there are 9 solutions, from different locations, via a local or cloud backup, even using a professional data recovery program to recover the screen recordings. But remember, act quickly!

Connie Yu has been a columnist in the field of data recovery since 2011. She studied a lot of data loss situations and tested repeatedly to find a feasible solution tailored for each case. And her solutions are always updated to fix problems from the newest systems, devices and apps.

JK Tam is the lead developer at Cisdem, bringing over two decades of hands-on experience in cross-platform software development to the editorial team. He is now the lead technical approver for all articles related to Data Recovery and DVD Burner.
Christopher
I had a QuickTime recording that disappeared after an unexpected issue, and I wasn’t sure if it could be recovered. Thanks for sharing these practical tips, finally found mine by searching.
Ernest Gunter
I was almost there to give up and planned to re-record the video. Thanks for your solutions, finally I brought it back. I tried the solutions from part 3, but failed, until I installed Cisdem and scanned. So, just hire an expert tool do the job.
Marian
Thank you so much! I had a 36 minute screen recording that disappeared after recording. This step helped me: " Then copy and paste ~/Library/ScreenRecordings/ as following, press Enter. "
Barbie
Helpful tips. I found Temporary folder a nice place to recover unsaved files from. You guys can have a go if your unsaved QuickTime recordings were created not long ago.
Miruna
Thank you for the help! I did interviews and the recordings weren't saved in the usual place so I panicked for a good while until I found this article.
BernardBiz
Thank you very much for the information provided I'm very impressed