

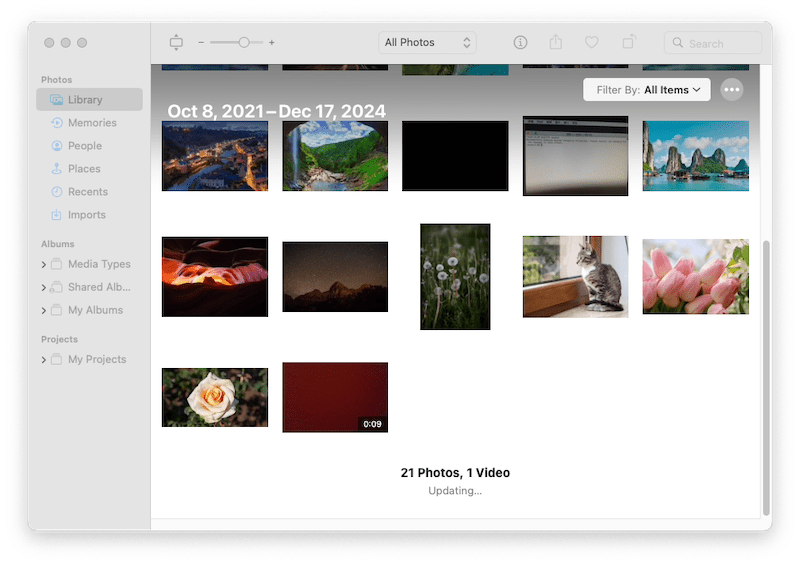
Photos Disappeared from Mac after Tahoe/Sequoia Update? Fix and Recover!
 59.7K
59.7K
 2
2


“We updated our iMac to Tahoe 26 and now we faced a problem with the Photos app. I have stored 6-year photos on my Mac, but now 90% of them were gone. How to recover ... we can not allow to loose those precious old photos.”----Apple Discussion
You may run into the same annoying situation when upgrading macOS, or for other unknown reasons, all the photos just disappeared from your Mac. Though Apple blames the issue on no iCloud backup and does nothing for users, there appear to be some reliable methods to getting the disappeared photos back, according to related posts and my personal testing.
 Cisdem Data Recovery for Mac
Rescue Disappeared, Deleted, Corrupted Photos on Mac
- Restore disappeared photos caused by macOS update, downgrade, reinstallation, crash, etc.
- Recover photos from Photos app, iPhoto app, USB, SD card, internal and external hard drive.
- Fix damaged photos, also repair damaged videos and documents
- Recover photos with or without iCloud backup
- Search and locate lost photos quickly
- Recover 200+ file types: video, photo, audio, document, email, bookmark, archive, etc.
- Preview photos, videos, Word, Excel, PowerPoint, PDF and other files
 Free Download macOS 10.15 or later
Why Have Photos Disappeared from My Mac?
There are many reasons that lead to disappeared photos on Mac, but it is hard to determine what is exactly the reason to cause such an error, unless we test and exclude one by one. Anyway, following are the common possible reasons:
- Photo library corruption due to macOS update, sudden shutdown, system/app crash or disk error: interrupted macOS update, crashed Mac and failed disk are much likely to corrupt the library database, making your photos inaccessible.
- iCloud Photos sync issues: you’ve set up iCloud Photos across different devices, but accidentally disabled iCloud Photos on your Mac, so the photos don’t sync up and become missing.
- Log into wrong Apple ID or load wrong library: sharing a Mac with others, you may have logged into a wrong ID and mistakenly think the photos disappear. Or saving multiple photo libraries on your Mac and access the wrong one? This also cause missing photos on a Mac.
- Insufficient storage space: not enough space for macOS update or storing new photos, and old photos are overwritten to create necessary space for the files.
- Accidentally deletion: the photos are deleted by yourself or someone else mistakenly.
- Malware or virus attacks: some viruses are coded to delete your files or corrupt the system files, which lead to the loss of your Mac photos.
If your photos just disappear right after macOS Tahoe or Sequoia update, check the fixes in Part 2. If you don’t know the reason and want to recover the disappeared photos, check Part 3.
Photos Disappeared from Mac after Update? Fix It!
There might be a time when restarting Photos app or Mac works, but if it doesn’t work in your case and the photos are missing right after macOS update, here are 8 fixes for you to try, from simple to advanced.
#1 Choose Correct Library or Account
Photos Library is the database where all photo files, thumbnails, metadata info, etc. are stored. You may have multiple photo libraries on your Mac and load the wrong one, which makes your photos seemed to be disappeared.
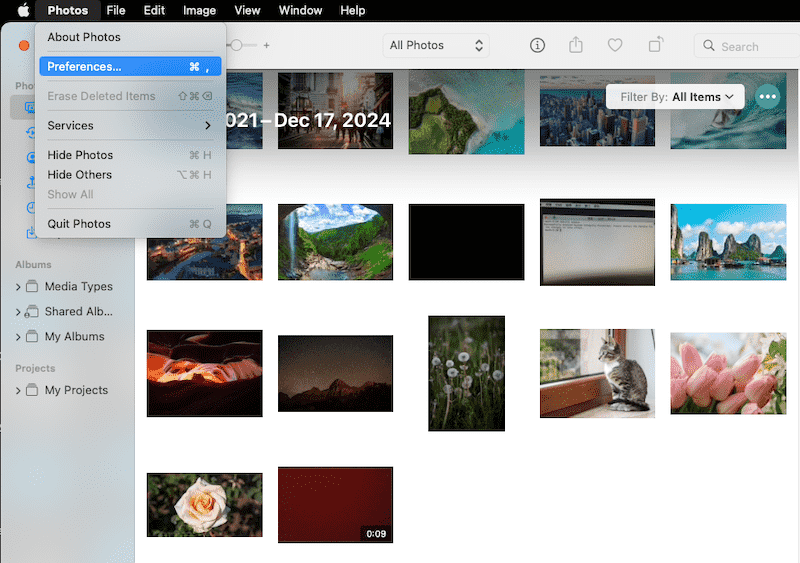
- Open Photos app on your Mac, click on Preferences.
![load library 01]()
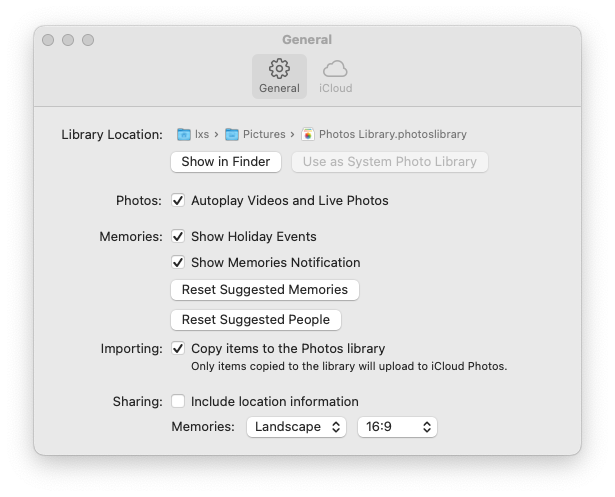
- Go to General, click on the system photo library.
![load library 02]()
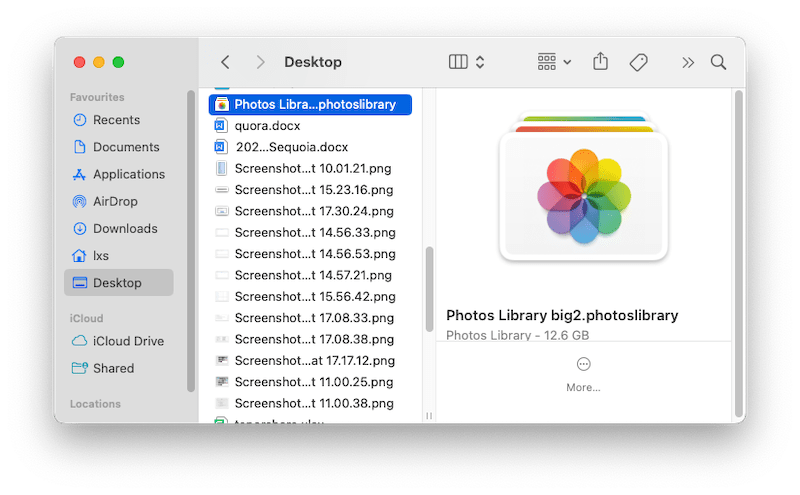
- Navigate to the correct photo library, and double click to open.
![load library 03]()
- Then click Switch to load the correct photo library and your photos will appear.
![load library 04]()

Also, you should make sure you’ve logged into the correct user account or Apple ID if you are sharing the Mac with others:
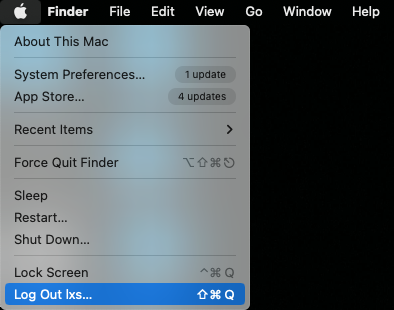
- Click on the Apple icon to check which user account you are logging in. If wrong, log out the current user account and log in with the correct one.
![apple log 01]()
- Open System Settings > Apple ID to check which Apple ID you are using to load the photos. If wrong, sign out the current one and sign in with the correct one.
![apple log 02]()

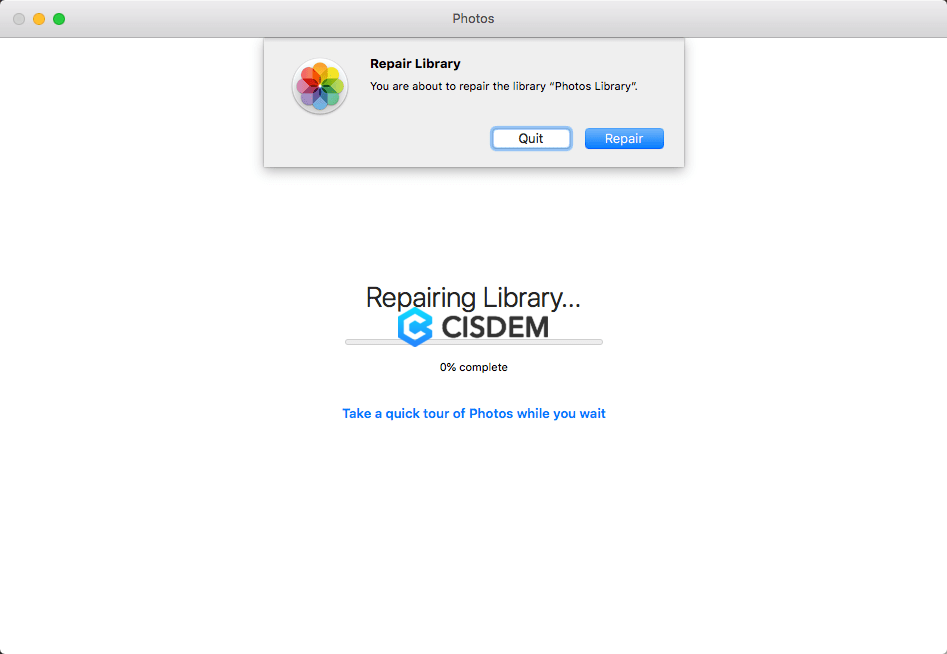
#2 Repair Photos Library on Mac
Trying to open the Photos app but not able to access the photos? The library database may get into trouble. Luckily, whenever there is a problem detected, Photos will auto launch its Repair Library tool to fix the issue.
But before the repair, you are always recommended to backup the photo library first. And you may need to wait a few minutes or several hours for Photos to fix.
- Quit Photos app if it’s launched.
- Press Option + Command while you re-open Photos.
- In the pop-up Repair Library dialog, click on Repair to fix the problematic photos library.
![Recover Lost Photos via Repair Library]()
- Wait for the Repair process to finish, then your Photos Library will be opened automatically and now you can check your missing photos.
![recover photo library]()

The process might stop syncing photos with iCloud. So it’d better to verify it by navigating to Photos > Preferences > iCloud once the process is finished.
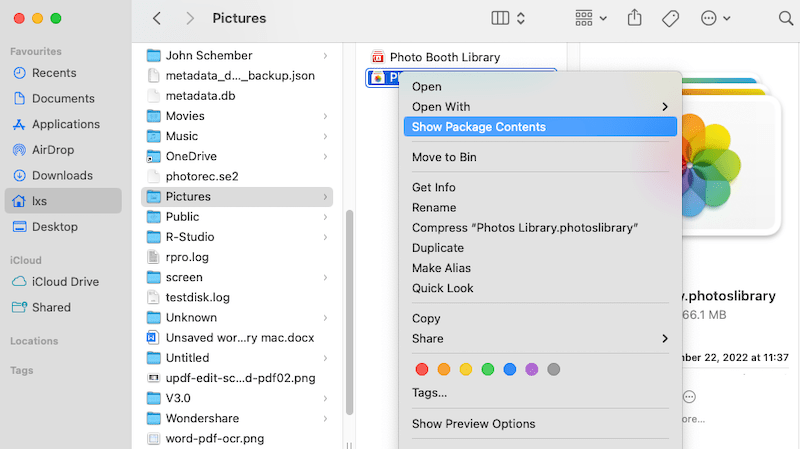
#3 Manually Import Photo Library
Repairing library did not bring the photos back? Here is an alternative to rebuild your photo library by manually importing the photos from a library copy. For example, we may have a photo library that is created in iPhoto app, but won’t load in Photos app. Then manually re-import of the library may work.
- Open Finder app, go to Home > Pictures.
- Right click on Photos Library.photoslibrary and choose Show Package Contents.
![import library 01]()
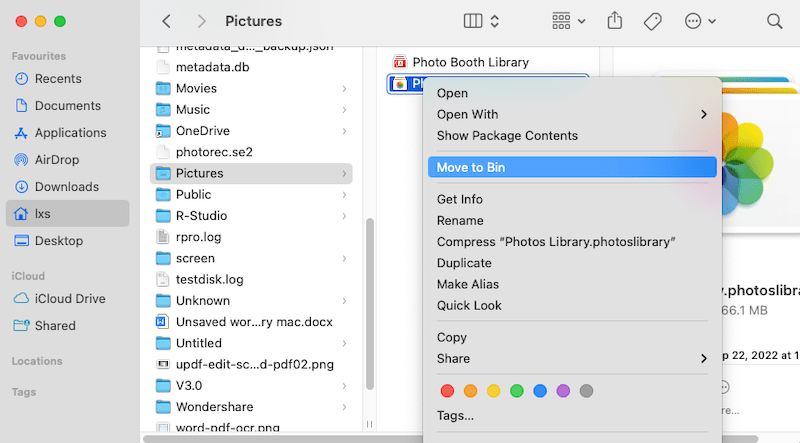
- Then check if the original folder is empty or not.
![import library 02]()
- If empty, delete the entire photo library by Move to Bin.
![import library 03]()
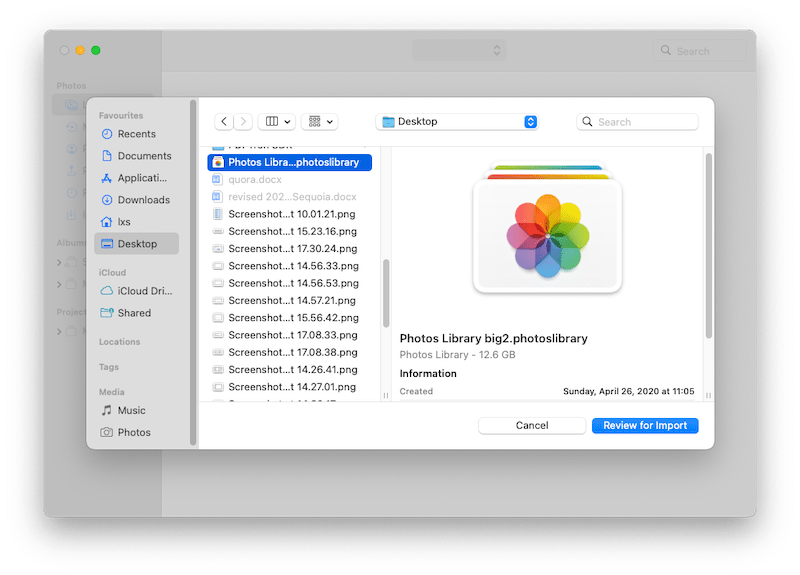
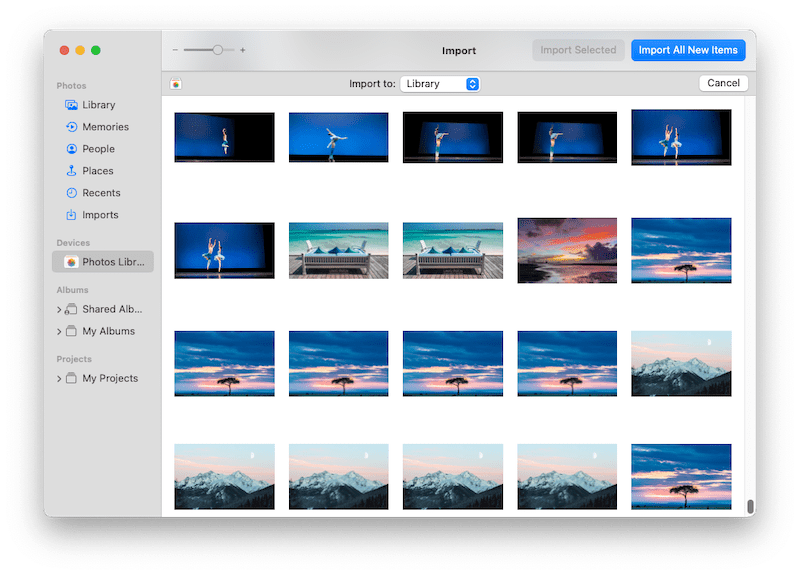
- Then open Photos app, click File > Import.
![import library 04]()
- Navigate to a working photo library that you can open and view photos, click Review for Import.
![import library 05]()
- Then the photos will be loaded and appear.
![import library 06]()


#4 Photos Missing from Mac? Find Original!
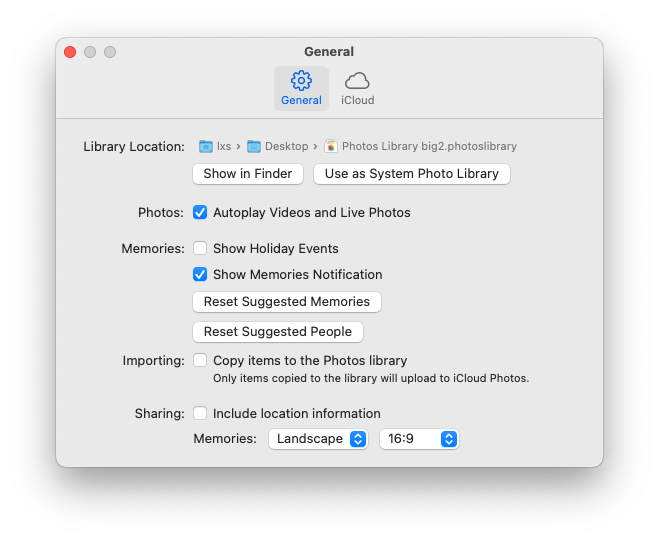
All your photos are stored on an external hard drive? You may have viewed the photos in Photos app, but did not get a correct setting for this app, like you leave “Copy items to the Photos library” unchecked, so next time you want to check the photos again in iCloud Photos, they became “missing”. In this case, you need to restore these missing photos by Consolidate.
- Launch Photos app, go to Preferences > General, check the box before Copy items to the Photos library.
![find original 01]()
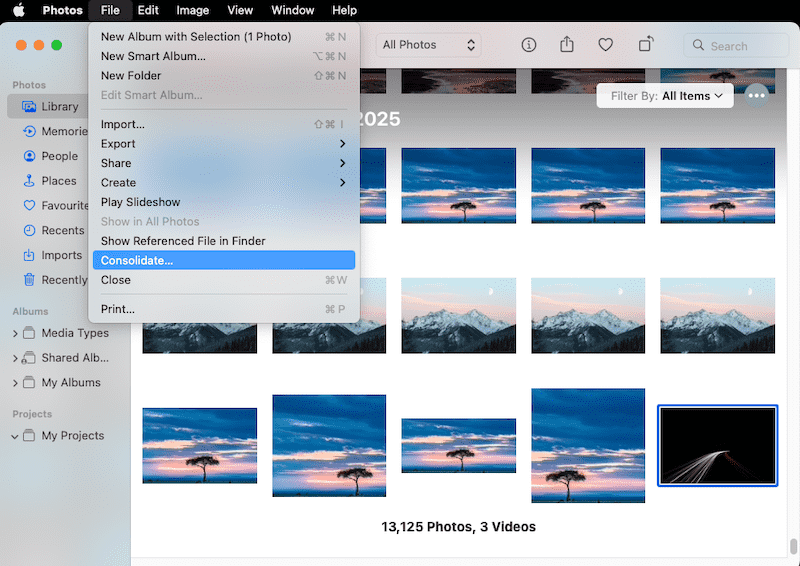
- In Photos app, click on one of the “missing” photos that you cannot find in iCloud photos.
- Then go to File > Consolidate.
![find original 02]()
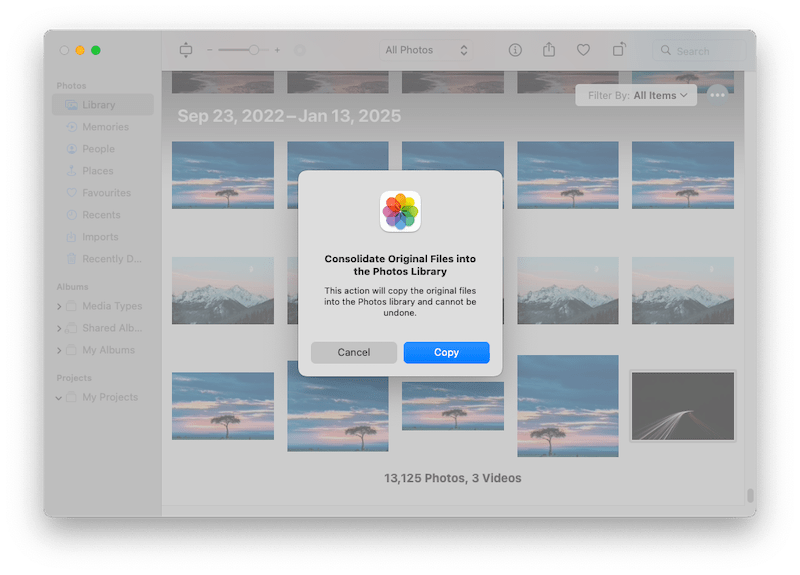
- Click Copy, the Photo will be moved to your photo library and upload to iCloud, you can access anywhere, anytime.
![find original 03]()
#5 Sign out and in iCloud
Upgrading macOS to the latest version won’t sign you out from iCoud account, but sometime it happens, especially when Apple makes changes to its iCloud terms and require you to agree, or your keychain may temporarily disconnect during the update, or Apple detects suspicious activities and locks your account for reauthentication. Even when there is a delay of iCloud sync, your photos may seem to be disappeared, you can sign out and sign in again to accelerate they sync up.
- Open System Settings, click Sign in.
- Enter your Apple Account and click Continue.
- Enter password and click Continue.
- If you’ve signed in, click Sign Out in System Settings first, then sign in again.
- Then open Photos app, go to Preferences.
- Go to iCloud tab and check iCloud Photos. Then check if the photos appear or not.
![icloud sync]()
#6 Unhide Hidden Photos on Mac
Mac photo seems to be missing if it has been hidden by mistake, so that you can only see it in your Hidden album. Suppose you use iCloud Photos, photos that you hide on one device will be hidden on other devices as well. To revert photos disappeared from Mac, here are the steps to unhide your hidden pictures.
- Launch Photos app, go to View > Show Hidden Photo Album.
![show hidden photo album 01]()
- The Hidden album will appear in the left sidebar. Choose it, find and right click the disappeared pictures on your Mac, select Unhide to recover them.
![show hidden photo album 02]()


#7 Repair Disk Using Disk Utility
Another approach to fix Photos Library errors is making use of Disk Utility on Mac. When you see messages like “a volume is not working properly”, “Photos program shuts unexpectedly” pop up on Mac, try this method to recover Mac disappeared photos within several steps.
- Open Finder > Applications > Utilities > Disk Utility.
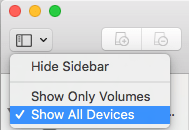
- Click on View > Show All Devices.
![repair using disk utility 01]()
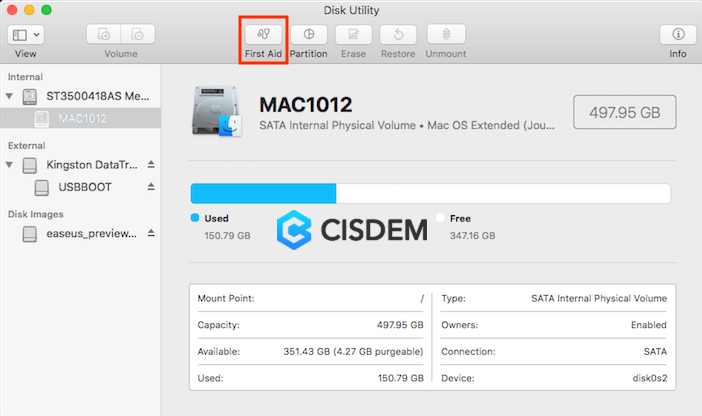
- Select the internal disk that stores your photo library.
- Click on First Aid.
![repair using disk utility 02]()
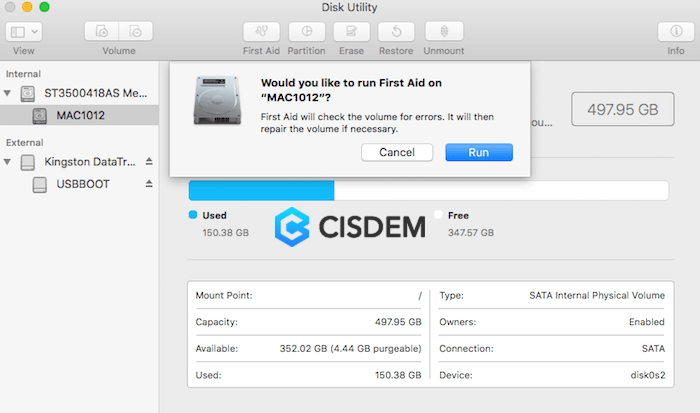
- A confirmation window will pop up. Choose Run to start the repairing process.
![repair using disk utility 03]()
After the First Aid process done, head to check if your Mac disappeared photos show up again. If not, proceed to other solutions.
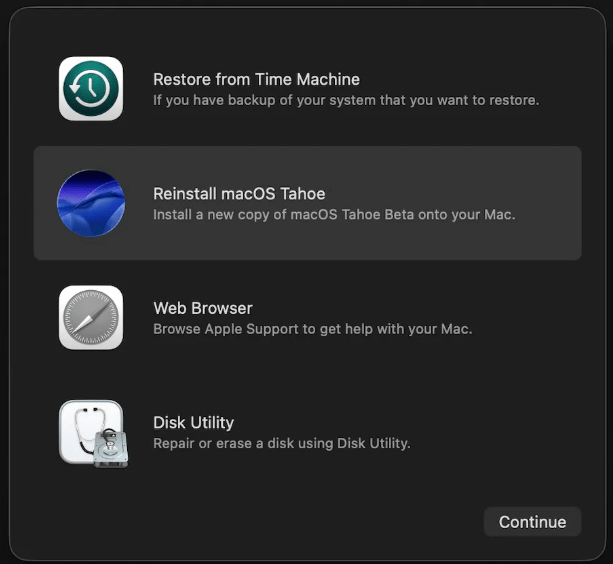
#8 Reinstall macOS
Glitches in a beta macOS or an interrupted macOS update may cause disappeared photos on your Mac, and an reinstallation may solve the issue.
- Back up your files with Time Machine to an external hard drive first.
- Then start up your Mac from macOS Recovery with this Apple guide.
- Choose Reinstall macOS Sequoia. And click Continue.
![reinstall macos]()
- When the re-installation is complete, your Mac will start up automatically. Follow the steps to finish the setup.
- Then open the Photos app and check if the photos are back.
How to Recover Photos Disappeared from Mac?
Tried all the fixes above and your photos are still missing? Then you can use following methods to recover the disappeared photos.
#1 The Quickest Way: Recover with Cisdem
The fastest and most straightforward way to recover lost or disappeared photos on Mac after update is using a piece of data recovery tool, which saves your time and even brings some valuable data back to your MacBook Pro or Air.
Cisdem Data Recovery for Mac - the best method for recovering lost images, videos, songs, etc. from both the internal Mac hard drive and external storage devices. It supports an extensive number of formats and drive types.
If your pictures are missing after upgrade, in the absence of a Time Machine backup, you can recover them using this software. Better yet, after scanning, Cisdem will detect and repair the corrupted photos by default. If you have a iCloud backup, Cisdem supports recovering disappeared photos from iCloud too.
In my testing, Cisdem took about 20 minutes to completely scan my drive (239GB used on 300GB SSD drive), and found me back 727.25GB lost data, including 3,652,000 photos.
- Install the program.
Download and install the free trial of Cisdem Photo Recovery on your Mac, and then run it.
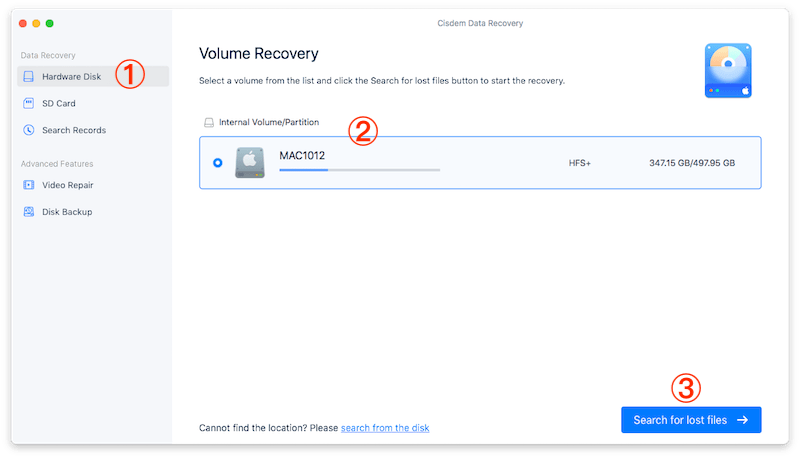
Free Download macOS 10.15 or later - Choose the location for lost or disappeared photos.
Go to Hardware Disk, choose the location where stored the lost photos on your Mac.![choose a mode]()
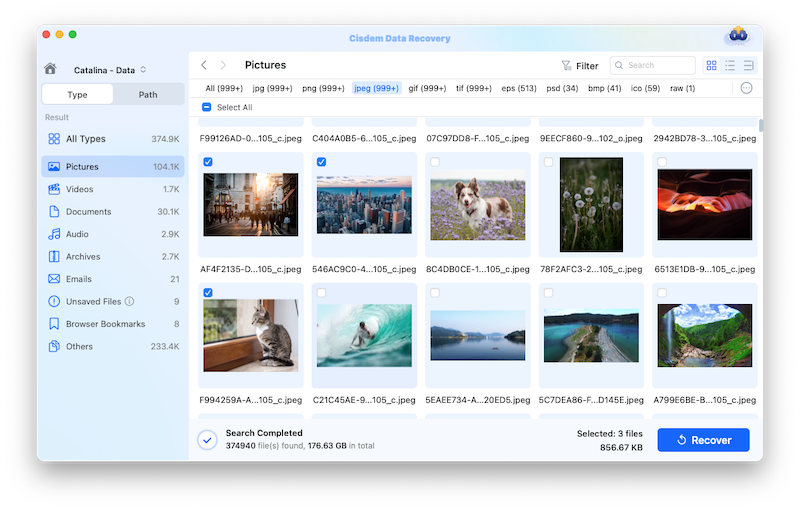
- Scan and find the disappeared photos.
Click Search for lost files button to start scanning the hard drive, go to Type > Pictures and check the photos of different formats.![choose a disk]()
- Preview and recover disappeared photos on Mac.
Double click on the photos to preview, select the photos and click on Recover to get them back.![found files]()

tips: if you have a iCloud backup for the disappeared photos, you can use Cisdem’s iCloud Recovery mode to get the photos back to your Mac:

#2 Recover Lost Photos after Mac Update from Recently Deleted
Don’t forget to have a look at the "Recently Deleted" album in Photos app, you may have deleted the photos by mistake.
- Open Photos app.
- Click the Recently Deleted tab from the left side.
- Choose the thumbnails of your lost photos.
- Click on the Recover button on the upper-right corner to restore missing files after Mac update.
![recover recently deleted]()

Matters need attention:
- The photo items in the “Recently Deleted” album only give you 30-day grace period before getting rid of them to the ground.
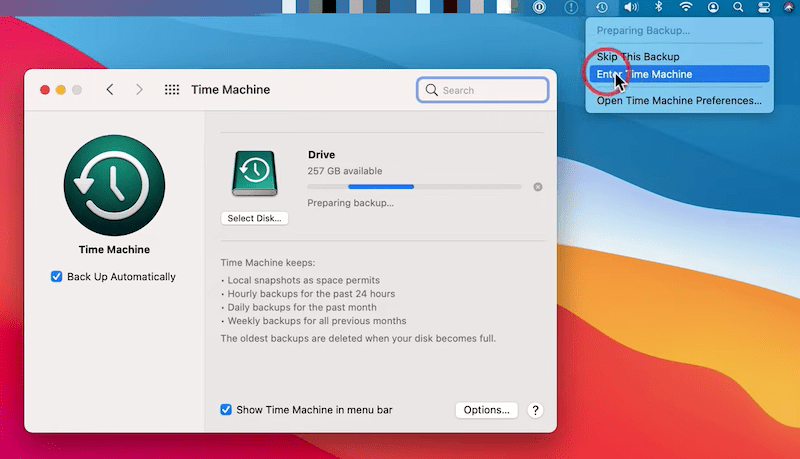
#3 Restore Photos after Mac Update with Time Machine Backup
If you have enabled and set up the Time Machine backup, now take a crack at Time Machine restore.
- If the Photos is open, Quit it.
- Connect Time Machine backup drive to your Mac.
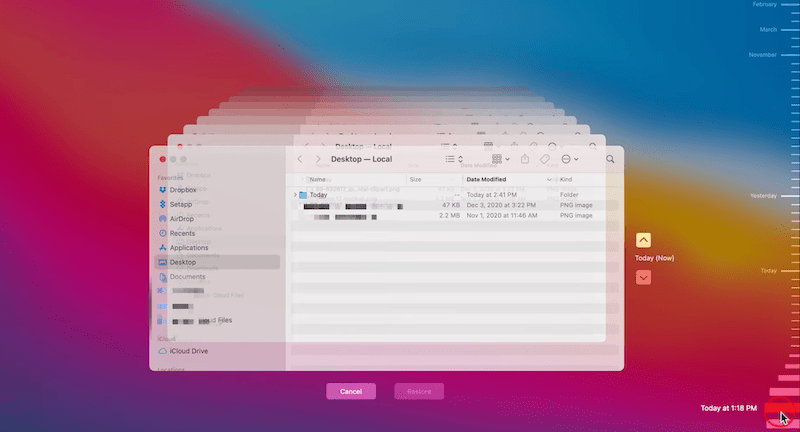
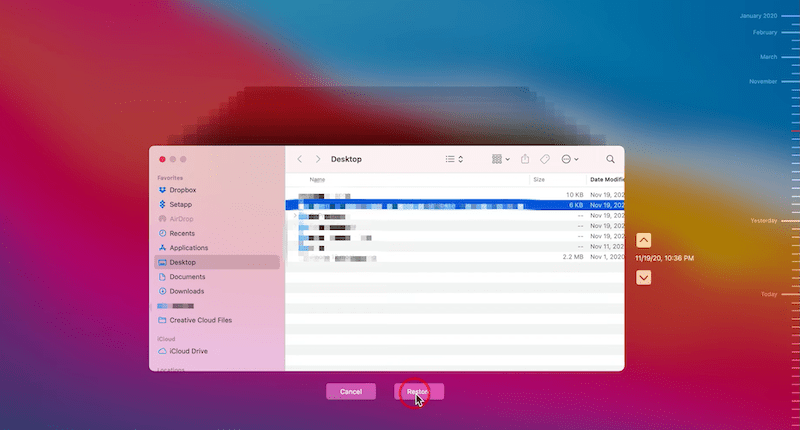
- From Apple menu bar, click on Time Machine icon and Enter Time Machine.
![recover photos from tm01]()
- Time Machine will show you all available backups. Click the date of your last backup and select the lost photos that you want to restore. You can also press the space bar to preview the photos.
![recover photos from tm02]()
- Click the Restore button to get the disappeared photos back to your Mac.
![recover photos from tm03]()
#4 Retrieve Photos Disappeared from Mac with iCloud Backup
In the case that you don’t have a Time Machine backup but enabled iCloud backup, go check your iCloud account and find if the photos are still up there in the cloud, because there is a chance that you’ve disabled the iCloud update on Mac before the photos went lost from Mac.
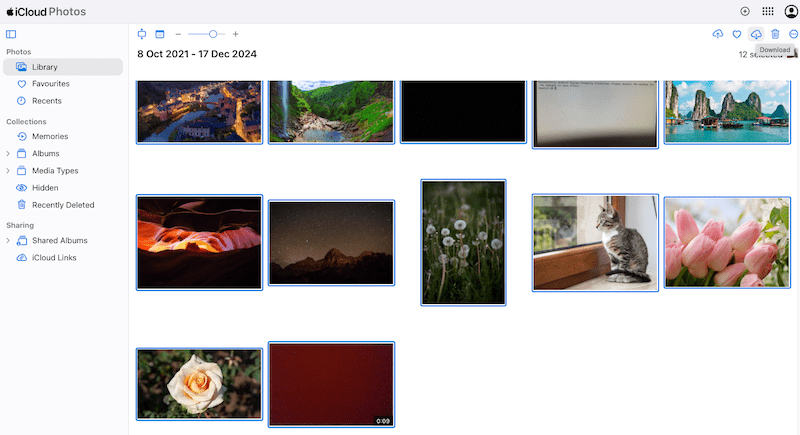
- Visit iCloud.com in your browser, log in.
- Go to Library > Photos, select the photos that you want to recover to your Mac.
- Then click on the Download icon to transfer to the photos to your Mac.
![recover from icloud backup01]()
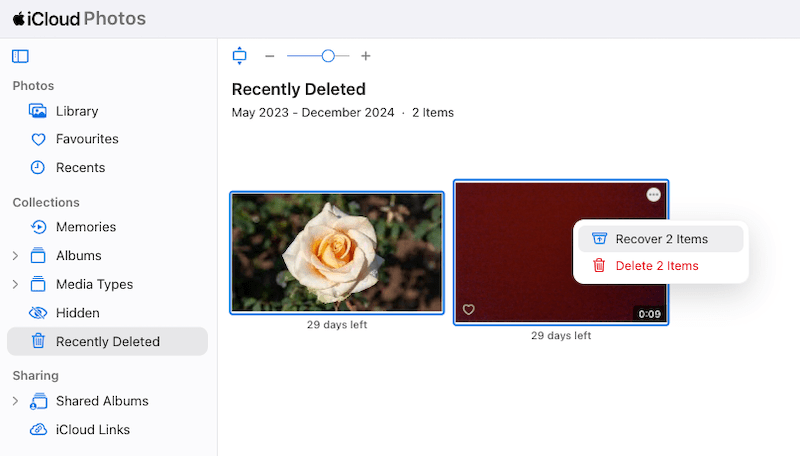
- If you cannot find a photo, go checking the Recently Deleted folder and put it back if available.
![recover from icloud backup02]()
#5 Retrieve Photos Disappeared from Mac with iPhone Backup
Backed up the disappeared photos in a previous iPhone backup? You can revert your iPhone to a previous version first, and upload the photos to iCloud. Then enable iCloud sync across your devices, and the disappeared photos will appear on your Mac.
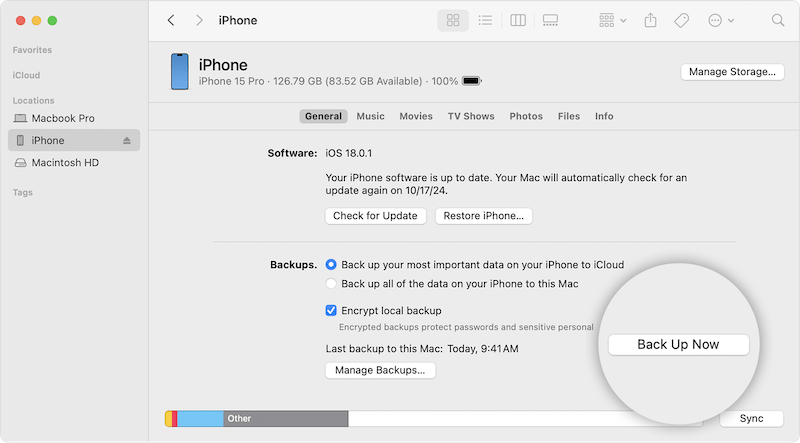
- Connect your iPhone to the Mac via USB.
- Open Finder, select your iPhone and click Back Up Now to create a copy for your current iPhone files, so you can easily restore to the latest version later.
![iphone backup01]()
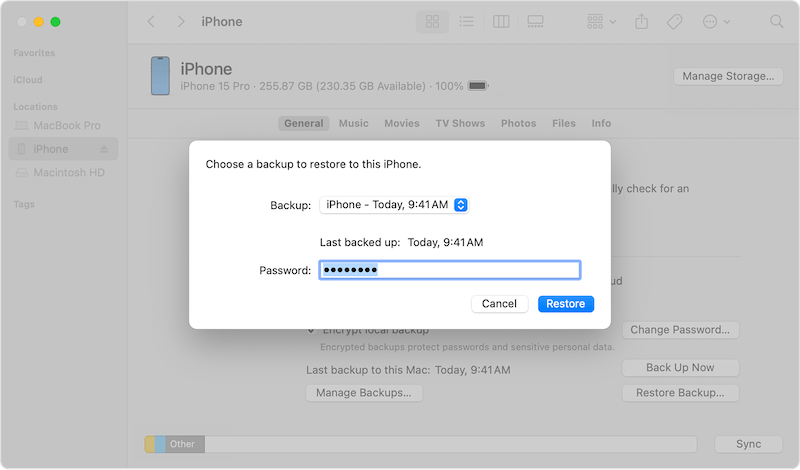
- Then click on Restore iPhone and choose the backup that has the copies of the disappeared photos. Click Restore.
![iphone backup 02]()
- On your iPhone, go to Settings > Apple ID > iCloud > Photos, toggle off iCloud photos sync.
- Then log into iCloud.com in a web browser on your iPhone, upload the copies of the disappeared photos from your iPhone to your iCloud account.
- Turn on iCloud sync (System Settings > Apple ID > iCloud > Photos) on your Mac, and the photos will appear on your Mac.
- Lastly, you can restore your iPhone to its latest version using the backup you created in step 2 in Finder.
FAQs about Photos Disappeared from Mac
1. Where has photo library gone?
The system photo library is located at Home > Pictures as follows: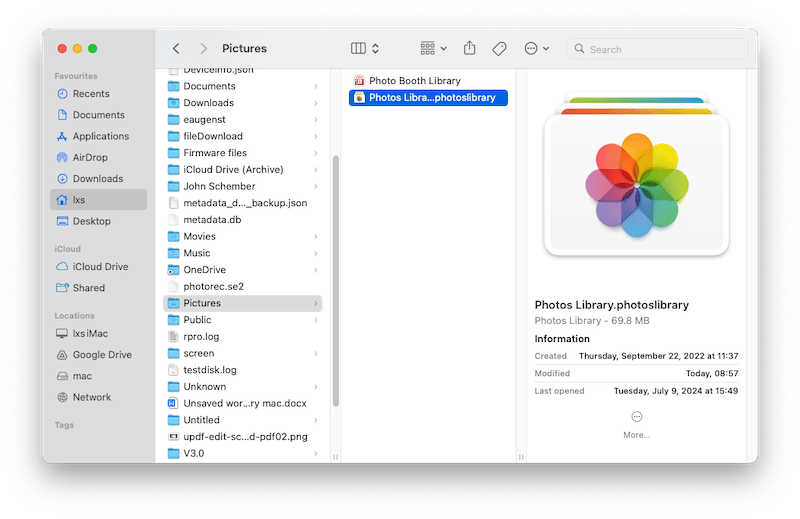
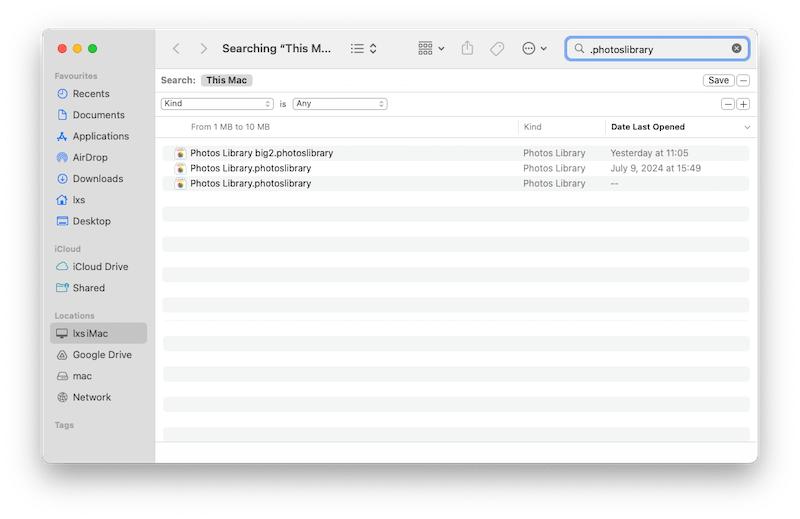
But if you have multiple photo libraries on your Mac, you can use the Spotlight tool to search the photo library with file extension .photoslibrary:
2. Does macOS update delete photos?
No, actually macOS update won’t delete any photos stored on your Mac. If photo lost does happen after an update, it could be caused by some unexpected factors during the update process, such as power outage, malware or virus infection, data overwritten due to insufficient space, conflict between apps and the updated macOS system, etc.
3. Photos not updating on Mac? Why and how to fix?
This can be caused by several reasons as follows:
- Discontinued or unstable Wi-Fi/Internet connection on your Mac and other devices.
- Sign into different iCloud account.
- System glitches.
- Use the wrong library as system photo library.
And the 4th reason is often the main reason why this happens.
To fix this, you need to:
- Make sure your Mac and other devices are using a stable the Wi-Fi/Internet connection first.
- Sign in to the same iCloud account which stores your photos.
- Restart Photos or Mac, then check. If the issue persist, update your macOS to the latest version.
- Restart Photos app, go to Preferences from Apple menu bar, then choose General, click on current photo library and select the wanted one to use as your system photo library.
4. How to find photos on Mac hard drive?
There are 2 ways to find photos on your Mac hard drive.
First, open Photos app, go to File > Import, load the photos into Photos app, then you can view and organize the photos in the app. In Photos app, there is a search box on the top of right side, enter keyword. Or find the photos via the drop-down menu by Years, Months, Days.
Also, go to the drive where stores the photos, press Command + F to find photos via name, image type, created date, etc.
Summary
Whenever photos disappeared from Mac, especially after macOS update, there is a reason. Just stay calm, and follow the 8 fixes above to make the lost photos appear again. If none of the fixes works in your case, there are 5 ways to recover the disappeared photos, and the most helpful and all-in-one solution I think is to install Cisdem Data Recovery.
Also, it is necessary to back up the entire Mac drive before upgrading to new Tahoe, Sequoia, or other versions. You can back up them to multiple storage devices via Time Machine or using cloud service.

Connie Yu has been a columnist in the field of data recovery since 2011. She studied a lot of data loss situations and tested repeatedly to find a feasible solution tailored for each case. And her solutions are always updated to fix problems from the newest systems, devices and apps.

JK Tam is the lead developer at Cisdem, bringing over two decades of hands-on experience in cross-platform software development to the editorial team. He is now the lead technical approver for all articles related to Data Recovery and DVD Burner.
Joyce R. Sloan
The tip that’s saved me in the guide is: holding Option (⌥) + Command (⌘) while launching Photos to trigger its built-in repair tool. It’s saved me from the headaches! Thanks again for the clear instructions.
William
Thanks Cisdem Data Recovery. I tried nearly all tips to find back my precious photos lost after my macOS up to Monterey, which were taken on my grandma's 75th birthday, but I failed. Cisdem has done it successfully.