

Cisdem Data Recovery User Guide
 8.7K
8.7K
 0
0


Cisdem Data Recovery is a safety software to easy recover the lost data caused by Mac crash, accidently delete, SD card formatted or macOS upgrading. So don’t be panic when you lost data, three steps with Cisdem Data Recovery help you to bring it back. To facilitate your use of Cisdem Data Recovery, there are seven parts for you to get started.
Gettings Started
Download & Install
1. You can download the installation package of Cisdem Data Recovery from the below link.
 Free Download
2. Install Cisdem Data Recovery with the downloaded package.
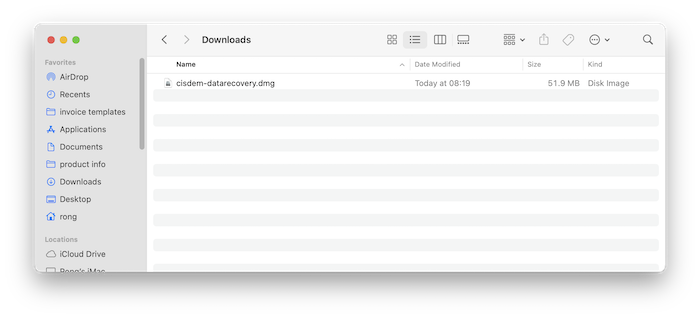
Double-click the .dmg file.
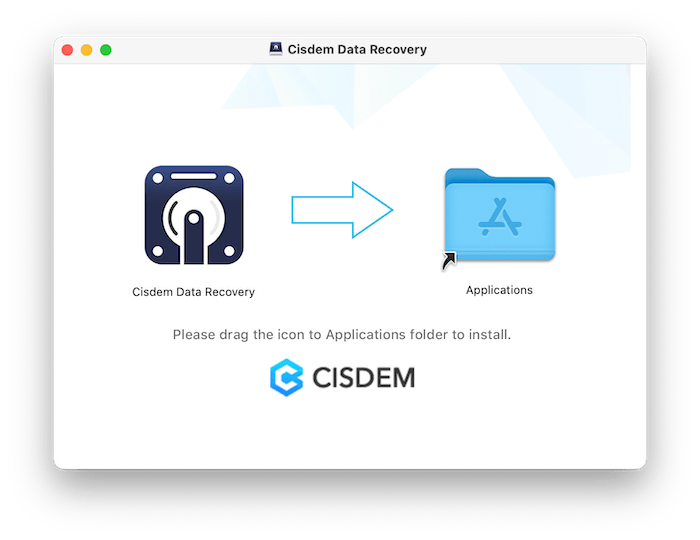
Drag the Cisdem Data Recovery icon to Applications folder.
Activation
After installing the program, you need to activate the program if you want to use the full version features.
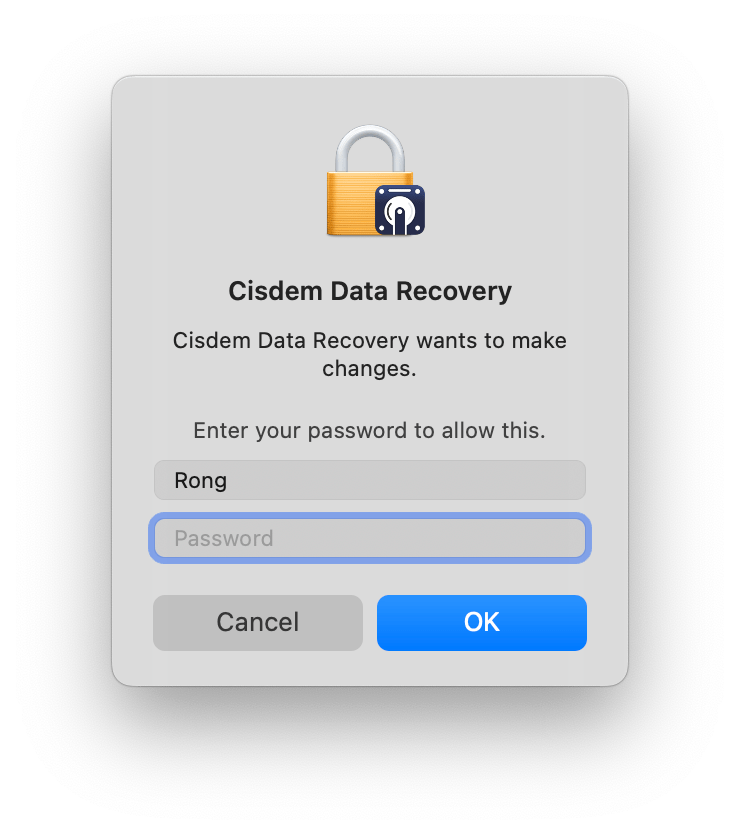
1. Go to Launchpad or Applications folder, double click Cisdem Data Recovery to run the program, and then click the key icon at the right upper corner.
Tips: While you launch Cisdem Data Recovery, a popup will show up as follows, please enter your user account password and click “OK”, then you can access to the program.
2. Copy-n-paste the license code into the popped-up window, click Activate.

Recover Lost Files
To recover the lost files, it is quit easy to follow the below three steps.
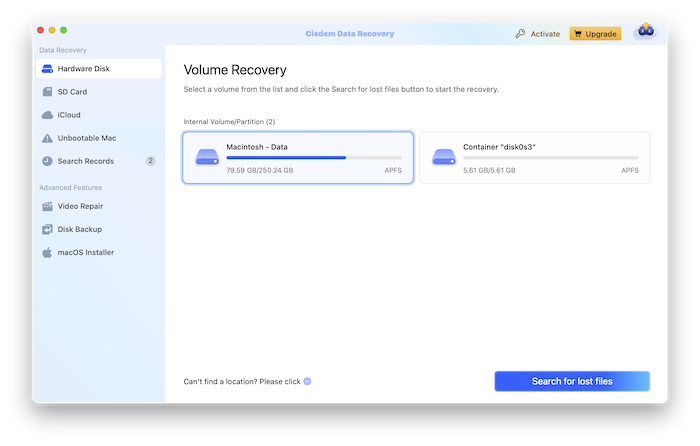
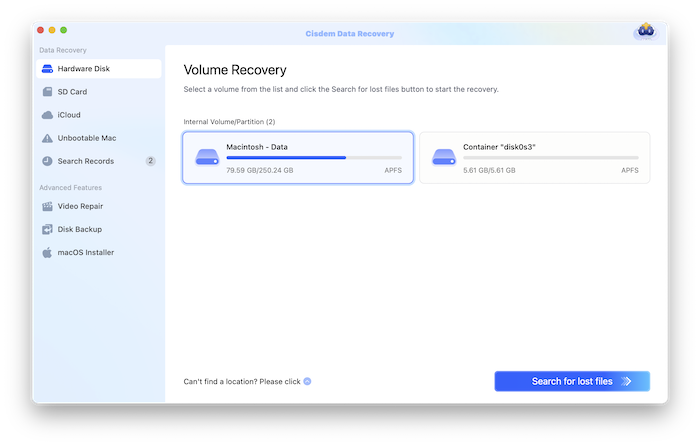
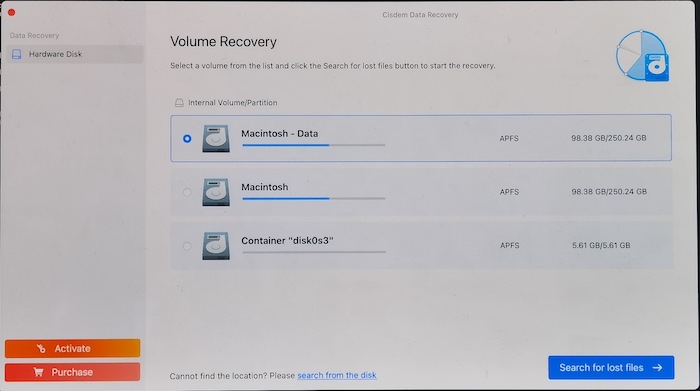
Step 1 Locate
Specify the location where your files are deleted/lost and click Search for lost files. Cannot locate the lost files? Click here to get a help.
Tips:
1. If you've lost the files from a hard drive, then click "Hardware Disc" to select a hard drive to start scanning, if you've lost files from an SD card, then click "SD Card" to select your SD Card to start scanning.
2. If you've lost files from your Internal hard drive, before data recovery, you'd better click "Disk Backup" from the left sidebar to create a backup of your Mac to avoid further data loss. After backing up, the software can recover data from the Mac backup, and your computer can wirte new data again.
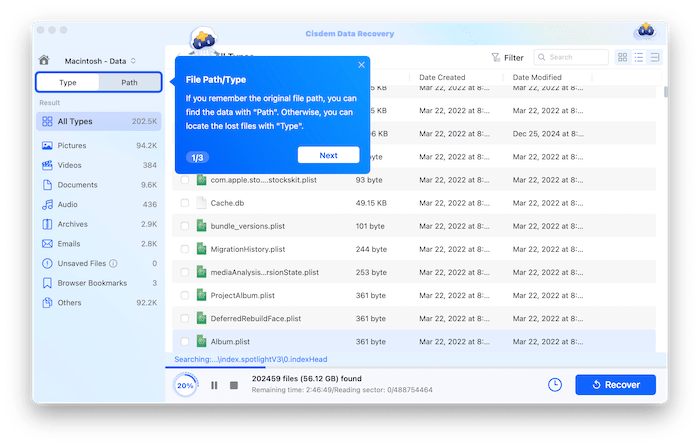
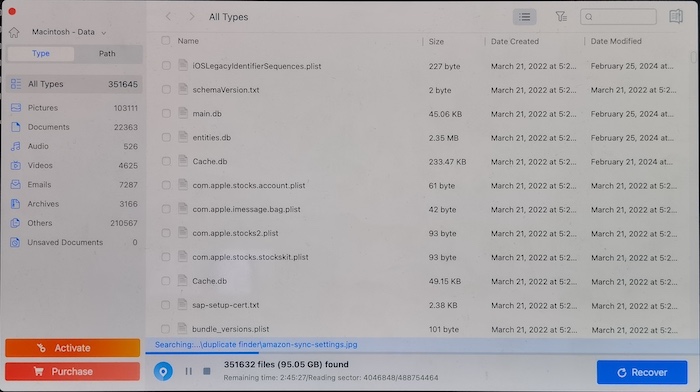
Step 2 Scan
Cisdem will run both quick scanning and deep scanning to detect every sector on your hard drive, and displays the number of found files on the left panel.
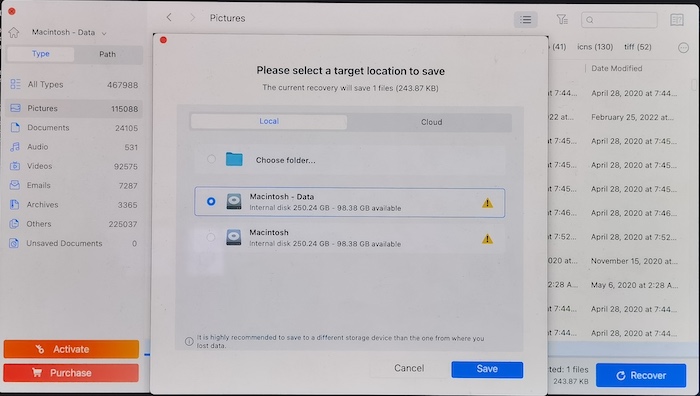
Step 3 Recover
When the scan completes, locate and preview the lost files, then select/check the exact files and recover them to your local drive or Cloud drive.

Tips:
1. To avoid overwritten, please do not save the recovered data on the hard disk where you lost your data. For example, if you scanned Internal Disk 1, please select Internal Disk 2 or an External Disk to save the recovered data.
2. If you cannot find the lost files, or you found it but it cannot be open after recovered, you still have a chance to get your lost data by RAW recovery.
3. If the recovered video files are corrupted and cannot be opened, we suggest you to try the video repair function to repair the video.
Recover Chrome bookmarks
Before recovering the Chrome bookmarks, you should clear that Chrome bookmarks are saved in the files "Bookmarks" . And then you need to use Cisdem Data Recovery to scan your hard drive and recover that file.
Step 1 Scan your Internal hard drive with Cisdem Data Recovery.
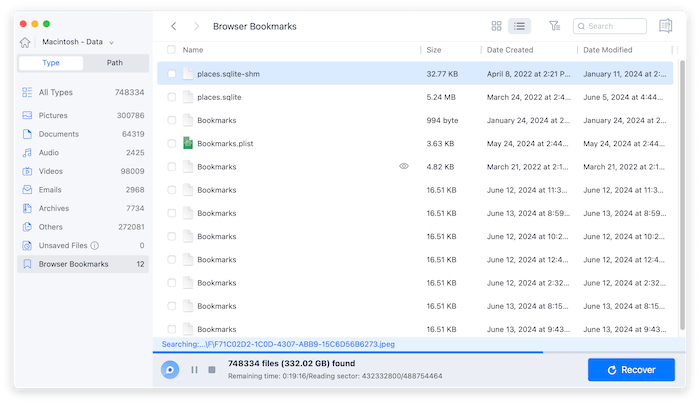
Step 2 After the scan completes, navigate to Type> Browser Bookmarks, select the "Bookmarks" file and recover it.
Tips: Please don't recover the file to your Internal hard drive to avoid overwritenning the lost data.
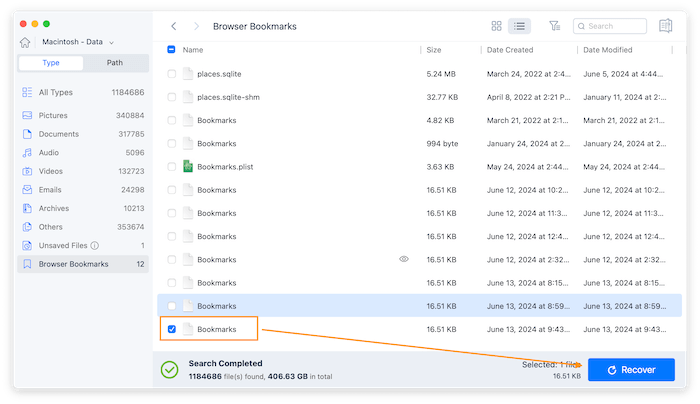
Step 3 Put the recovered "Bookmarks" file back to the Chrome bookmark path.
If you don't know where the Chrome bookmark path is, you can open a new tab on Chrome, type chrome://version/ in the search bar, press "Enter/Return" on your keyboard, you can then find Chrome bookmark path next to Profile Path.

Copy the path, launch Finder, click Go> Go to Folder on the top menu bar, paste the path into the search bar, press "Enter/Return", it will bring you to Chrome bookmarks path in Finder.
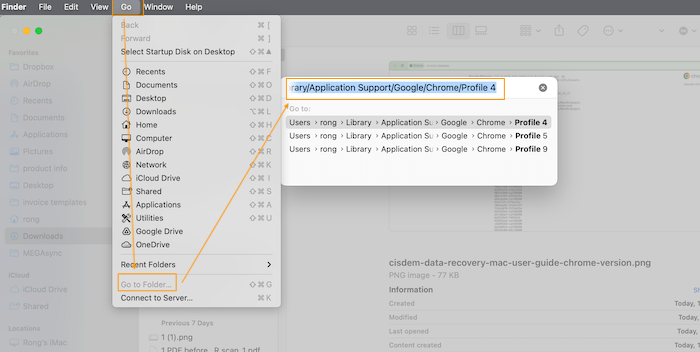
Move the recovered bookmarks file into this path.

After that, launch Chrome on your Mac to see if you can see your lost bookmarks.
With the same method, you can also recover the bookmarks on Safari and Firefox.
For Safari, you need to recover the file Bookmarks.plist, and move it back to the path ~/Library/Safari
For Firefox, you need to recover the files places.sqlite and places.sqlite-wal, and move it back to the path ~/Library/Application Support/Firefox/Profiles/xxxx.default-release
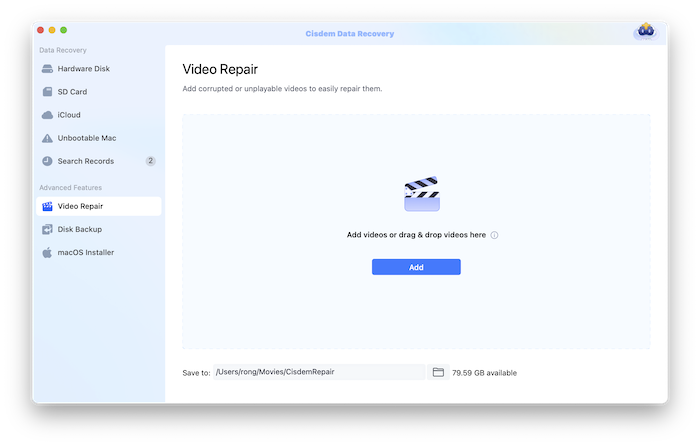
Repair Corrupted Video Files
Like losing important data, it is also frustrating to find that the important video files are corrupted and cannot be opend. Cisdem Data Recovery also provides the video repair function to help you repair the corrupted video files.
Step 1 Select Video Repair on the left panel, click  or directly drag and drop the corrupted video files into the program.
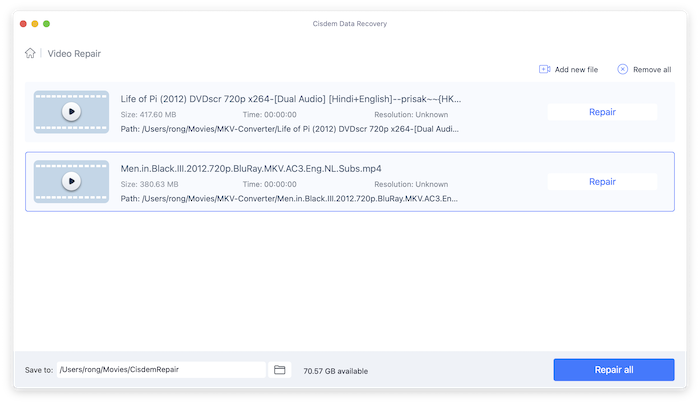
Step 2 Click  after the target video file or directly click
  to start the repairing process.
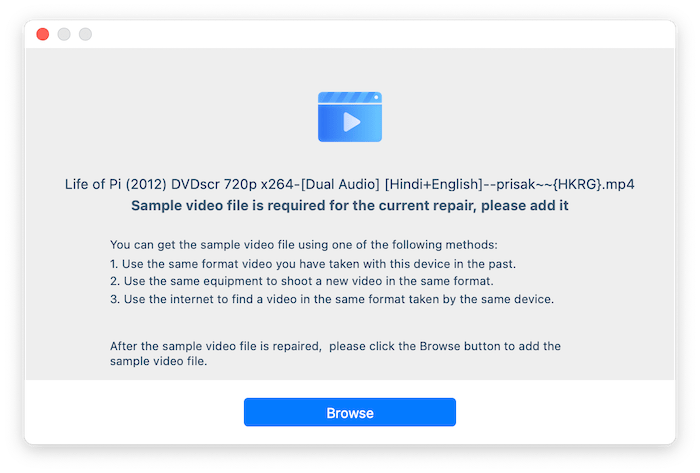
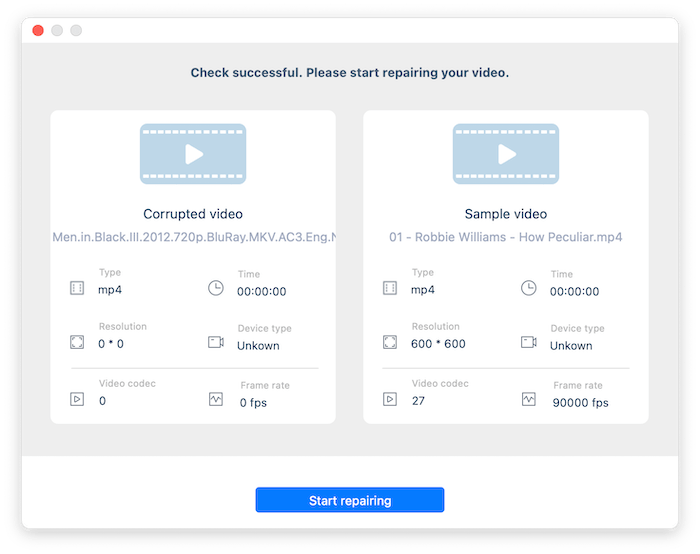
Step 3 (Optional) After clicking the Repair/Repair all button, a window may pop up to ask you to add a sample file to help repair the video files, just click  to add the sample file as requested.
Step 4 Start repairing after adding the sample file as requested.
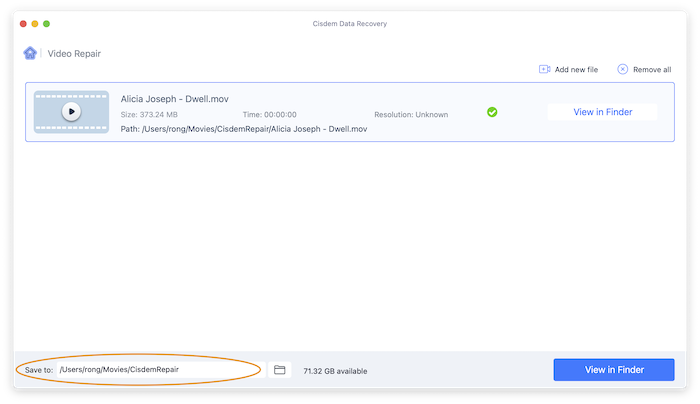
Step 5 Click  or go to the save location to view the repaired video file when the repairing process is done.
Find Lost Files Faster
In order to increase the probability of recovering lost files, the program will list every possible file. So there might be a huge amount of files listed after the scan. If you fail to find the lost files, please try again with the following methods and you might get a wonderful result.
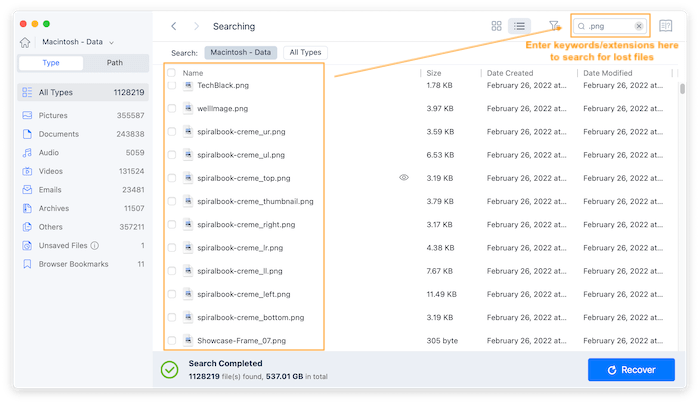
1. Search box
After the scan completes, Cisdem will list all the files in the result page, you can see a search box at the right corner of the interface. You can search the lost files by KEY WORDS, FILE EXTENSIONS or any customization search combinations.
Cisdem will list all the found files that meet the search criterial, you can then check those files and locate your lost files.
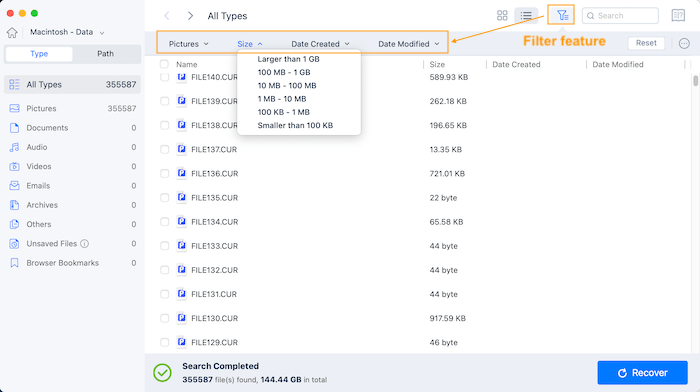
2. Filter feature
The filter feature is also a good tool to help you search lost files by type, size and date.
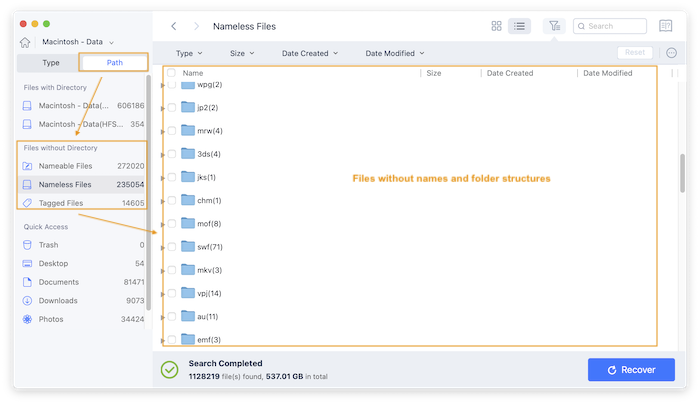
3. Raw files
Generally, file storage is made up of the file directory information (contains the file name, establish time, the storage place of data content, etc.) and the specific data content. The two parts are saved on different areas on the disk/drive/partition.
If both parts of the file are intact after lost, Cisdem will recovery the file with its original information. But sometimes the file directory information might have been damaged. The only way to recover the lost files is from the file content area directly. However, all the found files will be renamed and included in the folders named “Nameless Files” and "Tagged Files".
4. List file in different categories
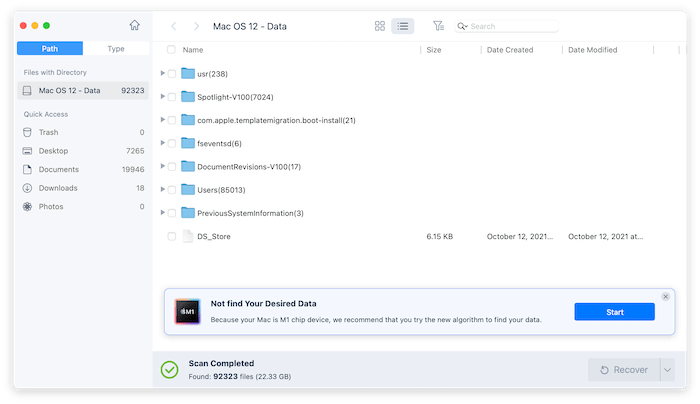
If you remember the original path of the lost files, you can find the data under "Path". Otherwise, you can find the data under "Type", if you have one specific file type to recover.

Recover Data on Apple Silicon Macs
You can scan the below QR code to view this section on your mobile device, which is convenient for you to operate on your Apple Silicion Mac.

M1 chip structures so different from the Intel chip, an M1 chip has far higher security than the Intel chip. So when you use Cisdem Data Recovery to recover files from a Mac with M1 chips, you will receive a message like below
To resolve this issue, you will need to go to the Recovery environment to reduce the security and then enable system extensions by Cisdem. Below is a step-by-step guide to show you how to do that.
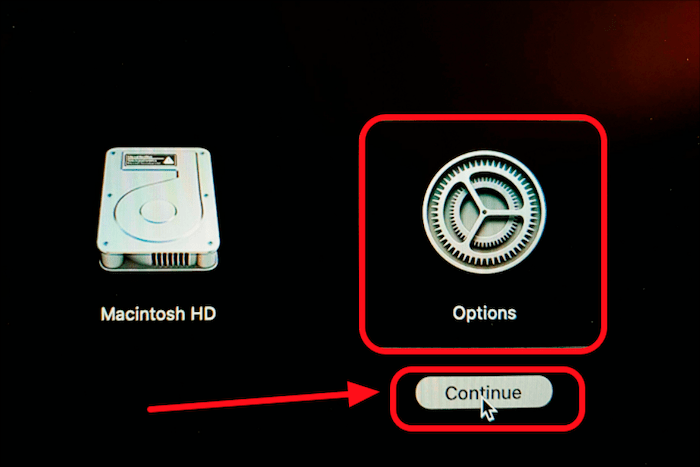
Step 1 Shut down the system, then press and hold Touch ID or Power button until the Options icon appears.
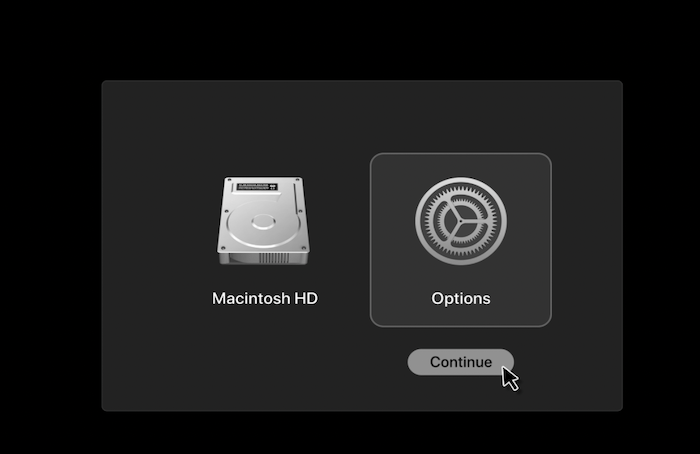
Step 2 Click Continue under the Options icon, then you will be asked to select an admin user and enter your account password, after that you will see the below window.
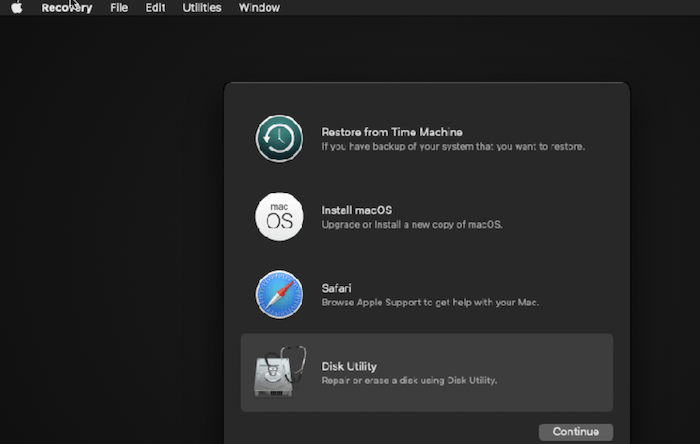
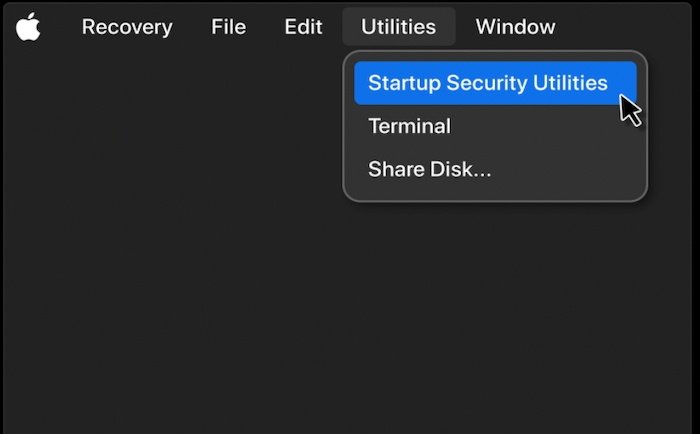
Step 3 Click Utilities on the top menu bar and select Startup Security Utilities.
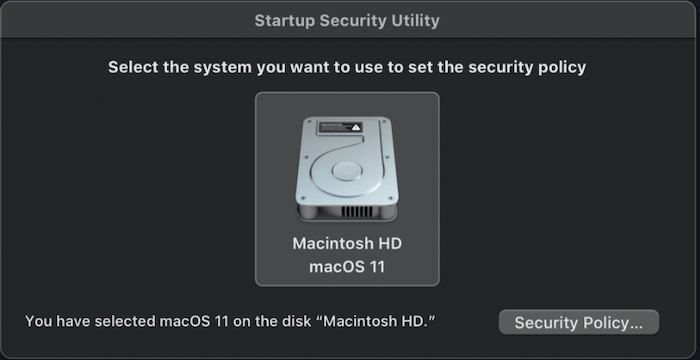
Step 4 Select the hard drive where Cisdem Data Recovery installs (usually it is Macintosh HD) and then click Security Policy button on the right lower corner.
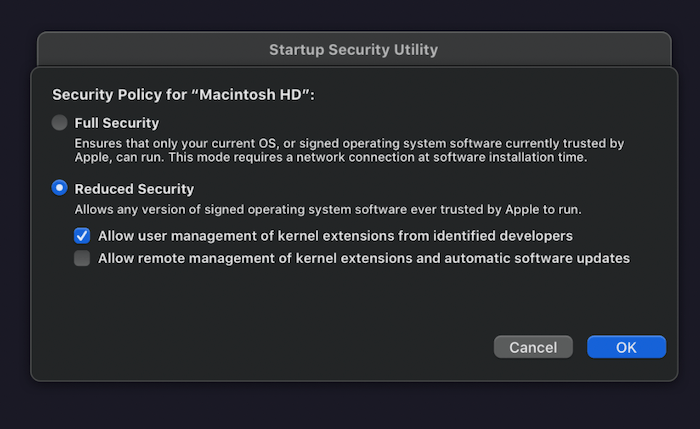
Step 5 In the popped-up window, select Reduced Security and check the sub-option allow user management of kernel extensions from identified developers, click OK to save the settings and then restart your Mac.
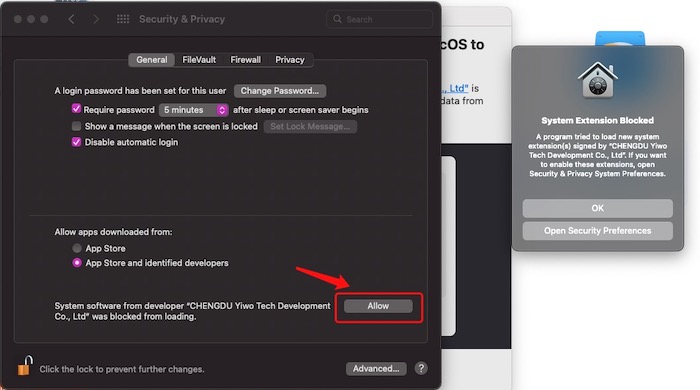
Step 6 After your Mac starts up, run Cisdem Data Recovery, a message will pop up to ask you to go to System Preferences to load system extension of Cisdem Data Recovery.
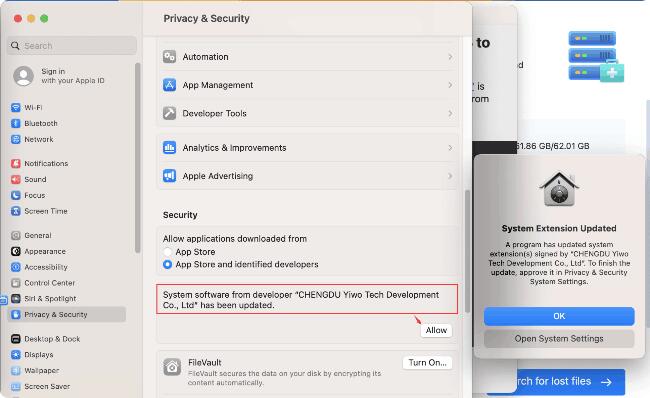
To do so, for macOS 12.0 or before, please go to the System Preferences > Security & Privacy > General, click the lock icon at the left lower corner to unlock it (it may require you to enter the account password to unlock it), then click the Allow button to accept the system extension of Cisdem Data Recovery.
For macOS 13.0 or after, please go to System Preferences > Security & Privacy, click the Allow button to accept the system extension of Cisdem Data Recovery.
At last, you will be asked to restart your Mac again, when your Mac restarts, you will be able to run Cisdem Data Recovery to scan and retrieve the lost files from your Internal hard drive.
Recover Files with RAW recovery
What is RAW recovery?
Cisdem Data Recovery rebuild the lost files in the following 2 methods, and the scan result will separately list under Files with Directory and Files without Directory.
1. Locate the files through File Directory Info
The scan result will list under “Files with Directory”, and the file’s directory info (file name, path and created/modified time) will be included.
2. RAW recovery
The scan result will list under “Files without Directory”, and the file’s directory (file name, path and created/modified time) will be lost and replaced as random numbers.
So if you cannot locate the lost data by searching with the file’s name under Files with Directory, or you found it but cannot open it after recovering, you can then have a try under the Files without Directory.
How to fast locate lost data via RAW recovery?
Since the files found by Raw Recovery comes with a random name, it seems that you have to check all the files one by one to see if your lost data is included, which will cost a huge amount of time to confirm all the listed files. Here we will show you 2 tips to help you fast locate the lost data.
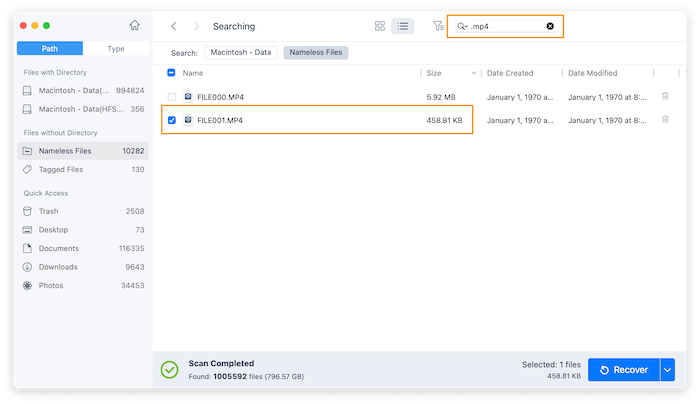
1. Locate the lost data based on the file extension and file size.
Enter the file extension in the search box, and then sort the listing files by size, double click to preview the listing files to locate the target file to recover it.
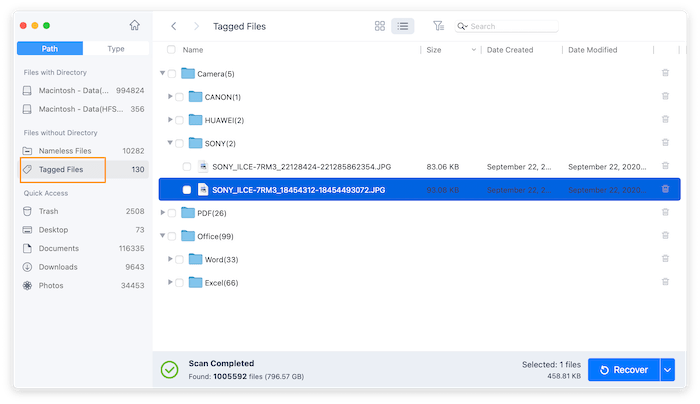
2. Filter the files by tags and locate the lost data.
The files under this tab will be reorganized by file types if there is no file system information can be retrieved. For example, Camera includes the photos and videos, Office includes the word and excel files, etc. And there will be sub-folders if the program detects more information like the device you used to shoot the photos/videos, which will further help you locate the right files you need.
Fix Drive Detection Issues
Usually when you run Cisdem Data Recovery, you can see all the drives listed on the left panel of the main interface, if the target drive is not listed there, you may find a solution here.
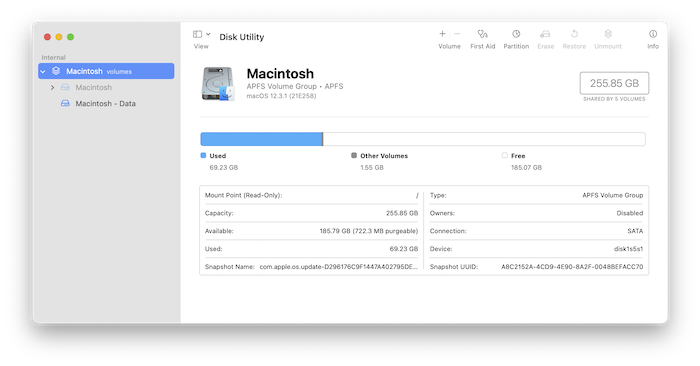
Please go to Applications folder > Utilities folder, find the app Disk Utility, and double click to open it, all the devices will be listed under Disk Utility, please check if the target drive is listed here.
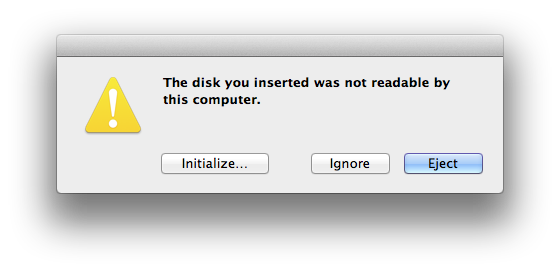
Case 1: The device is "Not Initialized".
Generally, when you connect a "Not Initialized" drive, Mac OS will auto pop-up a window to ask you to Initialize the drive, you can directly click "Initialize" in the pop-up window or go to Disk Utility to initialize the drive, after that, you can run Cisdem Data Recovery for Mac to scan the drive.
Note:
1. The data is still recoverable after you initialize the disk, the Initialization only re-allocate the disk so it can be reformatted.
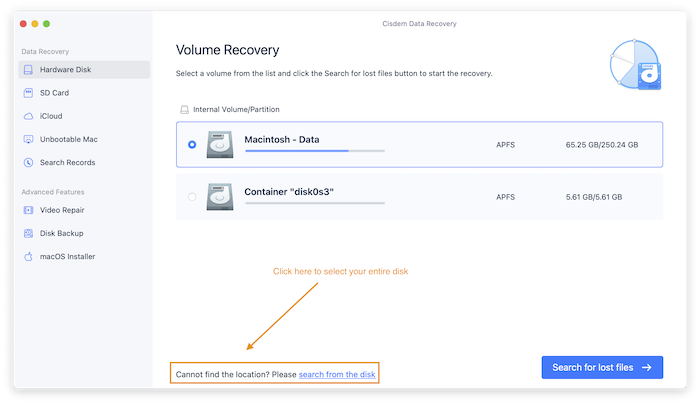
2. Even if you are failed to initialize the disk, you are still able to use Cisdem Data Recovery to scan the disk, just click Ignore and select the entire disc to search for your lost data.
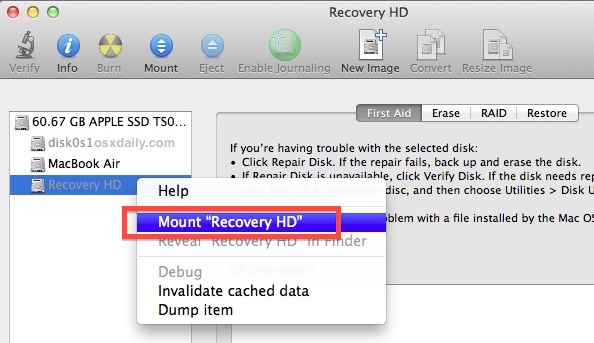
Case 2: The device is "Grey Out".
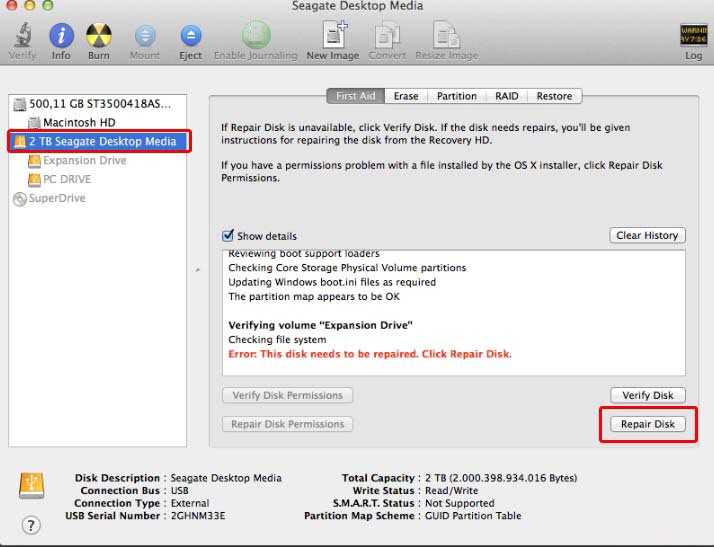
If the device is grey out in Disk Utility, it's probably hidden for some reasons. Right click on this drive and choose "Mount" option to mount the drive, then check if it will be detected.
However, if it does not work, please select the drive and click "Repair Disk" to fix the disk error, then try to run Cisdem Data Recovery again.
Case 3: The issue with the USB Port or USB Cable.
If it is an external device and cannot be detected by Disk Utility at all, please check the connections between the external drive and your Mac to see if the connection is poor or loose.
1. Try to re-plug the external drive to see if it shows up in Disk Utility.
2. Try another USB cable to connect between the external drive and Mac.
3. Try to connect the external drive with another USB port on your Mac.
4. Try to restart your Mac to see if it will show up in Disk Utility.
If the drive still cannot be detected in Disk Utility, please check the power supply. Single USB ports can provide only 5V. In that case, make use of USB cable having one USB connection for the external drive and two for Mac. This will supply the power required by the external hard drive.
Notes:
If none of the methods above works, you probably need to send the drive to manufacturer or local hardware maintenance lab for an overhaul.
Recover Data from a Unbootable Mac
If you encounter the following two scenarios, you can recover the data in MacOS’s Recovery mode without accessing the system.
1. Your can not boot your Mac due to a various of reasons, such as getting stuck while upgrading system, system crashing, getting errors while accessing the system, etc.
2. Your Mac was attached by virus, to ensure the safety of your Mac, you don’t want to access your system to install the program.
Below is a step-by-step guide to show you how to go to the Recovery mode and recover data from your Mac in Recovery mode.
Step 1 Boot the Mac into Recovery mode
For Intel-based Macs:
1. Completely turn off the Mac.
2. Turn it on and immediately press down Command + Option + R keyboard keys together.

3. Hold them until you see a spinning globe on your screen.

For Apple Silicon M1/M2/M3 Macs:
1. Completely turn off the Mac.
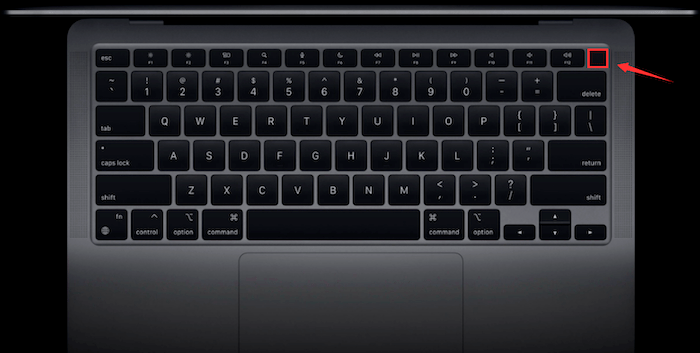
2. Press and hold the power switch(Touch ID) until you see Loading startup options.
3. Click Options and Continue to enter the macOS Recovery mode.
For T2-secured Macs:
1. Completely turn off the Mac.
2. Turn it on and immediately press down Command + Option + Shift + R keyboard keys together.
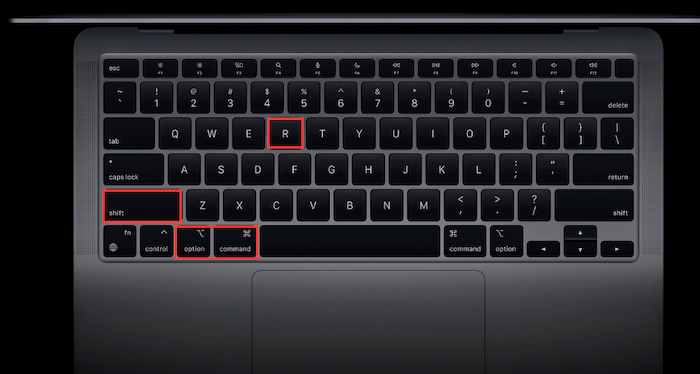
3. Hold them until you see a spinning globe on your screen.
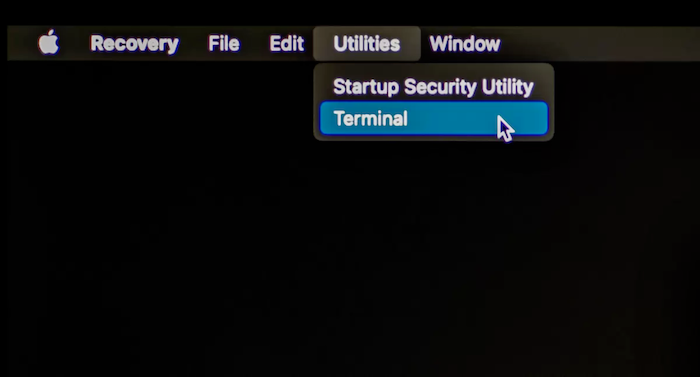
Step 2 Run Cisdem Data Recovery in macOS Recovery mode.
1. Connect your Mac to a Wi-Fi or Ethernet network as Cisdem Data Recovery requires an internet connection for fetching the software from its server.
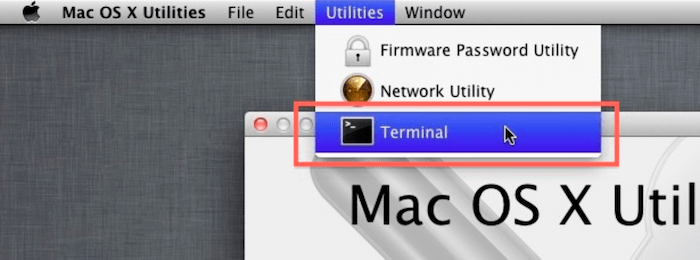
2. Launch Terminal in the Utilities from the top menu bar.
3. Enter the following command and press Return.
sh <(curl https://download.cisdem.com/boot.sh)
Note: There is a space between the sh and <

4. Wait for the application to open automatically (it may take a few minutes).
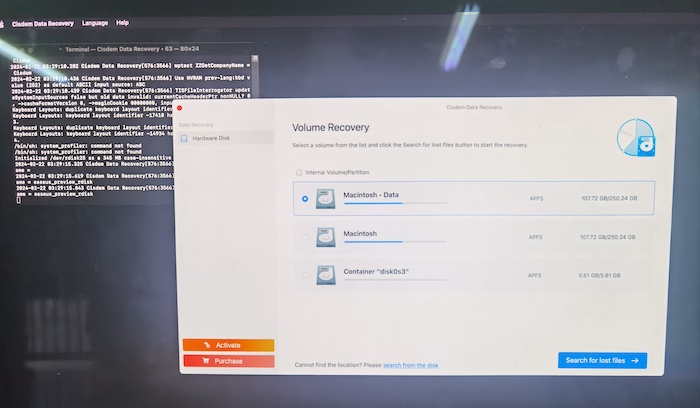
Step 3 Select the hard drive to scan and recover the lost data.
1. Locate the disk
Select the disk where you lost data after updating to macOS Sonoma/Ventura/Monterey/Big Sur. Then, click "Search for lost files".
2. Find lost data after the scan.
Cisdem Data Recovery will scan the selected volume/partition soon and list the files it scanned out on the left panel. Use the file type/path and filters to find wanted data.
3. Recover your lost data.
Click the Recover button and choose a proper location to save the recovered files.
Tips: Due to the limitation of Apple, the file types that are supported for previewing are limited in Recovery mode, so you are suggested to recover all the suspected lost files first and then view them after recovery.
Create A macOS Installer Boot Drive
Cisdem Data Recovery for Mac can help you create macOS Installer so that you can boot your Mac with the macOS Installer and recover files from it.
In some cases, you may need to install macOS on multiple computers, or you cannot install macOS from Finder or macOS Recovery because of a compatibility issue, it will be useful for you to create a macOS installer with Cisdem Data Recovery and save it on a USB flash drive or other secondary volumes. Significantly, it serves as a valuable tool to quickly restore your system when your computer crashes or hard drive fails.
How to create macOS installer boot drive
Step 1 Download/add macOS installer
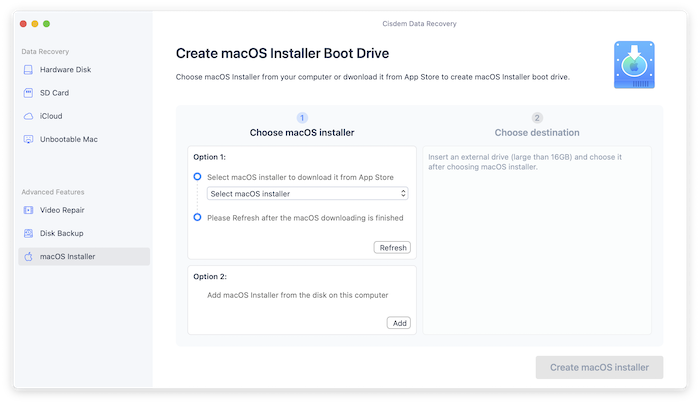
Navigate to macOS Installer on the left side bar, Cisdem will auto detect the available macOS installers on your Mac and list on the right side. If not, there are two options for you.
Option 1: Select a macOS installer and download it from App Store, when the download is complete, click Refresh for the product to detect the downloaded macOS installer.
Option 2: Click Add to load the existing macOS installer from your Mac.
Step 2 Choose the macOS Installer

All the available masOS installer will be listed in a column under Choose macOS installer, you can choose one to create. If you prefer a different one, you can click "Download or choose" to download/add a new one.
Once you've confirmed the selection, proceed to Choose destination and insert a hard drive to burn it onto. A proper disk capacity will be recommended, you can reference it to choose a target disk.
Step 3 Create the macOS installer
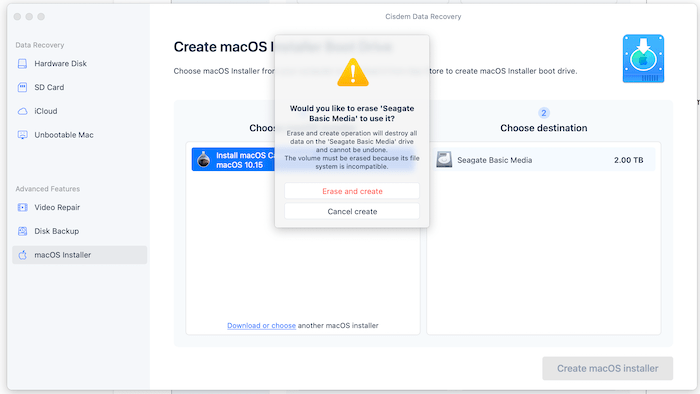
Once you've selected a proper disk, click "Create macOS installer" to start the creation.
Please note that the creation will erase all the data from the destination disk, if you don't want to erase it, you can click "Cancel create" and choose another proper disk.
How to use the macOS installer boot drive?
Once you've created the macOS installer boot drive, you can reference the guide below to know how to use the bootable installer.
As we known, there are two types of Mac chips, Apple Silicon and Intel. And the way how to use the macOS installer boot drive for those two chips are different.
For Mac with Apple Silicon
Step 1 Shut down/turn off the Mac.
Step 2 Connect the bootable installer to the Mac.
1. Make sure the Mac is compatible with the macOS that you're installing. If not, it might start up to a circle with a line through it.
2. Make sure the Internet is accessed to the Mac. You don't need to download the macOS with the macOS installer, but it does need an internet connection to get firmware and other information for this Mac model.
Step 3 Turn on the Mac and continue to hold the power button until you see the startup options window, which shows your bootable volumes, including the bootable installer.
Step 4 Select the bootable installer, then click Continue.
Step 5 When the macOS installer opens, follow the onscreen installation instructions.
For Mac with Intel chip
Step 1 Shut down/turn off the Mac.
Step 2 Connect the bootable installer to the Mac.
1. Make sure the Mac is compatible with the macOS that you're installing. If not, it might start up to a circle with a line through it.
2. Make sure the Internet is accessed to the Mac. You don't need to download the macOS with the macOS installer, but it does need an internet connection to get firmware and other information for this Mac model.
Step 3 Turn on the Mac, then immediately press and hold the Option (Alt) key.
Step 4 Release the Option key when you see a dark screen showing your bootable volumes, including the bootable installer.
Step 5 Select the bootable installer. Then click the onscreen arrow or press Return.
Step 6 If you're using a Mac with the Apple T2 Security Chip and you can't start up from the bootable installer, make sure that Startup Security Utility is set to allow booting from external or removable media.
Step 7 Choose your language, if prompted.
Step 8 Select Install macOS (or Install OS X) from the Utilities window, then click Continue and follow the onscreen instructions.
Update Cisdem Data Recovery
We always suggest users to use the latest version of the program.
When you launch Cisdem Data Recovery, Cisdem will auto check for updates and prompts you to download the latest version package.
Also, you can click Cisdem Data Recovery > Check for Updates on the left top menu bar to manually check for updates.


Traci Gordon has worked as a tester in a software company for 8 years, she believes that the best software should be a tool that can help users accomplish what they need with the simplest steps.

JK Tam is the lead developer at Cisdem, bringing over two decades of hands-on experience in cross-platform software development to the editorial team. He is now the lead technical approver for all articles related to Data Recovery and DVD Burner.