

How to Remove Duplicates in iPhoto: 2 Methods that Work
 29.0K
29.0K
 6
6


iPhoto was developed by Apple for Mac as a photo management app. Although it has been discontinued and replaced by Photos since 2015, there are still Google searches like "iphoto delete duplicates".
In this article, I will share two methods to automatically find duplicates in iPhoto and easily mass remove them.
 Cisdem Duplicate Finder
iPhoto Duplicate Finder & Remover
- Identify duplicate images, videos, audio files, and other types of files
- Detect similar photos too
- Support Mac, Windows PC, external storage devices, cloud drives, and more
- Find duplicates in folders, iPhoto, Photos, iTunes, and Music
- Display duplicate photos for you to preview side by side
- Automatically select all but one file for removal in each set of duplicates, enabling you to delete all duplicates at once
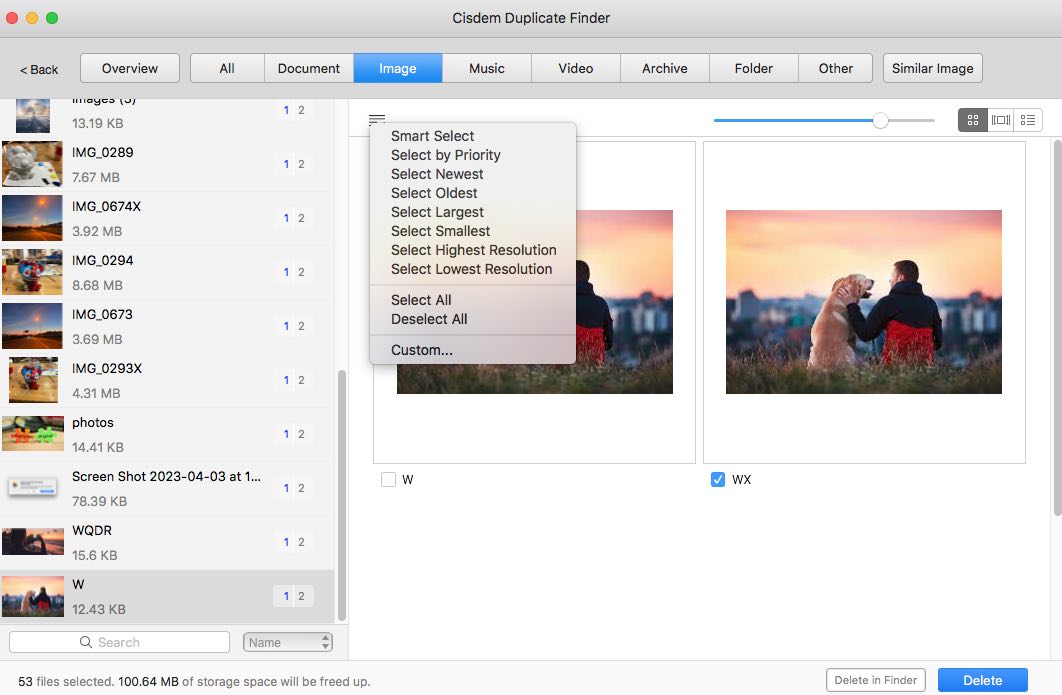
- Also let you select/deselect files manually or choose from 8 rules (e.g., Select Newest)
- Easy to use for everyone


3 important facts about iPhoto
Here are some important facts about iPhoto. Knowing them helps you better understand the process of finding and deleting duplicate photos in iPhoto.
- The photos imported into iPhotos on your Mac are stored in the iPhoto library (with the extension .photolibrary) instead of the iPhoto app. The iPhoto library is located in the Pictures folder by default.
- iPhoto was discontinued in 2015 with the release of OS X 10.10.3 Yosemite. macOS 10.14 Mojave is the last version of macOS to run the iPhoto app.
- If your Mac is running macOS 10.15 Catalina or later, it won’t be possible to use the iPhoto app, but your iPhoto library and the photos in it won’t be affected. You can open the iPhoto library in the Photos app, the successor of iPhoto.
How to delete duplicates in iPhoto with dedicated software
Applies to: macOS 10.11 El Capitan or later
This method uses Cisdem Duplicate Finder. This app automatically and accurately finds duplicates in your iPhoto library by comparing file content. It offers automatic duplicate selections and allows you to make adjustments, making it easy and quick to remove unwanted duplicates.
In addition, it can help you detect similar images (including photos that appear to be identical but have different formats, file sizes, or dimensions, and photos that look alike).
1. Quit the Photos app on your Mac if it’s open.
2. Press and hold the Option key and open Photos.
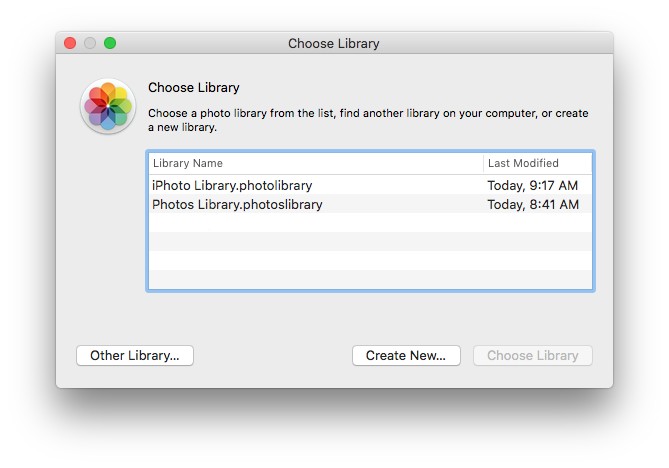
3. In the Choose Library dialog that appears, select your iPhoto library and then click Choose Library. (If you don’t see the iPhoto library, click Other Library to manually locate it.)
4. Click Get Started and wait for Photos to finish preparing the library.
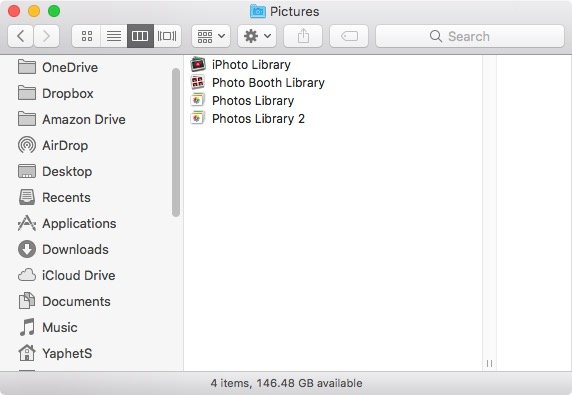
5. Open Finder and go to the Pictures folder. There you will find a new Photos library, and the content in your iPhoto library has been migrated to this new library. From now on, consider this new library your iPhoto library.
Tip
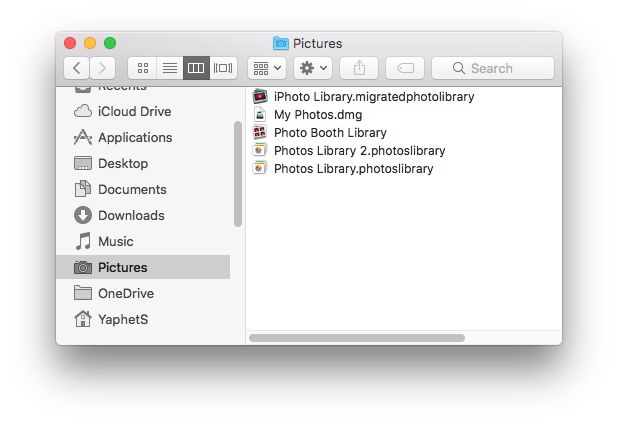
When you open the original iPhoto library with the Photos app (as what happens in steps 3 and 4), the extension of the original library will be automatically changed from .photolibrary to .migratedphotolibrary. You can delete iPhoto Library.migratedphotolibrary to free up space, or keep it as a backup of your iPhoto photos.
6. Download and install Cisdem Duplicate Finder. Open it.
 Free Download
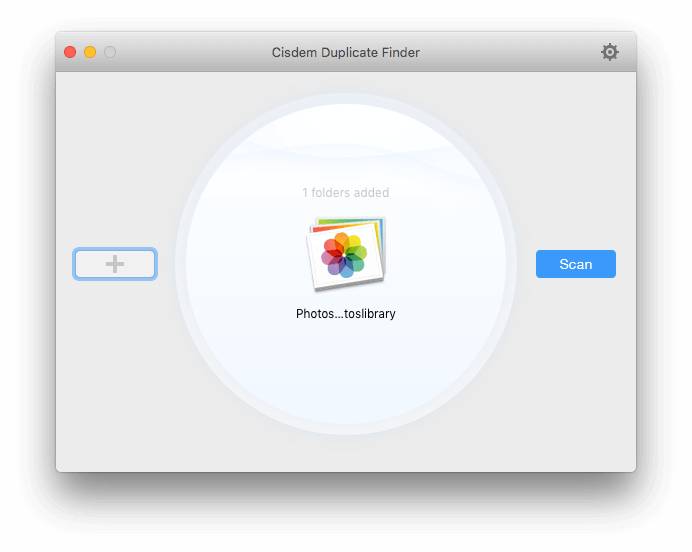
7. Drag your iPhoto library (the new Photos library) into it. Click Scan.
Tip
If you want to find similar photos as well, do this. Before clicking Scan, click the settings icon in the top right corner, choose the Similar images tab, and select the Enable similar images function checkbox.
8. When the scan is done, the results window will appear, displaying all duplicate photos and videos found in your iPhoto for you to view, sort and preview.
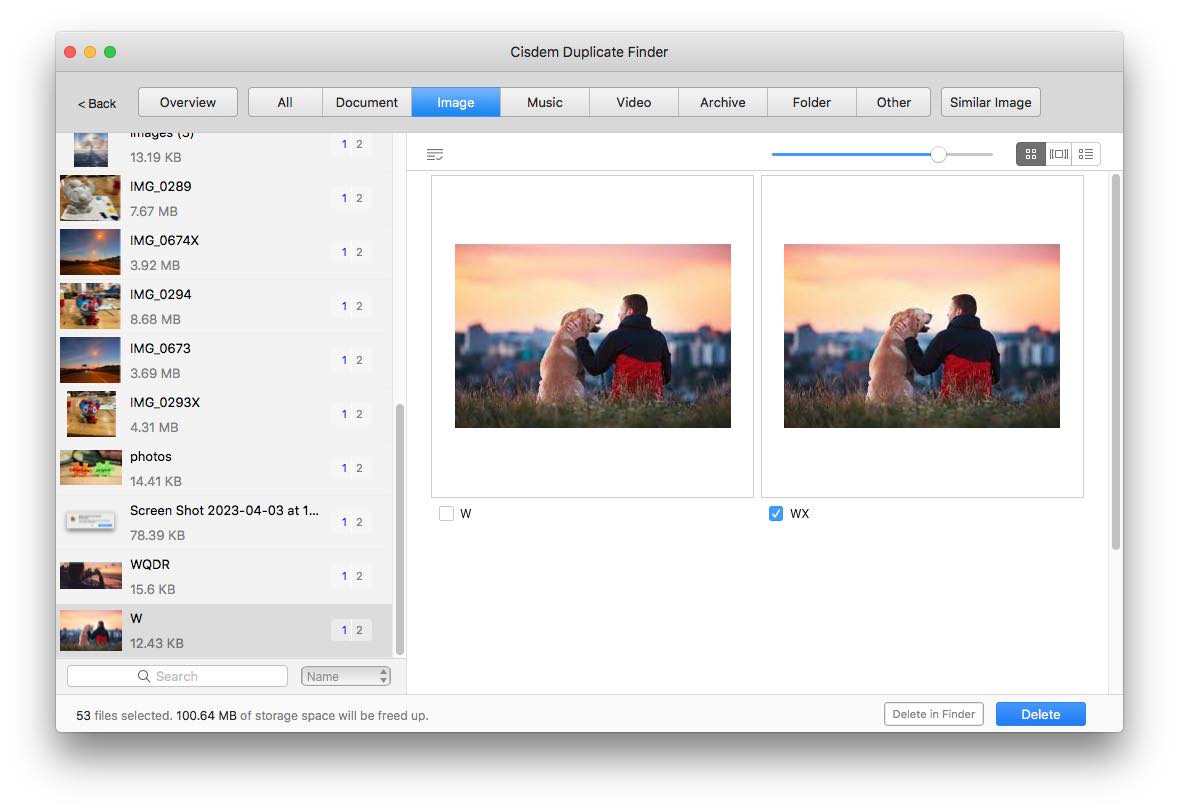
9. In each set of duplicates, Cisdem Duplicate Finder has automatically and intelligently selected all but one file for deletion.
If needed, you can select or deselect files by hand or choose a desired selection rule.
10. Click Delete in the bottom right corner to remove all the selected files at once. Confirm the deletion by click Delete in the message that appears.
Note
If your Mac is running macOS 10.14 Mojave or earlier, then step 10 will be different. Please read the user guide for details.
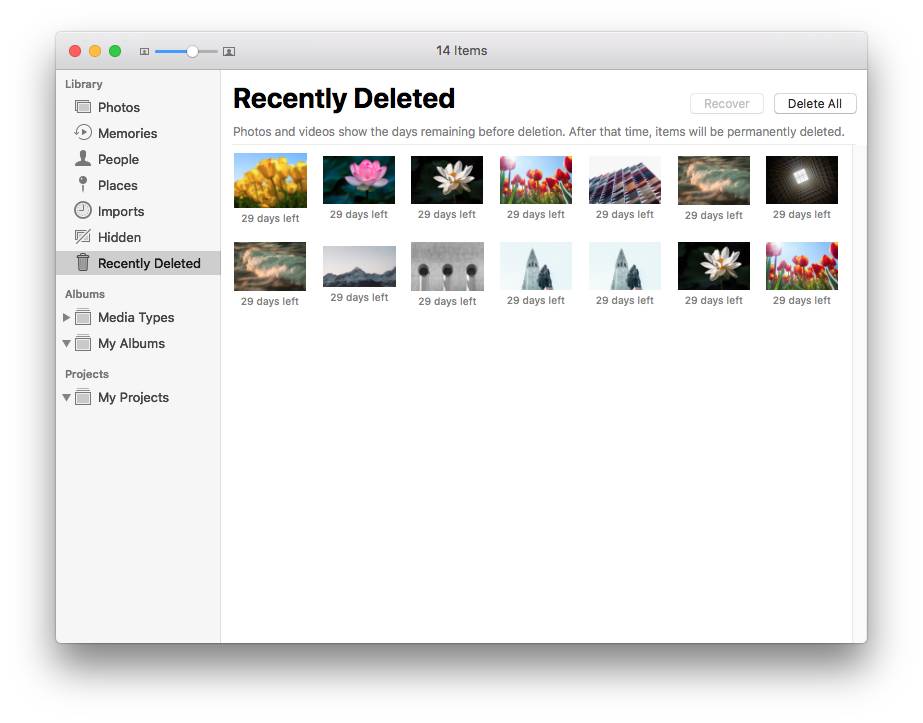
Duplicates removed from your iPhoto library will go to the Recently Deleted album in the Photos app and stay there for 29 days. If you want to permanently eliminate them right away, click Delete All in Recently Deleted.
With this method, the identification and removal of duplicates works based on the mechanism of iPhoto and Photos, ensuring utmost safety.
How to use Photos' Duplicates album to remove duplicates from iPhoto
Applies to: macOS 13 Ventura or later
If your Mac is running macOS Ventura or later, you can use the Photos app to find the duplicates in your iPhoto library because this app offers a feature to detect exactly identical photos and videos. It also detects very similar photos (including those that look identical but have unique resolutions or formats).
As with the first method, you first need to import your iPhoto library to Photos app.
1. Repeat steps 1 to 5 of the first method.
2. Wait for the Photos to find duplicate photos and videos. It may take minutes, hours or even days, depending on the size of your iPhoto library. (You can't start, pause, or stop the finding process since it's completely automatic.)
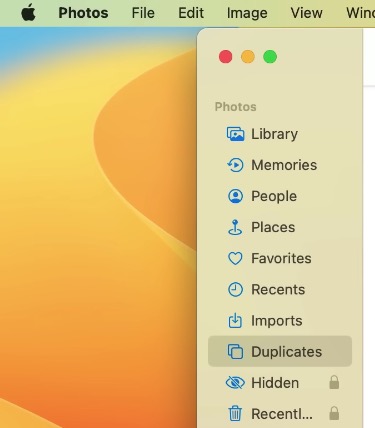
3. In the sidebar on the left of your Photos app, click Duplicates, which will open the Duplicates album.
4. You will be presented with the sets of duplicates found in iPhoto. You can preview the photos in each set side by side.
5. Click the Merge [number] Items button displayed next to a set. In the Merge Duplicates dialog that appears, click Merge. This way, this set will only have one unique photo, and the duplicate(s) will be removed. Repeat this step to manage the rest of the duplicate sets.
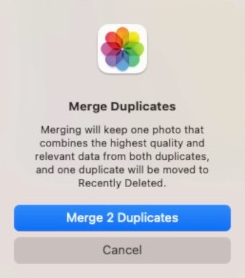
In step 5, if it’s a set of similar photos, clicking the said button will keep the highest version and remove the rest. In addition, all the relevant data like descriptions and keywords will be combined into the kept version.
If you are not into the idea of merging duplicates, in each set, you can manually select the unwanted photo(s), control-click, and choose Delete [number] Photo(s).
The deleted duplicates will go to the Recently Deleted album in the Photos app.
Tip
If you can’t see Duplicates in the sidebar in step 3, check out these fixes.
FAQs
How do I get rid of duplicates in iPhoto Events or Photos manually?
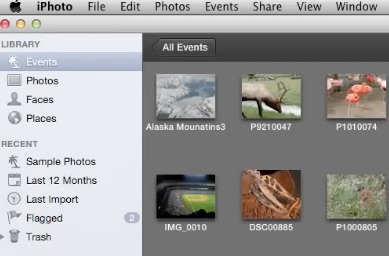
1. Open your iPhoto app. Tap on Events or Photos from the left bar.
In iPhoto, you have Events and Photos. Events in iPhoto contains pictures that are automatically grouped based on time or date they were taken. While you can view all your pictures in Photos. Often, you can find many duplicate photos in the same event. If you want to find duplicates at in iPhoto more efficiently, select an event according to your needs. Alternatively, you can select Photos to search for duplicates in your entire iPhoto library.
2. Click View > Sort Photos.
3. Sort your photos by keyword, date or other criteria. Select Ascending or Descending order.
4. Scroll down the list of photos to find duplicate images. Select a photo and click View > Info. The information provided in the Info window can help you know if two duplicate photos are exactly the same or different in image quality.
5. Hold and press the Command key and select the unwanted iPhoto duplicates. Press the Delete key.
6. Click Remove Photos to confirm the deletion.
Go to Trash to permanently delete them. Alternatively, you can leave them there. They will be automatically eliminated after a month.
Why does iPhoto duplicate photos when importing?
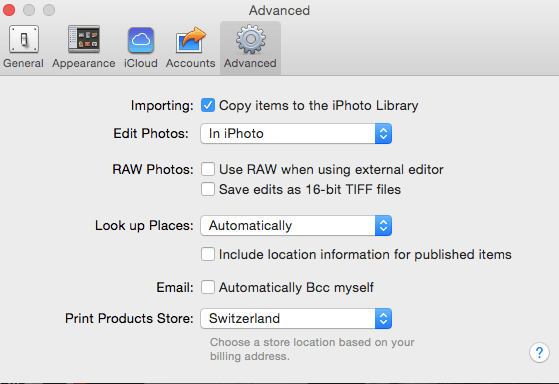
iPhoto duplicate photos when importing to protect your digital photo collection. Go to File > Preferences > Advanced, and you can find the Importing option Copy items to the iPhoto Library. It is also available in Photos. The option is enabled by default.
If this option is enabled, when you drag photos from somewhere on your Mac, say, the desktop, into iPhoto, iPhoto will copy the photos into the library. In other words, it duplicates them. Now you actually have two copies of each imported photo.
To prevent iPhoto from duplicating photos, you can unselect the checkbox before Copy items to the iPhoto Library. However, it is NOT recommended. If you set iPhoto not to store a copy of the photo it imports, and you accidentally delete the original copy, when you try to view the photo in iPhoto, a message will pop up telling you that it can’t find the file.
Conclusion
Duplicate photos can occur during importing photos, merging libraries, or other activities. Regardless of the cause, you can free up room and make your photo collection more organized by removing duplicate photos from your iPhoto.

With a passion for tech and writing, Sarah joined Cisdem, where she focuses on creating articles about using utility tools to enhance file management and simplify contact management.

Adrian Li is Cisdem’s Chief Engineer and serves as the editorial advisor for Duplicate Finder and ContactsMate. His work and insights have been featured in leading tech publications such as Fossbytes, TUAW, Redmond Pie, SafetyDetectives, and BestForAndroid.
Michael
Tried it out, and what a relief! Finally got rid of all those annoying duplicates. Thanks for sharing this! By the way, any tips on dealing with duplicates across multiple libraries?
Frank Manzke
I love this duplicate photo scan app. I’ve been using it to scan my iPhoto. I find it scans much quicker than other apps I used before. And super easy to use :)
Roger Elliott
This method worked and worked well. Thanks for sharing.
victor
is this finder not able to working on photo library on external drive? i can't select the photo library folder which i have stored on an external drive.
Rosa Reyes
Hi, victor, we apologize for any inconvenience to you. And this finder is able to find and remove duplicates from photo library folder on external drives. If you can't click "Add" button to select the folder, just drag and drop the folder to the app. This can solve your problem.
Sagar
Hats off to wheeovr wrote this up and posted it.