

Ultimate Guide to Converting Video to ProRes on Mac/PC
 70
70
 0
0


Editing 4K video in H.264 or HEVC is a total workflow killer. Choppy timelines, laggy scrubbing, it's just painful. That's why professional editors always convert video to ProRes before they even start.
Why ProRes?
- Intra-frame encoding means buttery-smooth 4K playback.
- 10-bit depth prevents "banding" during grading.
- No quality loss, even after multiple exports.
Here are the 5 best tools to handle your transcode today.
 Cisdem VideoPaw
All-in-one Video to ProRes Converter
- Convert video to any ProRes flavor like Proxy, LT, 422, HQ, etc.
- Batch convert dozens of videos to ProRes at once
- Support conversion between most popular media formats and encoders
- Keep high quality
- Fast conversion speed
- Easy to use
- Adjust file encoder, resolution, frame rate, and more
- Extra: Compress, edit, merge file; download online video; digitize DVD, Blu-ray
 Free Download macOS 10.15 or later
  Free Download Windows 10 or later
How to Choose Based on ProRes Versions
Apple ProRes comes in several versions - different versions optimized for specific parts of the workflow. Choosing the right one ensures you don't waste disk space while keeping your quality high:
ProRes 422 Proxy: Smallest files, perfect for smooth editing on slow hard drives.
ProRes 422 LT: Files are ~30% smaller than standard 422. Good for long videos or when your storage is almost full.
ProRes 422: The sweet spot. Good quality, not too big. Work for YouTube, social media, and most pro work.
ProRes 422 HQ: Broadcast quality. Use this when you need to do serious color grading.
ProRes 4444: Support transparency, so you get alpha channels. Great for graphics and visual effects.
ProRes 4444 XQ: The highest end flavor. Even less compression than regular 4444, meant for the most demanding HDR and film projects.
5 Proven Methods to Convert Video to ProRes
Once you've picked your ideal ProRes flavor, you'll need the right tool. I’ve selected these 5 reliable methods to help you transcode your files efficiently.
Method 1. Use macOS native way
Supported Outputs: ProRes 422 and ProRes 4444 (with transparency).
Advantages:
- Free
- No installation required for Mac users
- Very simple to use. Just a few steps and the conversion is done
Disadvantages:
- Use default settings and does not let you adjust them
- Not show progress details
- Not work on Windows PC
Encode Media is the built in encoder on Mac. It can handle basic conversions. If you only have a few video files to convert, this method works just fine.
Steps to re-encode a video into ProRes with macOS built-in tool:
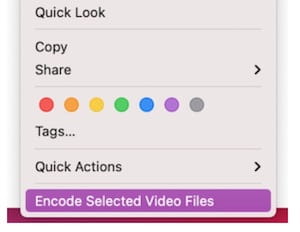
- Locate the video in Finder.
- Right-click the video file.
- Choose the “Encode Selected Video Files” option.
![select “Encode Selected Video Files”]()
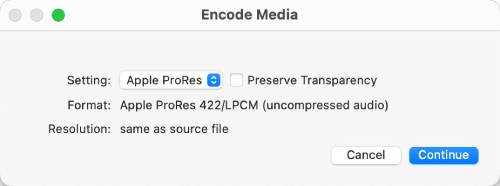
- In the settings box, choose “Apple ProRes”.
![choose setting encode media]()
- If you want to preserve transparency, check the box.
- Click “Continue”. The converted ProRes file will be saved in the same folder as the original one, with the same name but a .mov extension.
Tip:
If converting multiple files, you can press Shift and select them all at once before right clicking. Encode Media will process them one by one.
Method 2. Use Cisdem VideoPaw
Supported Outputs: ProRes 422, ProRes 422 HQ, ProRes 422 LT, ProRes 422 Proxy, ProRes 4444, and ProRes 4444 XQ. Support up to 8K resolution.
Advantages:
- One click presets for all major ProRes flavors, from 422 to 4444
- GPU acceleration for faster transcoding
- Supports ultra high resolutions including 4K, 5K, and 8K
- A multifunctional audio and video processing tool, not just a ProRes converter
Disadvantages:
- Paid software, the free trial only converts the first 5 minutes of each video
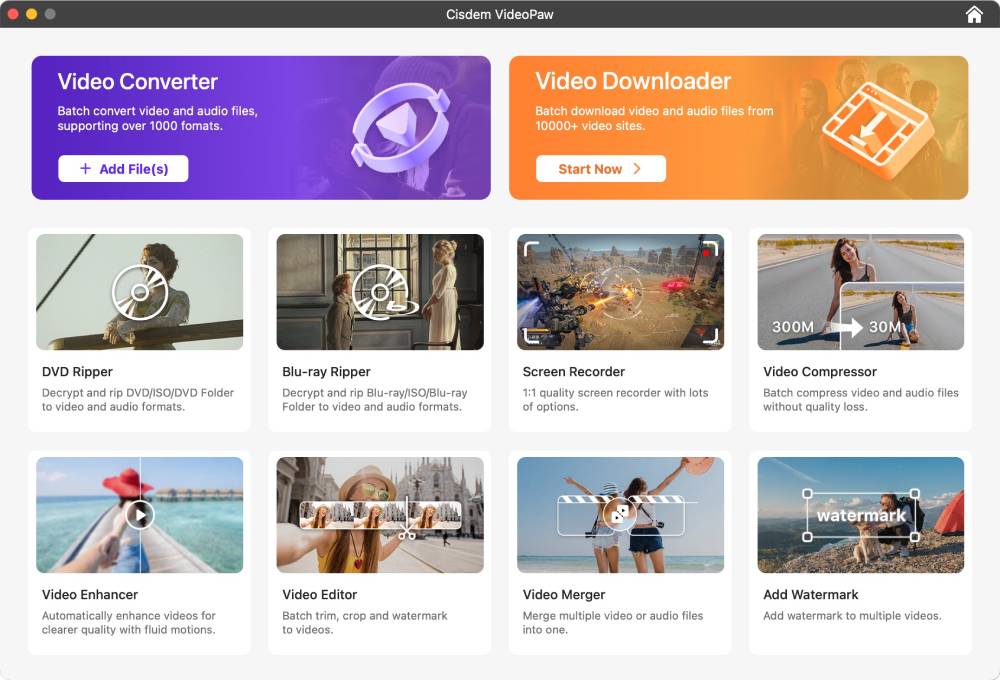
Cisdem VideoPaw is a dedicated choice for converting video to ProRes on both Mac and Windows. It comes with several easy to use modules like Video Converter and Video Downloader.
The app offers almost every ProRes flavor. You can convert a bunch of files to the same ProRes format or mix in different flavors while watching the progress. Prior to re-encoding, you can also trim, crop, add watermark to the file, and more.
How to use VideoPaw to convert files to ProRes format:
- Download, install, and launch Cisdem VideoPaw.
Free Download macOS 10.15 or later Free Download Windows 10 or later - Go to the Video Converter module on Mac;
Or stay on the default Video Converter interface on Windows.
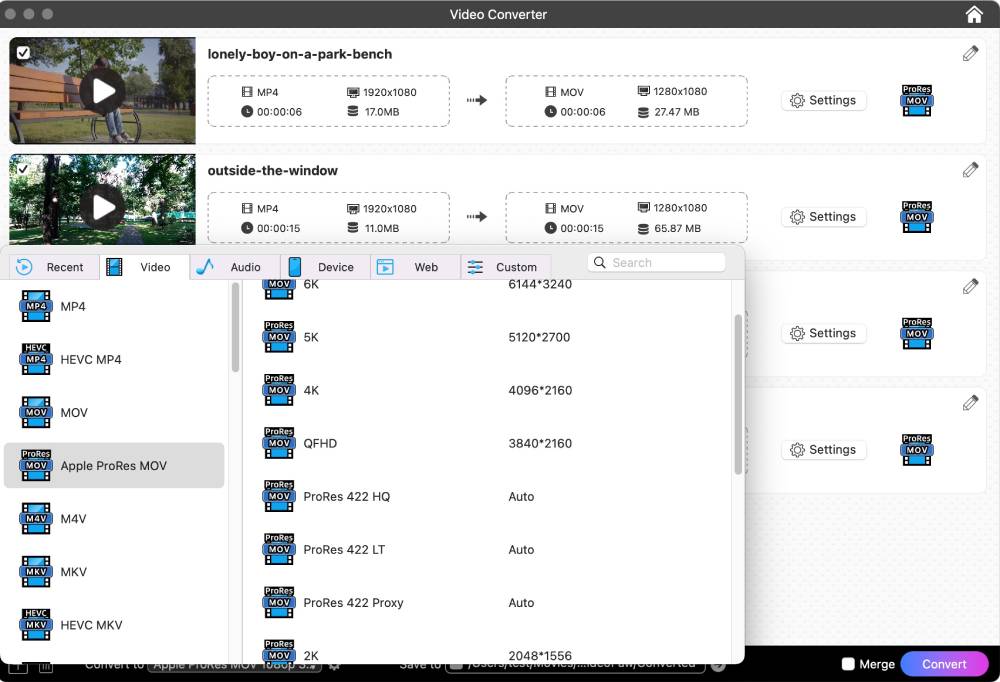
- Drag your video files directly into the main workspace window.
- At the bottom configuration bar, click the “Convert to” dropdown.
![choose prores videopaw]()
- Go to “Video > Apple ProRes MOV”, then select your target profile.
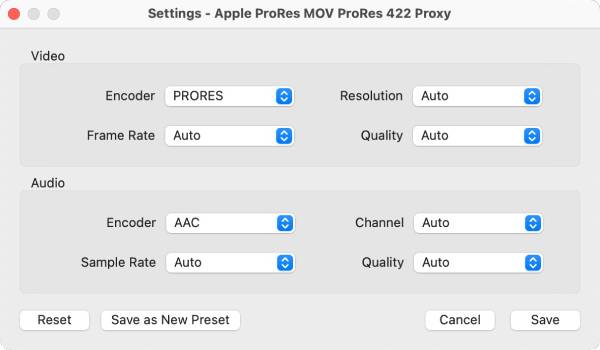
- (Optional quality tweaks): Click the gear icon (Settings) located next to the format to adjust custom frame rates or resolution.
![prores settings]()
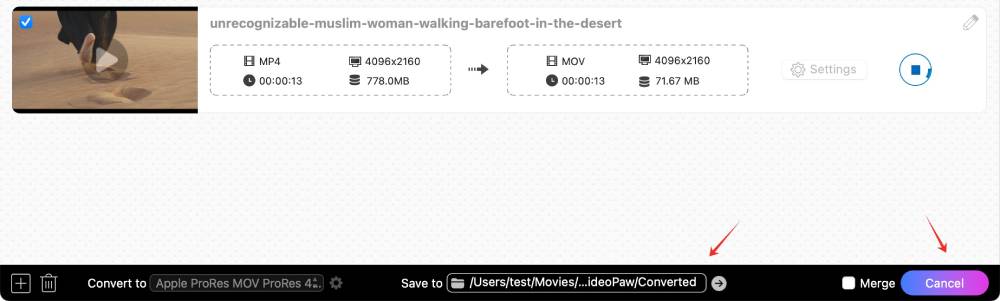
- Check the “Save to” field and change the export path if needed.
- Click the “Convert” button at the bottom right to re encode all added videos.
![start converting to prores]()
Tip:
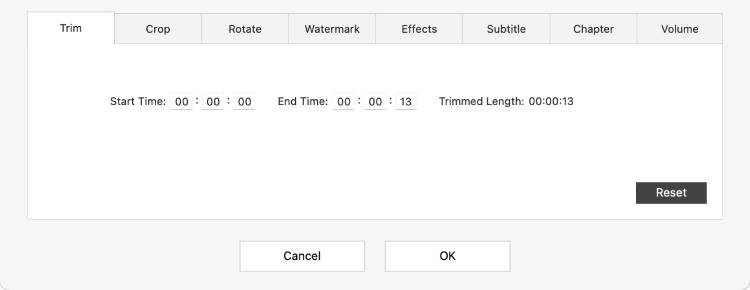
The app has video editing features. Just click the pencil icon to open the window. Use the “Trim” tab to cut out unwanted clips, and the “Crop” tab to remove black borders. This saves a huge amount of disk space.
Method 3. Use Handbrake
Supported Outputs: Default strictly to the standard ProRes 422 profile
Advantages:
- Completely free and open source
- Batch process multiple files at fast speed
- Export with smaller file size
Disadvantages:
- Limited ProRes flavor selection
- Low output quality compared to other ProRes encoders
HandBrake added ProRes encoding in version 1.11.0. It requires the MOV container and outputs standard ProRes 422 only. The app taps into your computer's hardware media engine for super fast ProRes encoding, using VideoToolbox on Mac and AMD VCN or Intel Quick Sync on Windows.
How to convert video to Apple ProRes via Handbrake:
- Open HandBrake and click “Open Source” on the top toolbar to load your video.
- Choose the output container format as MOV.
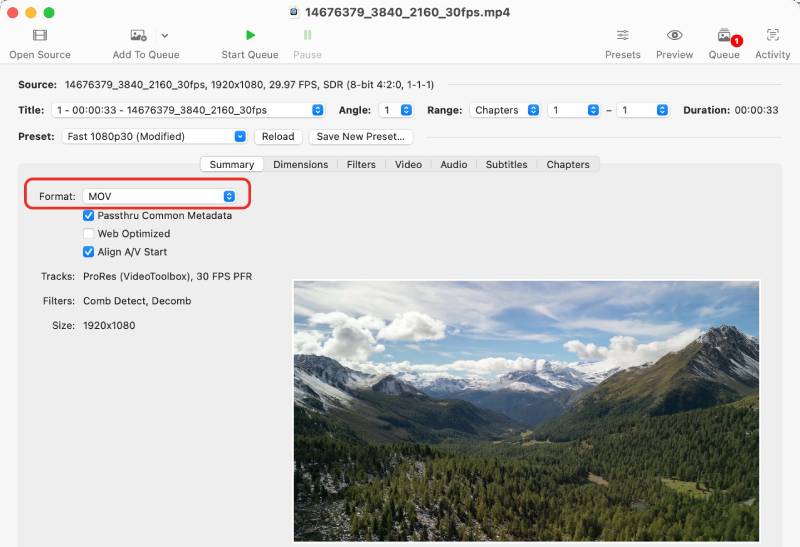
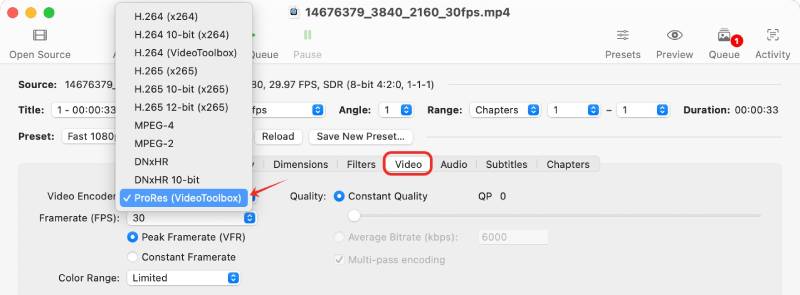
- Navigate to the central tab bar and click on the “Video” tab.
- Click the “Video Encoder” dropdown menu and select “ProRes (VideoToolbox)”.
![choose prores handbrake]()
- Set your file name in the “Save As” box.
- Click the “Browse” to specify the output path.

- Click the green “Start” triangle button on the top toolbar to begin the conversion.
Tips:
- For phone or screen recordings, change “Peak Framerate” to "Constant Framerate" to avoid audio sync issues.
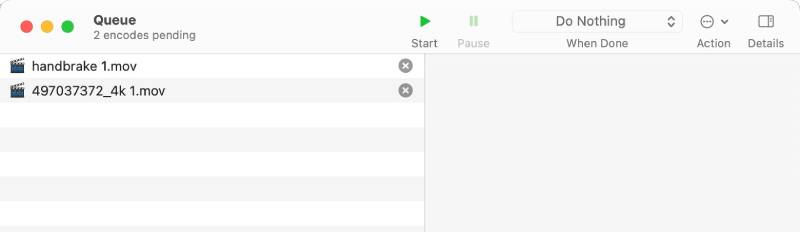
- To batch process files, drag an entire folder into HandBrake, and click the arrow next to “Add to Queue” to select “Add All Titles to Queue". Then, you can open the "Queue" window to process all.
![add files in queue]()
Method 4. Use Shutter Encoder
Supported Outputs: Proxy, LT, 422, 422 HQ, 444, 4444, and 4444 XQ
Advantages:
- Free and open source
- Support all official Apple ProRes formats
- Include extra tools like trimming, conforming, loudness analysis, and a "reduce banding" option to smooth out gradients
Disadvantages:
- The interface is dense and can overwhelm new users
- No hardware acceleration for ProRes encoding, software only, so conversions can be slow
- Reported banding issues and inconsistent file sizes
Shutter Encoder provides complete, native access to the entire official Apple ProRes stack via an optimized FFmpeg engine, making it a reliable option for professional workflows.
Steps to transcode your file into ProRes with Shutter Encoder:
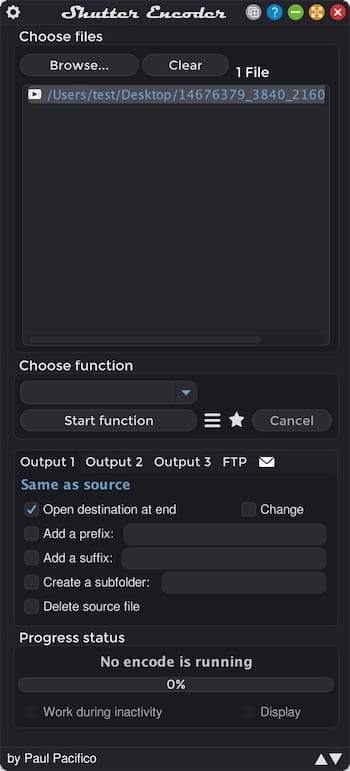
- Launch Shutter Encoder.
- Drag and drop your source clip directly into the drop zone.
![add video to shutter encoder]()
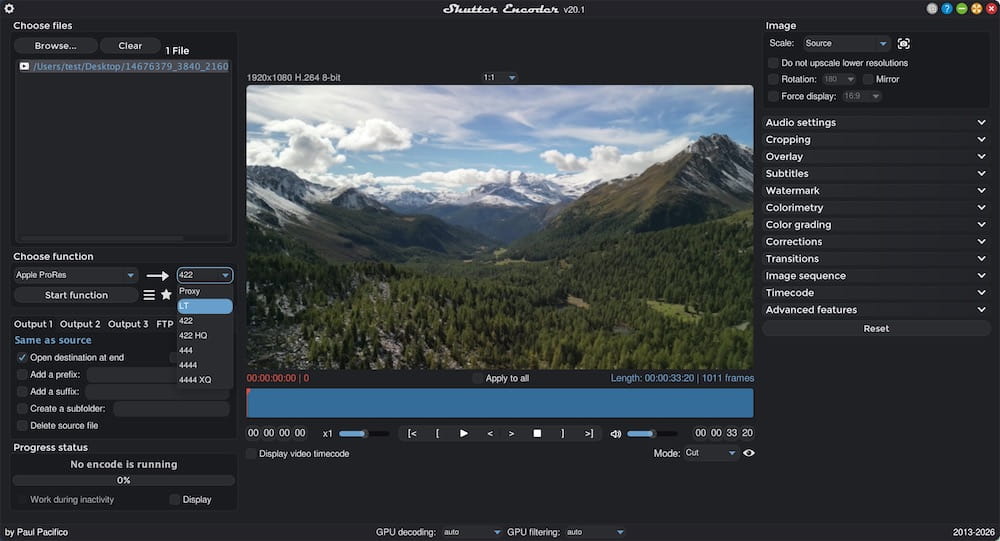
- Under the “Choose function” dropdown menu, navigate down to the Editing codecs section and choose “Apple ProRes”.
- The main window will open. Directly to the right of the function menu, choose a ProRes flavor you want.
![choose apple prores and version]()
- Click the "Start function" button right below the profile to begin processing.
![start function]()
Tip:
Shutter Encoder also support batch conversion. You just need drop multiple video clips into the file zone and the software will automatically processes every file in the list sequentially.
Method 5. Use Kdenlive
Supported Outputs: ProRes 422, ProRes HQ, ProRes 444 (prores_ks + pcm_s16le)
Advantages:
- Free and open source
- Use the stable prores_ks FFmpeg encoder with uncompressed audio
Disadvantages:
- Overkill for simple drag and drop conversions
- Only a single video can be encoded at a time
- ProRes 4444 alpha channel rendering can be finicky across different versions
Kdenlive is great for editing or layering transparent assets before exporting to ProRes. It needs macOS 13 or later and Windows 10 or later. My Mac is too old, so I tested it on a Windows 11 laptop instead.
How Kdenlive turns video into ProRes:
- Launch Kdenlive and click the "New Project" to open the main dashboard.
![add new project to kdenlive]()
- Close the window to select the profile of the project.
- Directly drag and drop the file to the timeline.
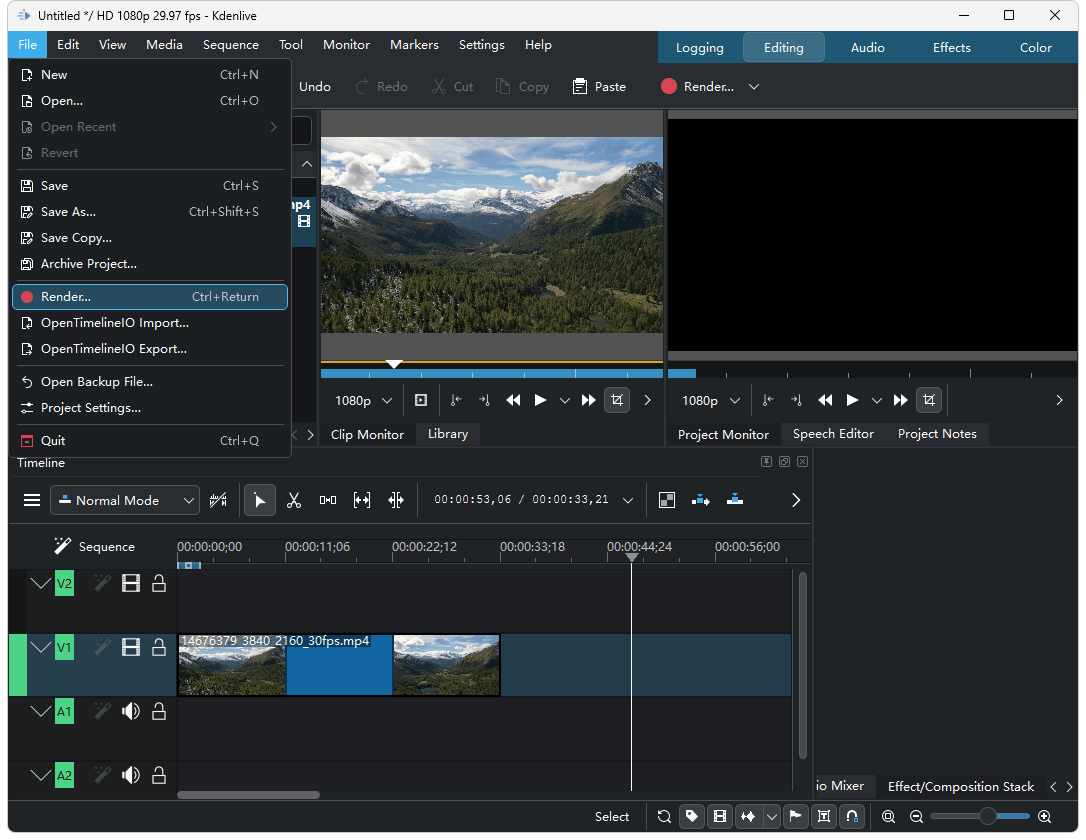
- Click the red "Render" button on the right side to launch the Rendering - Kdenlive panel. Alternative, click “File > Render”.
![click render]()
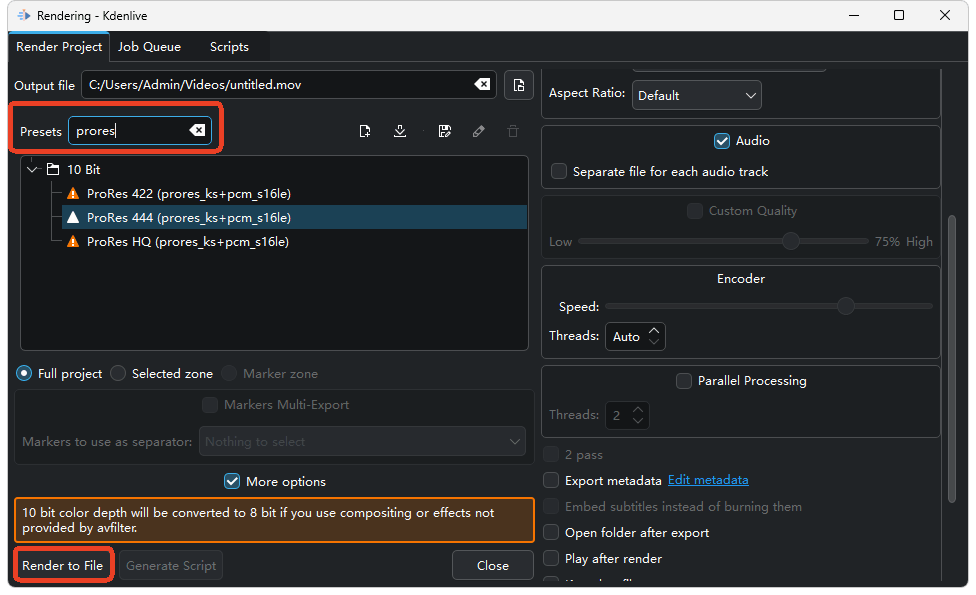
- Name the output file.
- Type "prores" into the Presets search filter box. This will filter out unrelated formats.
- Select your target profile from the filtered list.
- Click the "Render to File" button at the bottom-left corner to begin generating your MOV ProRes file.
![choose preset and render to file]()
Note: Don't use fancy effects or compositing if you want to keep 10 bit color. Kdenlive will drop it to 8 bit.
Common Questions
1. Are there any online video to Apple ProRes converters?
I tested several popular online converters and found none that support ProRes. Most output MOV with H.264, H.265, or MPEG4 only. No ProRes.
Why? ProRes encoding is too heavy for online servers. It requires a lot of processing power and licensing from Apple, so it only makes sense in desktop software.
2. Can VLC encode files into ProRes?
No. VLC can only convert video to MOV containers with other codecs like H.264. It supports ProRes decoding (playback), not encoding. The changelogs for VLC 3.0.22 show fixes like "Fix ProRes 4:4:4:4" and "Fix hardware decoding of ProRes", but these all refer to decoding.

Emily is a girl who loves to review various multimedia software. She enjoys exploring cutting edge technology and writing how-to guides. Hopefully her articles will help you solve your audio, video, DVD and Blu-ray issues.

Ryan Li is a senior developer at Cisdem. Since joining the company in 2017, he has led the development of Cisdem VideoPaw and now serves as the editorial advisor for all articles related to Video Converter.