

How to Recover Missing Files after macOS Sequoia or Sonoma Update
 37.5K
37.5K
 3
3


This article will show you how to recover missing files after Mac update from Sonoma to Sequoia, from Ventura to Sonoma, from Monterey to Ventura, from Big Sur to Monterey, etc. There are also tips to get back lost apps, Dock or other files, after macOS upgrade.
macOS 15 Sequoia comes with new apps, new features and improved performance. You can upgrade your Mac to enjoy these benefits. However, there could be risks. There have been situations where Mac update deleted everything, or users lost photos after macOS update, etc. This article mainly talks about the common ways to recover missing files after Mac update.
 Cisdem Data Recovery for Mac
Easily Recover Lost Data after Mac Update
- Recover photos, documents, videos, audios, emails and more
- Recover deleted files, formatted data, lost files after macOS upgrade or downgrade, etc.
- Repair corruped or unplayable videos in different formats
- Support Mac’s internal storage, external HD, SSD, SD card, etc.
- Allow you to quickly scan, preview and recover data
- Both quick scanning and deep scanning used for recovery due to different reasons
- Recovered files can be opened and edited successfully
- High success rate to do recovery
- Recover data to local drive or cloud
- Easy to use, safe, read-only and risk-free
 Free Download macOS 10.9 or later
 Note: Before you get all your lost data back, it’s recommended not to put new data to your Mac in case that the lost files would be overwritten by new data. Before upgrading to macOS, please be aware of possible data loss and try to minimize the possibility.
Restore lost files after Mac update from Time Machine backup
If you have complaints like “I updated my Mac and lost everything” or “Mac update deleted everything”, the best possible solution is to get things back from Time Machine backup.
Time Machine is a backup utility built-in to macOS, allowing you to back up your entire Mac. As a result, it’s possible to easily recover documents, apps, music, photos and other data missing after Mac update. Below are two facts.
- If you have created Time Machine backup before macOS upgrade or downgrade, you can restore lost or missing data from the backup. If not, then you can’t.
- If the last backup was days, weeks or even months ago, then there would still be lost data despite the restoring. In such a case, this method alone won’t be enough. Professional data recovery software will do the rest.
Step 1. From the Apple menu, select System Preferences, and then choose the Time Machine icon. Select the Show Time Machine in menu bar checkbox.
Step 2. Choose Enter Time Machine from the Time Machine menu. You'll be taken to the Time Machine window. Then you can navigate to the file or folder you'd like to restore.

Step 3. Select a file and press Space Bar to preview the file. Find the one you need to recover and click Restore to restore the selected file, or Control-click the file for other options. Time Machine will copy that file back to its original location on your hard disk.
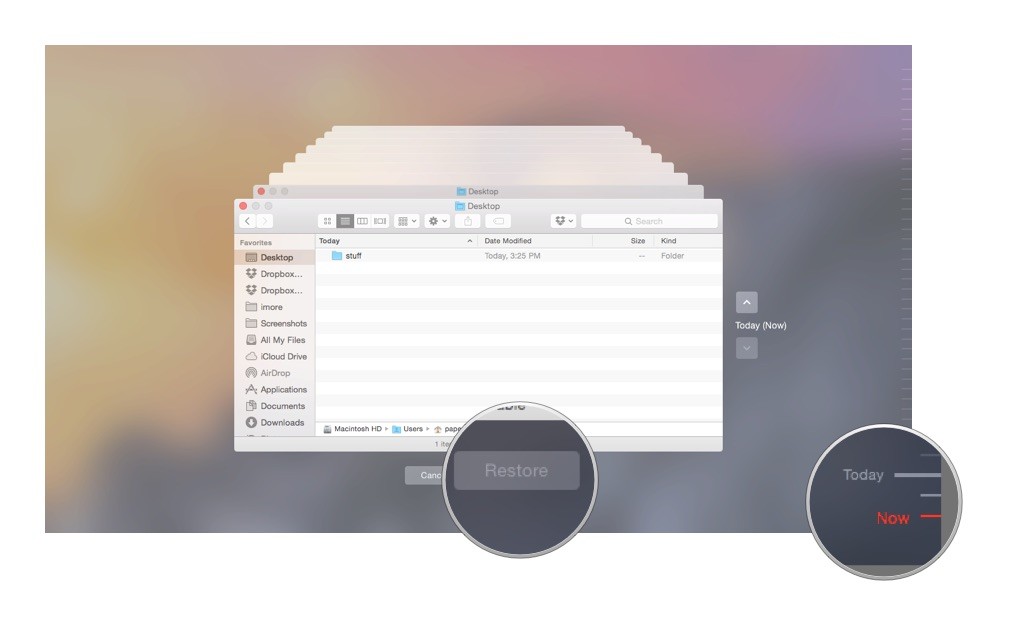
Tip: You can also use the timeline on the edge of the screen to see the files in your Time Machine backup as they were at that date and time and use the onscreen up and down arrows to jump to the last time the contents of the window changed.
Retrieve lost photos or iPhoto app without any third-party app
With the macOS update, some people lost a part (or worse, all) of their photos. Also, users of iPhoto find that the iPhoto app itself along with the photos has gone. With both cases, it’s very likely that the photos are still there, safe and sound, and you just need to make them reappear again. If so, there is an easy fix, which doesn’t require backup or any third-party tool.
Before getting started, let’s talk a little bit about iPhoto. Despite being discontinued for years, iPhoto is still available for use after the year of 2015 when it was replaced with Photos app. It can still run on Mojave. However, with the release of macOS 10.15, it’s not usable anymore. That’s the reason why users lost the iPhoto app after upgrading to Big Sur.
The solution is easy. Switch to Photos and load your iPhoto library.
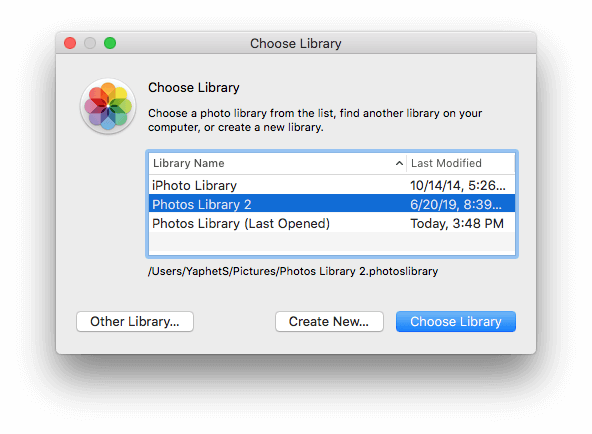
Step 1. Launch the Photos app while holding down the option key, which will bring up the Choose Library window.
Step 2. Select iPhoto Library. Click Choose Library.
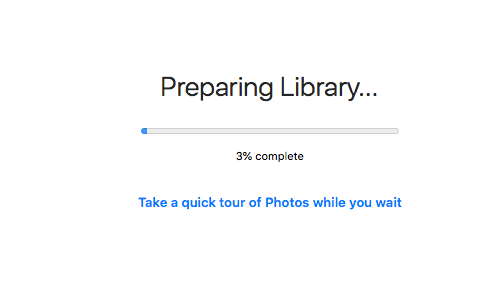
The app will start preparing Library. Once the process is completed, you will be able to see the lost photos again. It’s that easy to retrieve lost photos after Mac Big Sur or Catalina update.
How to recover lost files when backup is NOT available
This method is for you if you:
- Don’t use Time Machine
- Haven’t updated Time Machine backup for a long time
- Unfortunately find the backup is damaged
Mac updated deleted everything, and there isn't a backup available. It’s not the end of the world! Professional data recovery software like Cisdem Data Recovery can help you recover missing files after Mac update.
Cisdem Data Recovery for Mac Main Features:
- Recover folders, documents, photos, songs, videos, emails, archives, etc.
- Repair videos, images and documents
- Work with lost data due to system upgrade, permanent deletion, drive formatting, etc.
- Support files systems like HFS+, FAT16, FAT32, exFAT, NTFS, APFS, etc.
- Support Mac’s hard drive and various external storage devices
- Allow you to quickly scan, preview and retrieve data
- Use both quick scanning and deep scanning to recover data under different situations
- Guarantee read-only and risk free data recovery
- Traceable scan results to avoid repeated scanning
- Restore data to local drive or cloud platforms
Free Download macOS 10.9 or later
Step 1Get the app
Free download and install Cisdem Data Recovery on your Mac. Launch it.
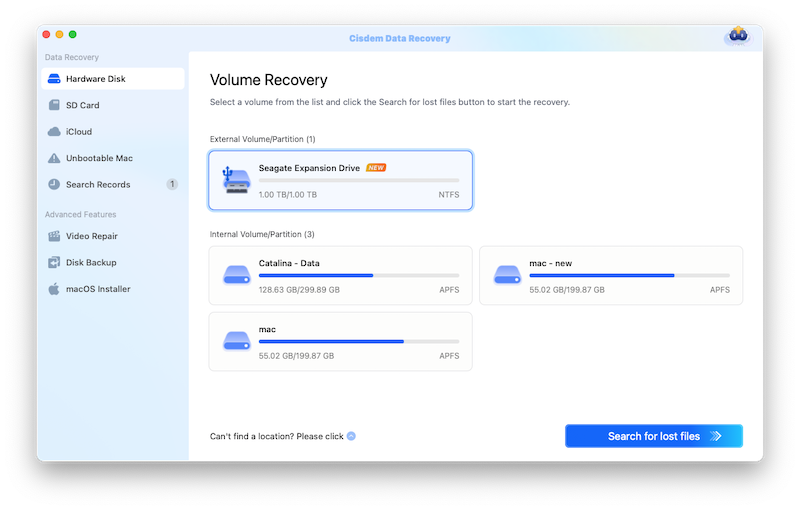
Step 2Go to Hardware Disk
Step 3Choose the hard drive to scan
This data recovery will automatically list all Mac hard drives and storage devices if connected to your Mac computer. Select the hard drive where you lost the data. Click Search for lost files to start scanning lost data from the selected hard drive or partition. The time the scanning process takes depends on the amount of files it is scanning through.
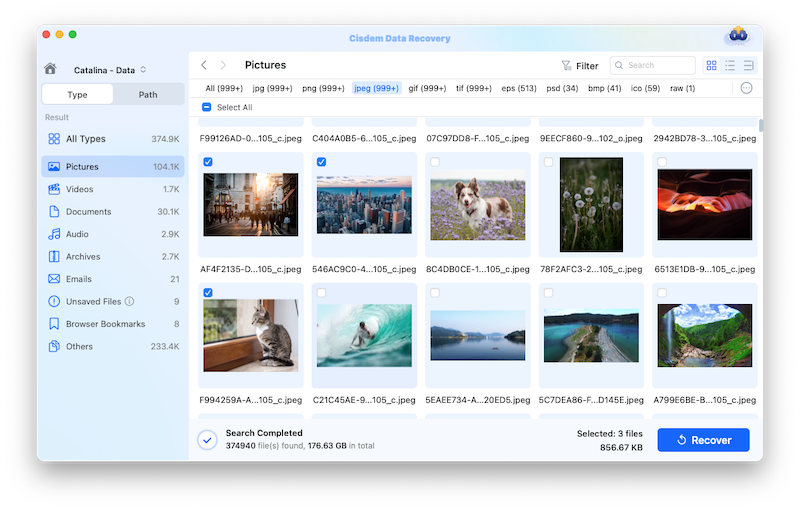
Step 4Preview the files and select, then click Recover to get them back to local drive or cloud.
Bonus tip: Get back missing apps, Album Artwork, etc. after update
In addition to missing files after Mac update, there can also be other common issues with macOS update. Here are some quick fixes that might be helpful. You can search on Google for more information.
| Issue | Fix 1 | Fix 2 |
|---|---|---|
| Album Artwork disappearing | Keep the Music app open and wait patiently | Manually add missing covers |
| Dock missing | Enter "defaults delete com.apple.dock; killall Dock" in Terminal | Restart your Mac. Go to System Preferences > Dock. Select and then unselect the checkbox before Automatically hide and show the Dock |
| Lost emails | Restore from Time Machine backup | Check out this guide to recovering Apple Mail files |
| Lost Microsoft Office apps | Upgrade Office to the 64-bit version | Downgrade your macOS |
| Lost 32-bit Adobe products | Upgrade your Adobe products to 64-bit versions | Downgrade your macOS |
Conclusion
I updated my Mac and lost everything. Mac update deleted everything. These situations are not uncommon. Hopefully this article can be of some help to you. To avoid the risk, you can also choose to partition your hard drives and install the new macOS in one of the partitions. Even though you can use powerful software like the Cisdem Data Recovery for Mac to get data back, make it a habit to back up your Mac in order to be prepared for any data loss situations.

Connie Yu has been a columnist in the field of data recovery since 2011. She studied a lot of data loss situations and tested repeatedly to find a feasible solution tailored for each case. And her solutions are always updated to fix problems from the newest systems, devices and apps.

JK Tam is the lead developer at Cisdem, bringing over two decades of hands-on experience in cross-platform software development to the editorial team. He is now the lead technical approver for all articles related to Data Recovery and DVD Burner.
Dolin
I truly realized the great importance of early backup when losing part of my important data after my Mac upgrade to Monterey. I was so regretful that no backup was available then. Gladly enough, I have Cisdem Data Recovery to regain my data.
Jooye
I found many files missing after mac os sierra upgrade, and I didn't backup them to somewhere, I tried this data recovery, it found them on my Mac hard drive, thanks a lot.
Tonyer
Losing data after mac os upgrade or downgrade is not very much common if the user operate correctly I think. But it is indispensable to always keep a data recovery in hands. I do have one.