 Apple released macOS Sierra this September, what does this mean for you? You probably want to update your Mac to macOS Sierra 10.12, but there are a number of things you should do before updating. In this article, I'm going to explain how you can prepare your Mac to update it to macOS Sierra smoothly. Follow below guides to prepare your Mac for macOS Sierra upgrade.
The first thing to do as you prepare for macOS Sierra is to check to see if your Mac is compatible with the new macOS Sierra operating system; not all Macs will be able to upgrade. According to Apple, "All Macs introduced in 2010 or later are compatible; MacBook and iMac computers introduced in late 2009 are also compatible." The Mac models compatible with macOS Sierra are listed below:

To check whether your Mac is able to run macOS Sierra, click the Apple in the upper-left corner and click “About This Mac”. Under the Mac operating system listed at the top, you'll see the year of your model next to its name. If your Mac is in the above list, then you can upgrade to macOS Sierra.
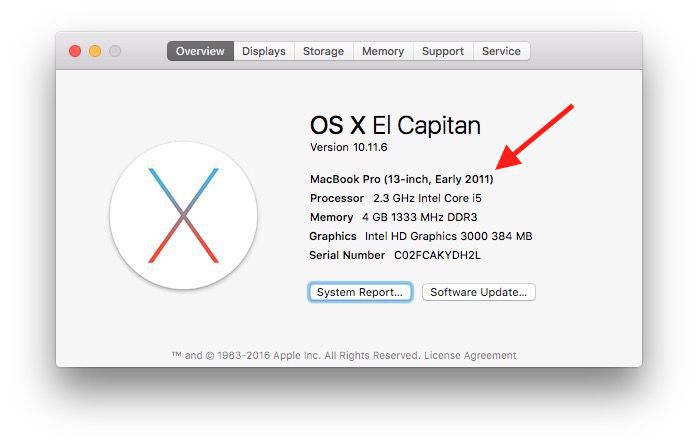
If you haven't updated your Mac's operating system for years, then you need to check to see if you are running OS X 10.7 or later. You can see your current OS version in the “Overview” tab where you check your Mac compatibility. If your Mac runs lower than 10.7, you need to upgrade your Mac to one of the following Mac operating systems first, thus you can upgrade to macOS Sierra.
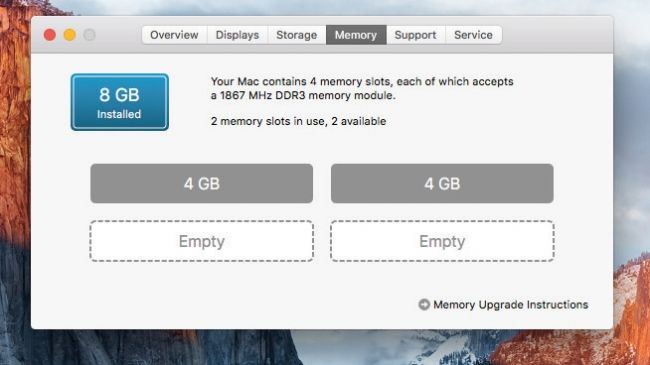
Go to “Memory” tab to check your Mac memory. Upgrading to macOS Sierra requires no less than 4GB RAM. If you have less than 4 GB RAM, you’ll have to look into upgrading your RAM.
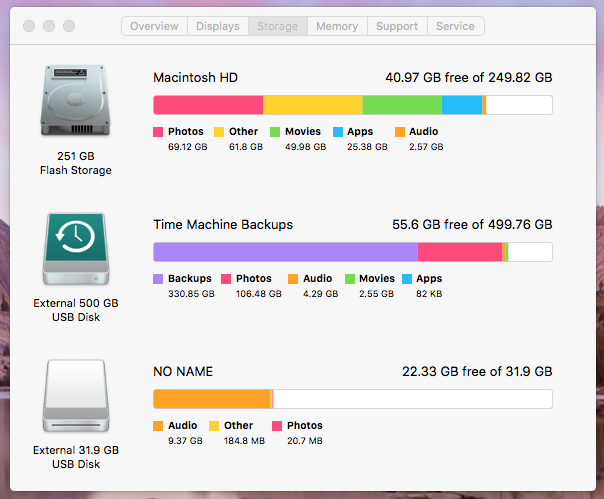
And you also need to check your Mac hard drive space. Just go to “Storage” tab, check the available space and what’s taking up your space before upgrading to macOS Sierra. If there is not more than 8 GB of free space for you to upgrade, you have to remove unless duplicate files, junk files, app cache, etc for upgrading. Check this useful guide: Six Useful Tips to Free up Space on Mac for macOS Sierra Upgrade.
If you have some apps you simply must use, check with the developer to make sure it’s compatible with macOS Sierra. Developers have had access to beta versions of the new operating system since June, but there are often some of apps that aren’t compatible with macOS Sierra. Check any essential apps before upgrading and update the apps compatible with macOS Sierra. You can also visit your installed apps within the /Applications folder and remove any that you no longer need or that aren’t supported by macOS Sierra.
And now it’s time for you to back up your Mac. Why? You never know what will happen when upgrading your Mac to macOS Sierra. Furthermore, it’s just good practice to back it up every so often, you know, just in case of data loss. You can follow below guidance to backup your Mac with Time Machine. For more solutions to backup Mac, please check this guide: Backup Mac in Three Easy Ways. It’s also better to backup your Mac with two or more methods.
Backup Mac with TimeMachine:
Step1. Go to your System Preferences folder. Select Time Machine.
Step2. Click “Select Backup Disk…” Select an external hard drive, Time Capsule, or other storage solution from the list, and then click “Use as Backup Disk”. An external drive or an Airport Time Capsule is good.
.png)
Step3. After you choose a backup disk, choose “Back Up Now” from the Time Machine menu. You can also optionally click “Add or Remove Backup Disk” to add more backup disks for extra security and convenience.
Now you can upgrade to macOS Sierra. If you don’t know how to upgrade, no worries, it’s quite simple. To download the new macOS Sierra and install it, you’ll need to do the next:
Step1. Open App Store and click Updates tab in the top menu. You’ll see Software Update - macOS Sierra.
Step2. Click Update. Wait for macOS download and installation. Your Mac will restart when it’s done. Now you have Sierra.
You can also install macOS Sierra on external hard drive. To know more about installing macOS Sierra, please visit this detailed article: How to Get and Install macOS Sierra.
Learn more
If you don’t like macOS Sierra after upgrading, you can also be able to downgrade your Mac to El Capitan, the previous version of the Mac operating system.
If you find some data lost after upgrading, don’t worry, a third party data recovery software like Cisdem DataRecovery will recover lost data after upgrading to macOS Sierra.
If you want to use the iOS-to-Mac and vice versa clipboard feature, you’ll need to make sure that the iPhone or iPad is updated to iOS 10.

Connie Yu has been a columnist in the field of data recovery since 2011. She studied a lot of data loss situations and tested repeatedly to find a feasible solution tailored for each case. And her solutions are always updated to fix problems from the newest systems, devices and apps.


