Mac file sharing is what many Mac users usually have to deal with. These years, we also witnessed the rapid development of file-sharing and synchronisation technology. For example, Dropbox, the cloud-based file hosting giant, has recently patented a new technology allowing users to utilize a peer-to-peer network to securely share and collaborate on documents without the need to store them in the company's centralized servers. In this article, instead of talking about the high-end technologies, we introduce the easiest ways to share files between Mac and PC, and also solutions to sharing files between Macs.
Generally speaking, it is very easy for a Windows PC user to share their files with anyone on a Mac, for Macs can detect any Windows computer connected to the local network and show them on the Finder’s sidebar. However, it may need more attention if you wanna a Mac to share its files to a Windows PC.
Step 1. Click on Apple icon and then choose “System Preferences”.
.png)
Step 2. Click the checkbox next to File Sharing and then open the “Option” menu. Check the box before the “Share files and folders using SMB(Windows)” to go on.
.png)
Step 3. Check the user account you'd like to share with Windows computers where it says Windows File Sharing. You'll be prompted to enter the password for that account. Besides, make note of the address (IP or hostname) of the Mac. It will be listed at the top of the sharing window.
Step 4. We need then connect to the Mac machine from windows. Go to “Start” > “Run” or use the Quick Search bar, and type in “\\” followed by the address of the Mac. You can then find the targeted Mac. Sometimes, the name for the Mac will be automatically changed to another one.
.PNG)
Step 5. Double-click the icon for the Mac. You’ll be asked for a username and password of the Mac. Then, log in the Windows admin account and you’ll see its public folder, home folder, and the Macintosh HD, along with any other folders you shared.
There are a variety of different ways to transfer or share files between Macs, here below are two easy and time-saving way by using Airdrop for your reference.
If you Mac is running OS X Lion or later, the easiest way to share files with another Mac is to make use of AirDrop. With AirDrop, you can wirelessly send photos, videos, websites, locations, and more to a nearby iPhone, iPad, iPod touch, or Mac.
Step 1. Choose Go and then AirDrop from the menu bar in the Finder.
.png)
Step 2. The AirDrop window shows nearby AirDrop users.
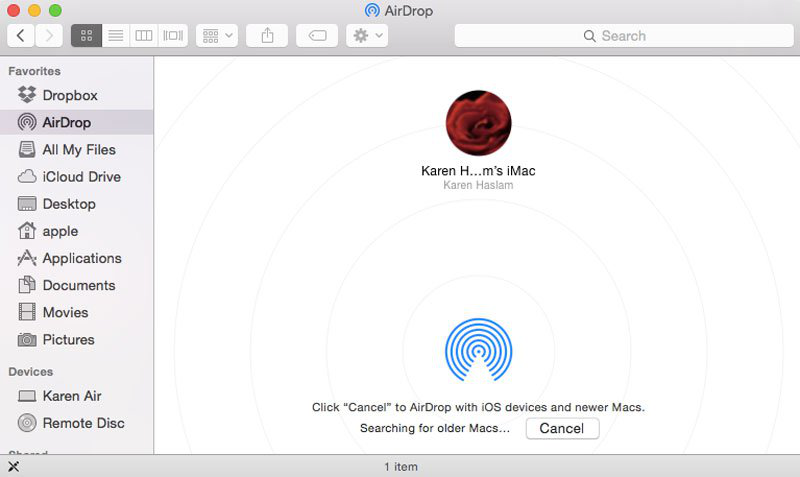
Step 3. Drag one or more items to the recipient's image in the window, then click “Send”.
Tips:
A. The two Macs must open the AirDrop window at the same time so that they can be visible to each other.
B. The two Macs must be within reasonable range of each other, but not necessarily on the same network.
This tutorial is used for common Mac file sharing. In the case that you need to share other information, you may need to find new ways. Contacts, for example, can be shared between Macs by using Cisdem ContactsMate.
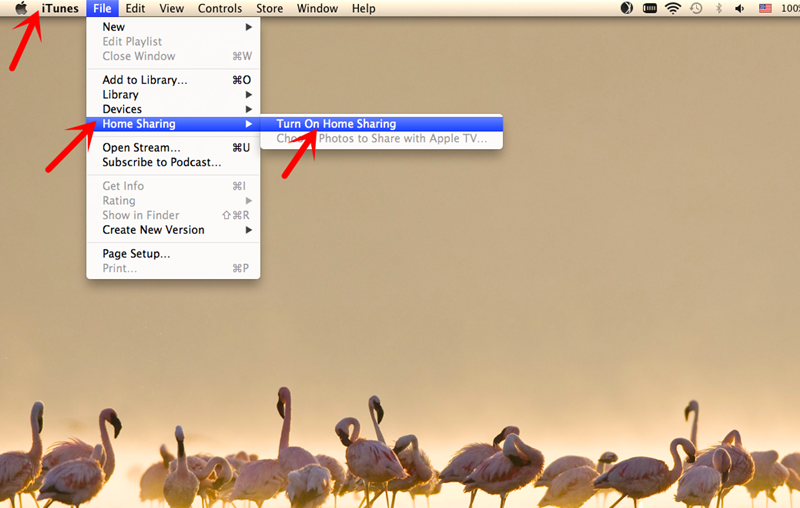
Home sharing is a feature designed to share and stream content, including stream music, movies, TV shows, apps, and other iTunes content, from iTunes library to other computers, iOS devices, and Apple TVs. It can be used for up to five computers on your home network. In order to share files between Macs, you can set as follows.
Step 1. Update your iTunes to the latest version and open it on your Mac.
Step 2. Click on “File” > “Home Sharing” > “Turn on Home Sharing”.
That's it. You can then share the authorized files on your Mac with other Macs now.
Tip: This method can also be workable to share files from Mac to PC if the recipient Windows PC has installed the latest version of iTunes for Windows too.
1. Whenever you share files to others on your Mac, you should make sure your anti-virus program is turned on. Take measures to make sure your privacy is well-protected.
2. If you have too many files to share or the storage is too large, it is wise to clear up the files before the sharing in order to save your time, say, removing the duplicate files and compressing large files on your Mac.
3. Computers that have file sharing turned on are tempting targets for hackers, who often exploit that feature to take over victims' machines. I urge you to disable the general file sharing capabilities of your OS X as soon as the sharing is finished.

With a passion for tech and writing, Sarah joined Cisdem, where she focuses on creating articles about using utility tools to enhance file management and simplify contact management.


