

How to Password Protect Files on macOS
 24.0K
24.0K
 4
4


“How can I password protect files on Mac? I am looking for a way to basically lock files in my Mac via password. I don't want these files to be viewed easily but I also don't want to burn them into my hard drive or anything like that. Is there any way to password protect these kind of files from someone who might hop on my Mac and these files popping up unexpectedly?” From an anonymous Mac user.
Computers have become the place where you store pictures, documents, videos,favorite music and everything else in the same place. But everybody who is able to access to your computer can open your important files easily. If you want to keep movies, pictures and other files under a safe lock, setting a password to protect them is very necessary. This article will show your how to password protect files on Mac using three certain ways.
 Cisdem AppCrypt
Lock Apps & Block Websites on Mac
- Lock individual apps with a password
- Offer an option to automatically re-lock apps after a period of inactivity
- Record failed attempts to open locked apps
- Block websites with a password
- Let you block specific sites and pages, URLs with certain keywords, or all sites except a few
- Let you lock apps and block websites permanently or at scheduled times
- Easy to use
- Hard to bypass
- Help with privacy protection, productivity and parental controls
- Compatible with macOS 10.12 or later
- Also available for Windows, iPhone and iPad, and Android
 Free Download macOS 10.12 or later
  Free Download Windows 10 or later


Method one: Use Disk Utility to password protect files on Mac
Disk Utility, which is primarily intended as a disk repair and imaging utility, can also be used to create a disk image that contains a folder’s worth of encryptedfiles. It is a default built-in feature of the macOS allows you to create password to password protected folder. Using Disk Utility to password protect files will cost you nothing but it is not easy to operate, but don’t worry, below will show you detailed steps on using Disk Utility to password protect files.
1. Open Disk Utility by going to the Applications Folder and then through Utilities.
2. Once inside, go under “File” and select “New”.Here, choose “Disk Image From Folder” and browse for the preferred folder which you want to be encrypted.
3. After choosing it, click “Image” and a new menu will pop-up with three possible options: to read/write the image, only to read it or to encode it. If you choose only “read”, you will not be able to add other files into that image.
4. Choose “Save”and type your password. It is very important to let unchecked the “Remember password in my keychain” option to be sure that other people that use that computer will not be able to open it.
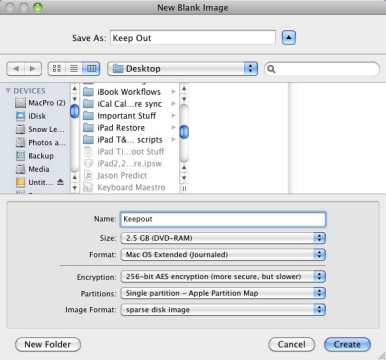
Pros and Cons: You personal or important files such as videos, photos, folders can be encrypted with a 256-bit AES encryption using Disk Utility. This algorithm is one of the best solutions used nowadays for protection because it offers maximum security. And your disk image will take up as much storage as the sum of the files within it. So, even though you’ve created a 2.5GB image, if you’ve only flung a single 300MB file into it, that’s the size it will be. But this way is not very easy touse.
Method two: Use Print to PDF to password protect files on Mac
The print-to-PDF feature in macOS is convenient for quickly preserving a document’s layout in the PDF format, so it can be viewed on most computers and tablets.If you would like to send someone a formatted document that contains sensitive information or if you are uploading or syncing the files to third-party cloud storage services, you may want to encrypt the document with a password. This will work for any file-type that gives you the option to “print” a file to PDF.
1. Open any file you want to convert to a password protected PDF.
2. Go to File > Print. When you get the Print window, look for a little button marked “PDF”. Click it, and choose “Save as PDF”.
3. Before you save the file, be sure to click the “Security Options”button.
4. Check the box next to “Require password to open document”and enter a password, enter it again to verify, then choose “OK”.

Pros and Cons: It is easier than using Disk Utility. But “Print to PDF” offers one algorithm, which is 128-bit RC4. It only supports files which can be converted to PDF, that’s the restriction of this way.
Method three: Use File Locker to password protect files on Mac
File Locker is an easy to use software that allows you to hide and lock files and folders on your Mac and gives you more privacy. If you lock files while hiding them, this encryption software will prevent accidental deletion of locked files. The app is password protected preventing unwanted or accidental viewing of your files. You can follow below steps to lock files on Mac.
1. Launch File Locker on Mac, click “+” button to add files or folders which you want to hide or lock to the app.
2. Select Hide Operation and Lock Operation. If you want to hide these files, select hide. And you can also unhide files here.
3. Click “Submit” to start to batch hide or lock files, once options are submitted, this encryption app will do according to your options.
.jpeg)
Pros and Cons: File Locker is very easy to use, and the interface is very user-friendly. But there is no helpful support if you come across problems when using File Locker. And this encryption software will cost you about three dollars.
Have locked files on Mac, now what?
You can choose the suitable method to lock or password protect your files. After having locked files on your Mac, what should you do next? Are you still feeling something that has not been locked on Mac? Maybe you guessed it, applications. There are some apps which you don’t want to be accessed by someone else, so you need a encryption software to lock your apps. Cisdem AppCrypt can do that for you. It allows you to lock individual app and keeps track of every failed attempt to access the blocked apps with date, time, and optional photo. You can download free version of this app locker software and it certainly doesn’t cost anything to see if it can lock apps for you!

Norah Hayes likes to share her tips on how to improve focus and stay motivated at work. She believes it is essential to eliminate all online distractions during work hours.

Ethan Long joined Cisdem in 2015 as a developer and now serves as the editorial advisor for Cisdem AppCrypt. He actively tests and uses Cisdem AppCrypt and other screen-time management tools to ensure AppCrypt meets its promises in real-world scenarios.
Ryan
This is a good article worth sharing. I will share it on my facebook and twitter.
Winfred
I used the disk utility method, once I open the file with my password, it creates a disk image on my Mac that I can open without my password. So I have to delete that disk every time I access it.
John
Don't DELETE the disk image, do an EJECT ONLY to close the disk image. Your files go back to being encrypted with your password protection.
Abeni
very useful, with the three methods, i can lock any files i want including videos, photos, document files, compressed files on Mac. I also want to buy AppCrypt to lock my apps on Mac