

How to Export Mac Contacts to CSV Easily: 3 Proven Ways
 48.6K
48.6K
 7
7


Key Takeaways
There are three common ways to export contacts from your Mac to a CSV file.
To successfully use the exported CSV file in certain services or apps, manual adjustments are needed sometimes.
Contacts (aka Apple Contacts) is a contact management app included in macOS, iOS and some other Apple operating systems. As you know, it has some feature to help you manage your contacts on Mac. If you export your Mac contacts, you can use the Export feature. It supports the vCard format as well as the ABBU format. What if you want to export them to the CSV format?
In this article, I’ll show you 3 different methods to export Mac contacts to CSV, including step-by-step instructions and the pros and cons of each method.
 Cisdem ContactsMate
The Best App to Export Mac Contacts to CSV
- Support various contacts sources: Mac’s Contacts, iCloud, Google, Exchange, etc.
- Directly export contacts from supported sources to 8 formats: CSV, Excel, vCard, etc.
- Import contacts from CSV and vCard files
- Let you view, search, edit, create, group, tag, share, print and sync contacts
- Find and delete/merge duplicate contacts in supported sources with a click
- Let you back up and restore contacts with a click
- Help you effortlessly transfer contacts between sources
- Help you effortlessly convert contacts between formats
- Easy to use
 Free Download macOS 10.11 or later
A brief comparison
One of the common reasons to export Mac contacts to a CSV file is to import the contacts to some service or app, such as Outlook, Google, or Shutterfly. This article talks about three methods to do the export. Here’s a brief comparison of these methods.
|
Compatibility |
Ease of Use |
Supported Formats |
Accuracy |
Security |
|
|---|---|---|---|---|---|
|
Method 1 |
macOS 10.11 or later |
Very easy |
CSV, CSV (Outlook), Excel, etc, |
Accurate |
Offline and safe |
|
Method 2 |
macOS 14.0 or later |
Moderate, may require manual adjustment |
CSV |
Accurate after manual adjustment |
Offline and safe |
|
Method 3 |
All macOS versions |
A bit troublesome |
CSV, CSV (Gmail) |
Some fields may match incorrectly after conversion |
Requires uploading contacts online |
About CSV, CSV (Outlook), and CSV (Gmail)
All these methods provide CSV as an export format, and some offer multiple options for CSV export. These options differ in field order and layout compatibility.
- CSV: This option is general and works with most places, like Excel, Numbers, etc.
- CSV (Outlook): This option is designed for Microsoft Outlook. If you are going to import Mac contacts into Outlook, choose this format.
- CSV (Gmail): This is compatible with Google.
Method 1. How to export Mac contacts to CSV directly
This method uses Cisdem ContactsMate, the best contact management app for Mac. It offers basic and advanced features to help users manage contacts. With it, you can easily export all your Mac contacts to CSV in bulk (without any duplicate or problematic contacts).
Below are the steps on how to do the export.
1. Download and install ContactsMate.
Free Download macOS 10.11 or later
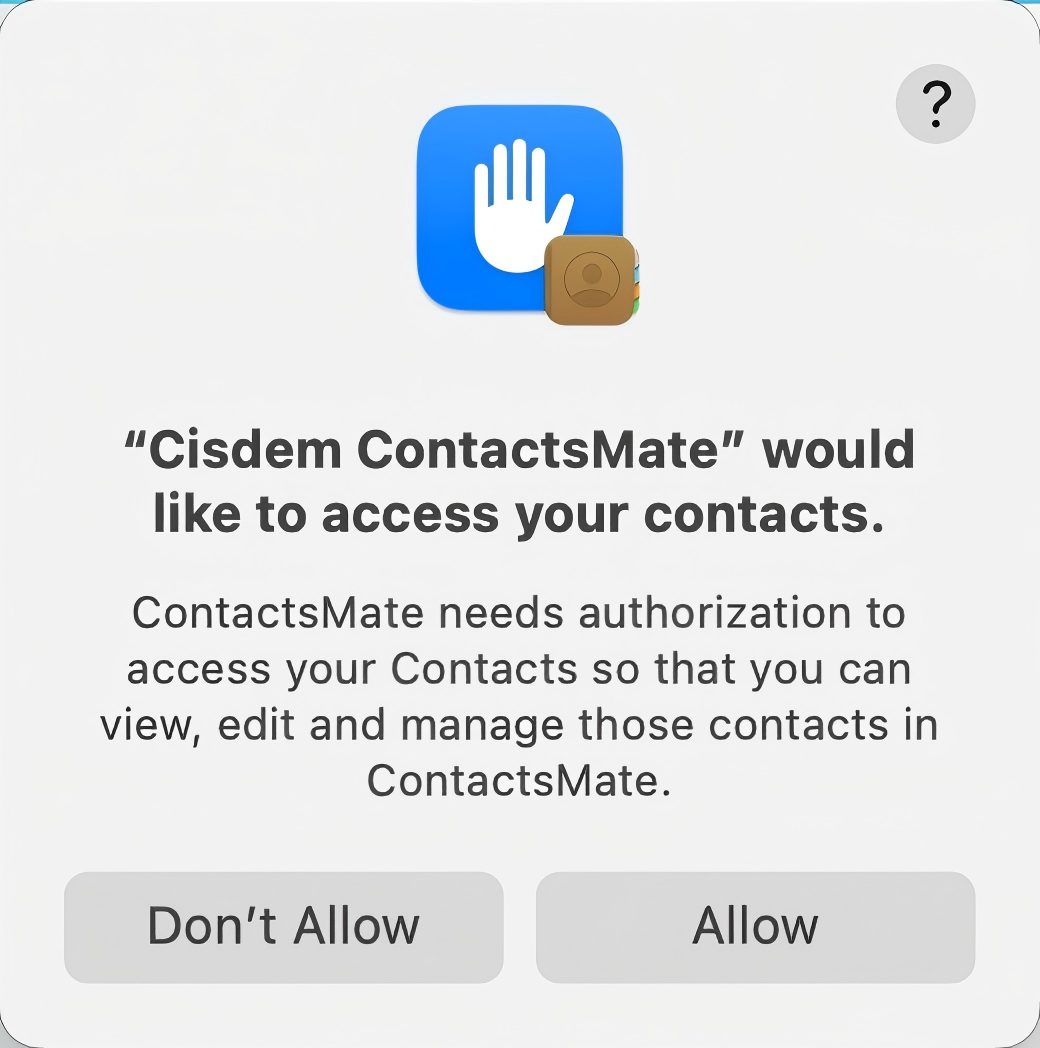
2. Allow it to access your contacts.
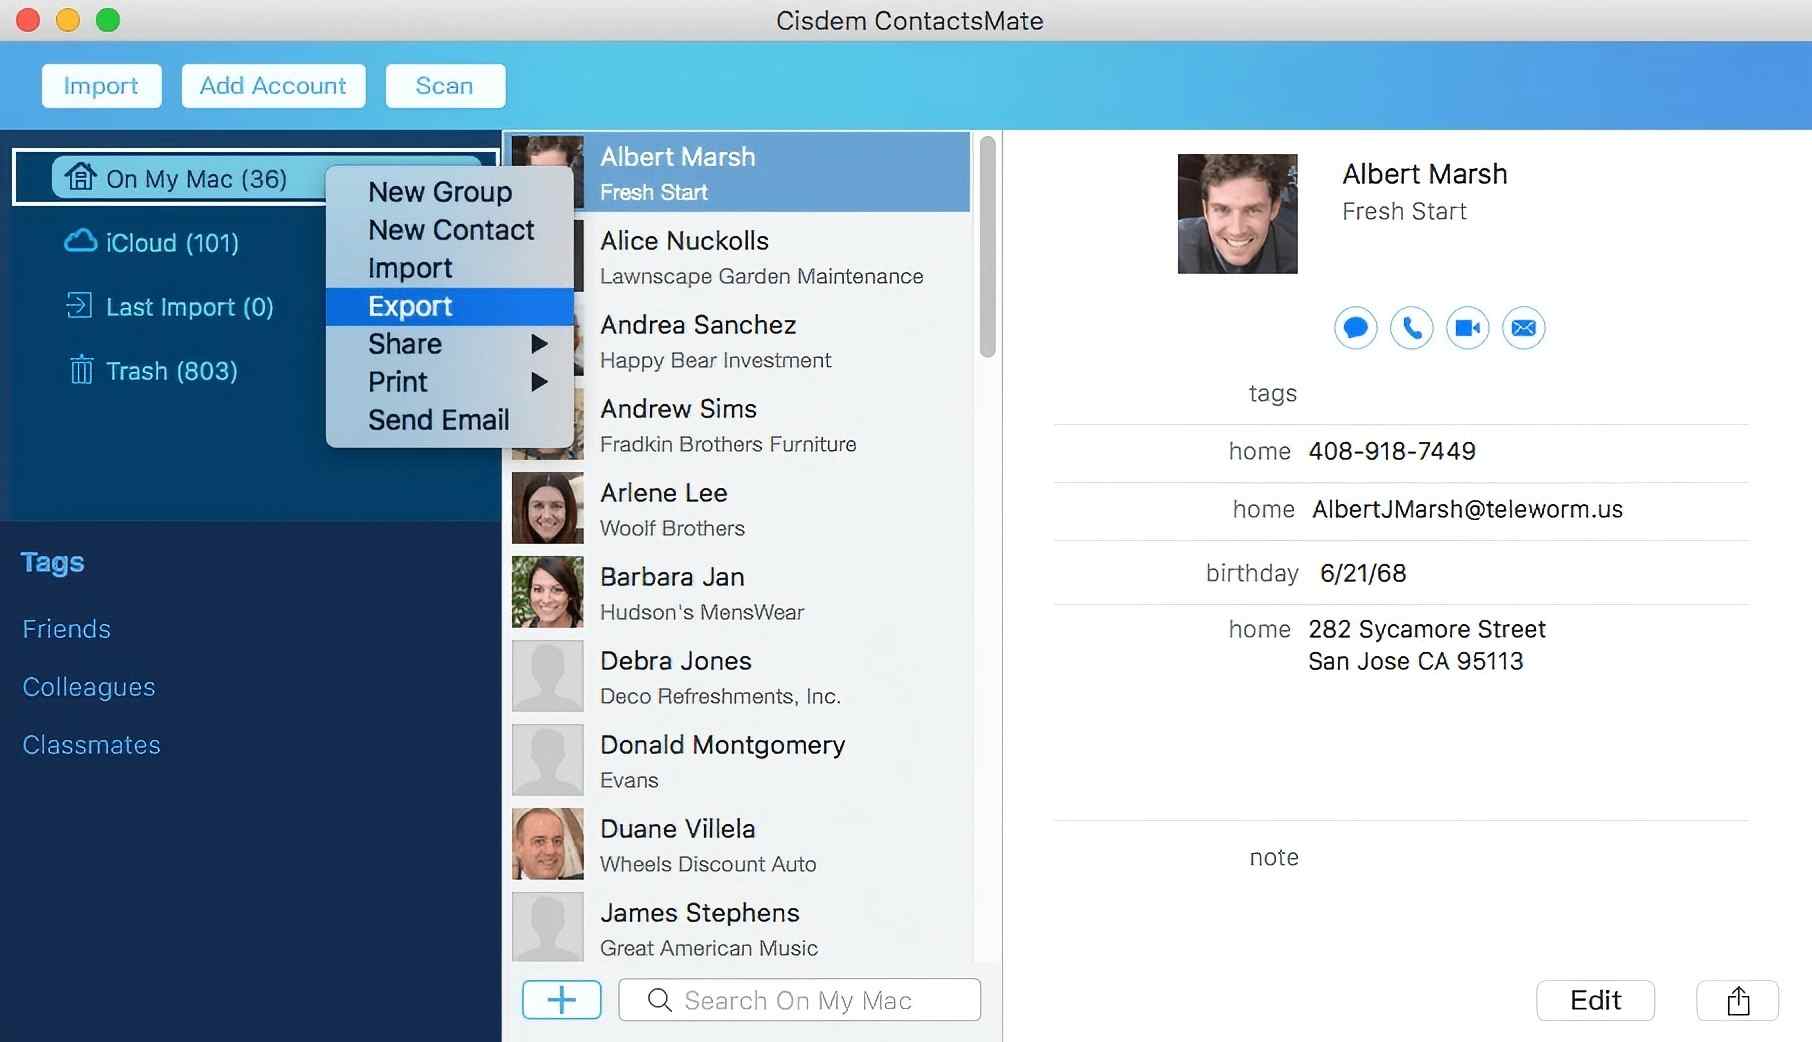
3. Control-click On My Mac in the left sidebar. Choose Export. (This will export all contacts.)
Tip
If needed, you can export only a contact group (or specific contacts) to a CSV file. To do this, control-click the group under On My Mac (or select specific contacts then control-click), and click Export.
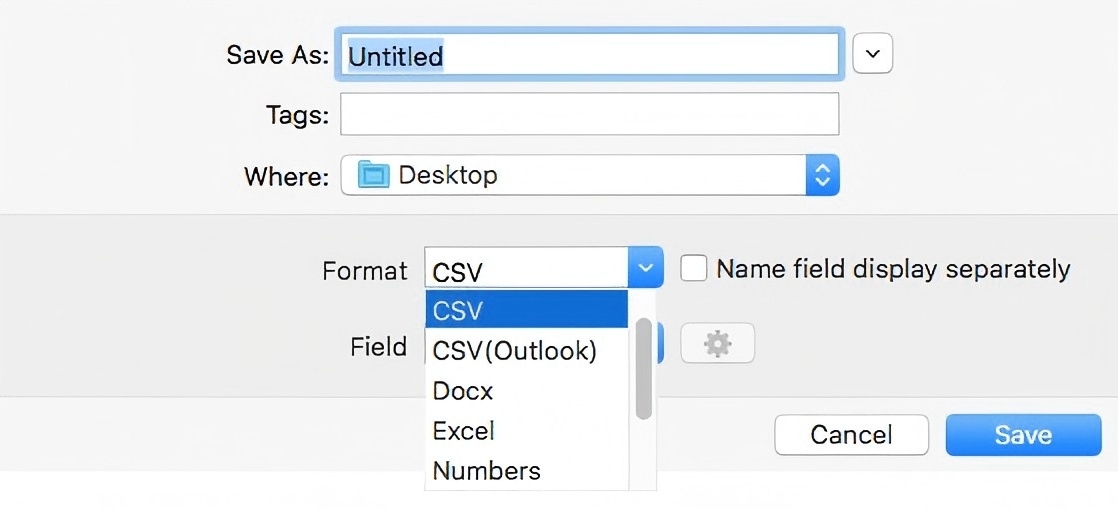
4. In the export dialog, click the Format drop-down menu. Choose CSV or CSV (Outlook) based on your needs.
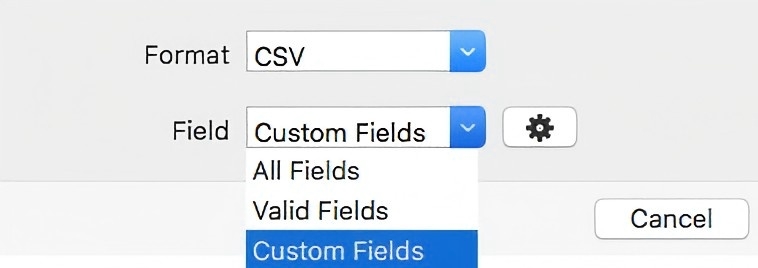
Tip
If needed, you can use the Field drop-down menu (located below the Format menu) to control which fields to export, for example, all fields or only fields of your choice.
5. Name the CSV file and choose a location to save the file.
6. Click Save.
It’s that easy.
On a side note, this method can also help you export contacts to a CSV file from iCloud, Google and more.
Why you need a dedicated app to export Mac contacts to CSV
In fact, you can export Mac contacts to CSV without installing any app (if you’re interested in that, you can skip to method 3). However, I still list this app as method 1 for some reasons. Here’s why I recommend it and what makes it a dedicated app for exporting Mac contacts.
- For exporting contacts from Mac to CSV, this app saves you from manually adjustment. It exports contacts in bulk without errors.
- If you want a custom CSV file, this app also allows you to customize the export. You can choose which contact fields to export as your like.
- Before exporting, it can detect and remove/merge duplicate contacts on Mac. This ensures your exported CSV file is well-organized. It also detects problematic contacts in your contacts list like incomplete name, invalid phone numbers or email addresses.
- The app can work offline. You can export Apple contacts to CSV without uploading any contacts information online, keeping your personal data private and secure.
- In addition to CSV, ContactsMate supports exporting contacts to Excel, vCard, Numbers, TXT, or other commonly used formats. You can import the exported contacts file into different services or platforms.
Method 2. How to export Mac contacts to CSV with Numbers
Although Mac’s Contacts doesn’t allow you to export contacts to the CSV format, macOS does provides a method to help you do the export, which involves using the Numbers app. This app is preinstalled in some Macs. You can also download and install it from the App Store, which is compatible with macOS 14.0 or later.
This method is easily accessible and usable. And it only takes a few steps. However, if your purpose is to import the exported CSV file to some service or app (like Outlook), this method may not be a good choice because you may have problems importing contacts from this CSV file.
Below are the steps.
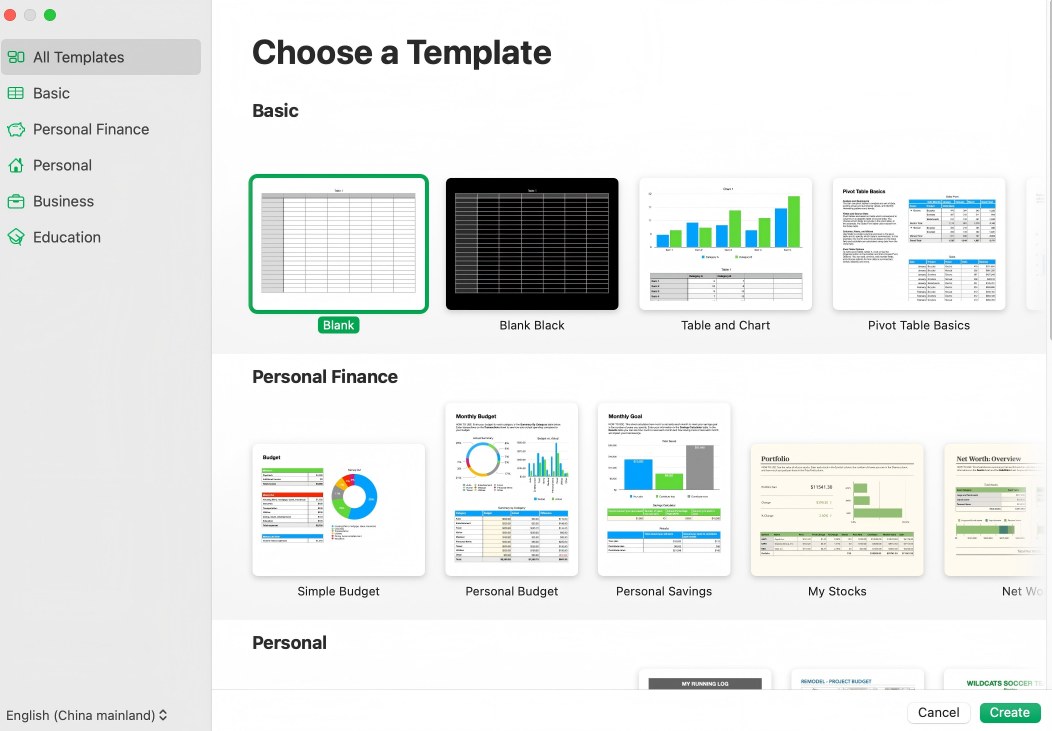
1. Open the Numbers app.
2. In the Choose a Template dialog, choose the Blank template. Click Create.
3. Open the Contacts app. To select all contacts, click the first contact card and then press Command + Shift + Down arrow keys.
(Note: Pressing Command + A won’t work here. I tried that, and then couldn’t drag the contacts into Numbers in step 4.)
4. Drag selected contacts into the Numbers app.
5. From the File menu, choose Export To > CSV.
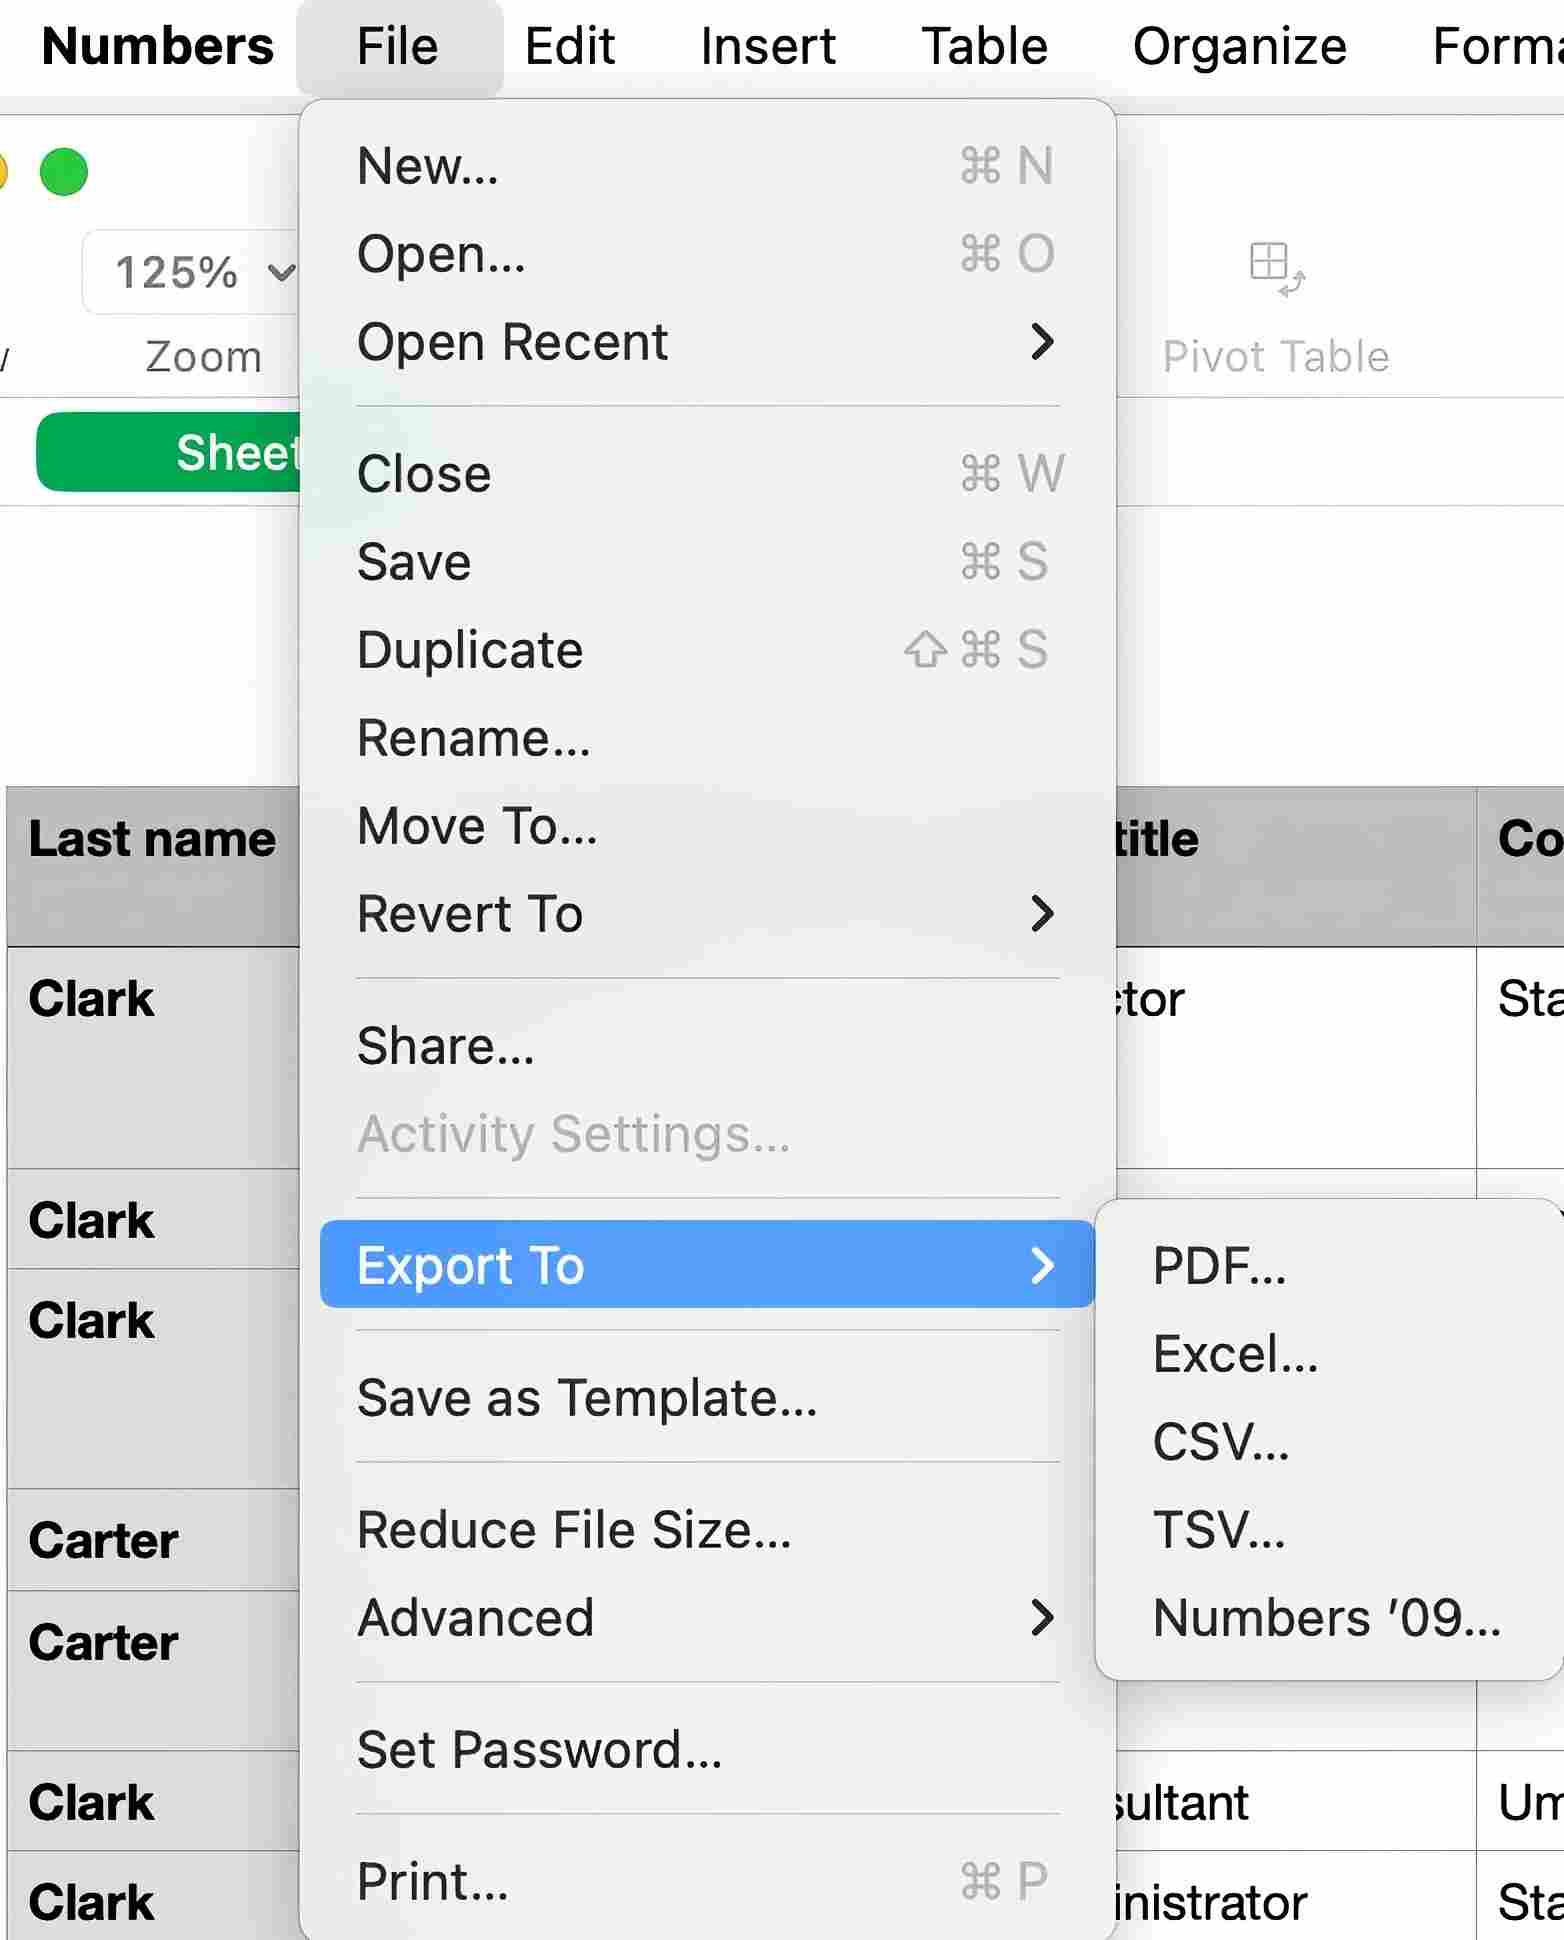
6. In the dialog that appears, click Next.
7. Click Export. Name the CSV file and choose a location to save it.
Method 3. How to export Apple contacts to CSV using an online tool
If you don’t mind uploading the information of your contacts online, then this method can be a choice. There are several online tools that you can use. The tool tribulant.com/vcard-csv is one of them, and the following steps use this tool as an example to show you how to use the method. Note that the method is less straightforward than the other two.
1. Open the Contacts app.
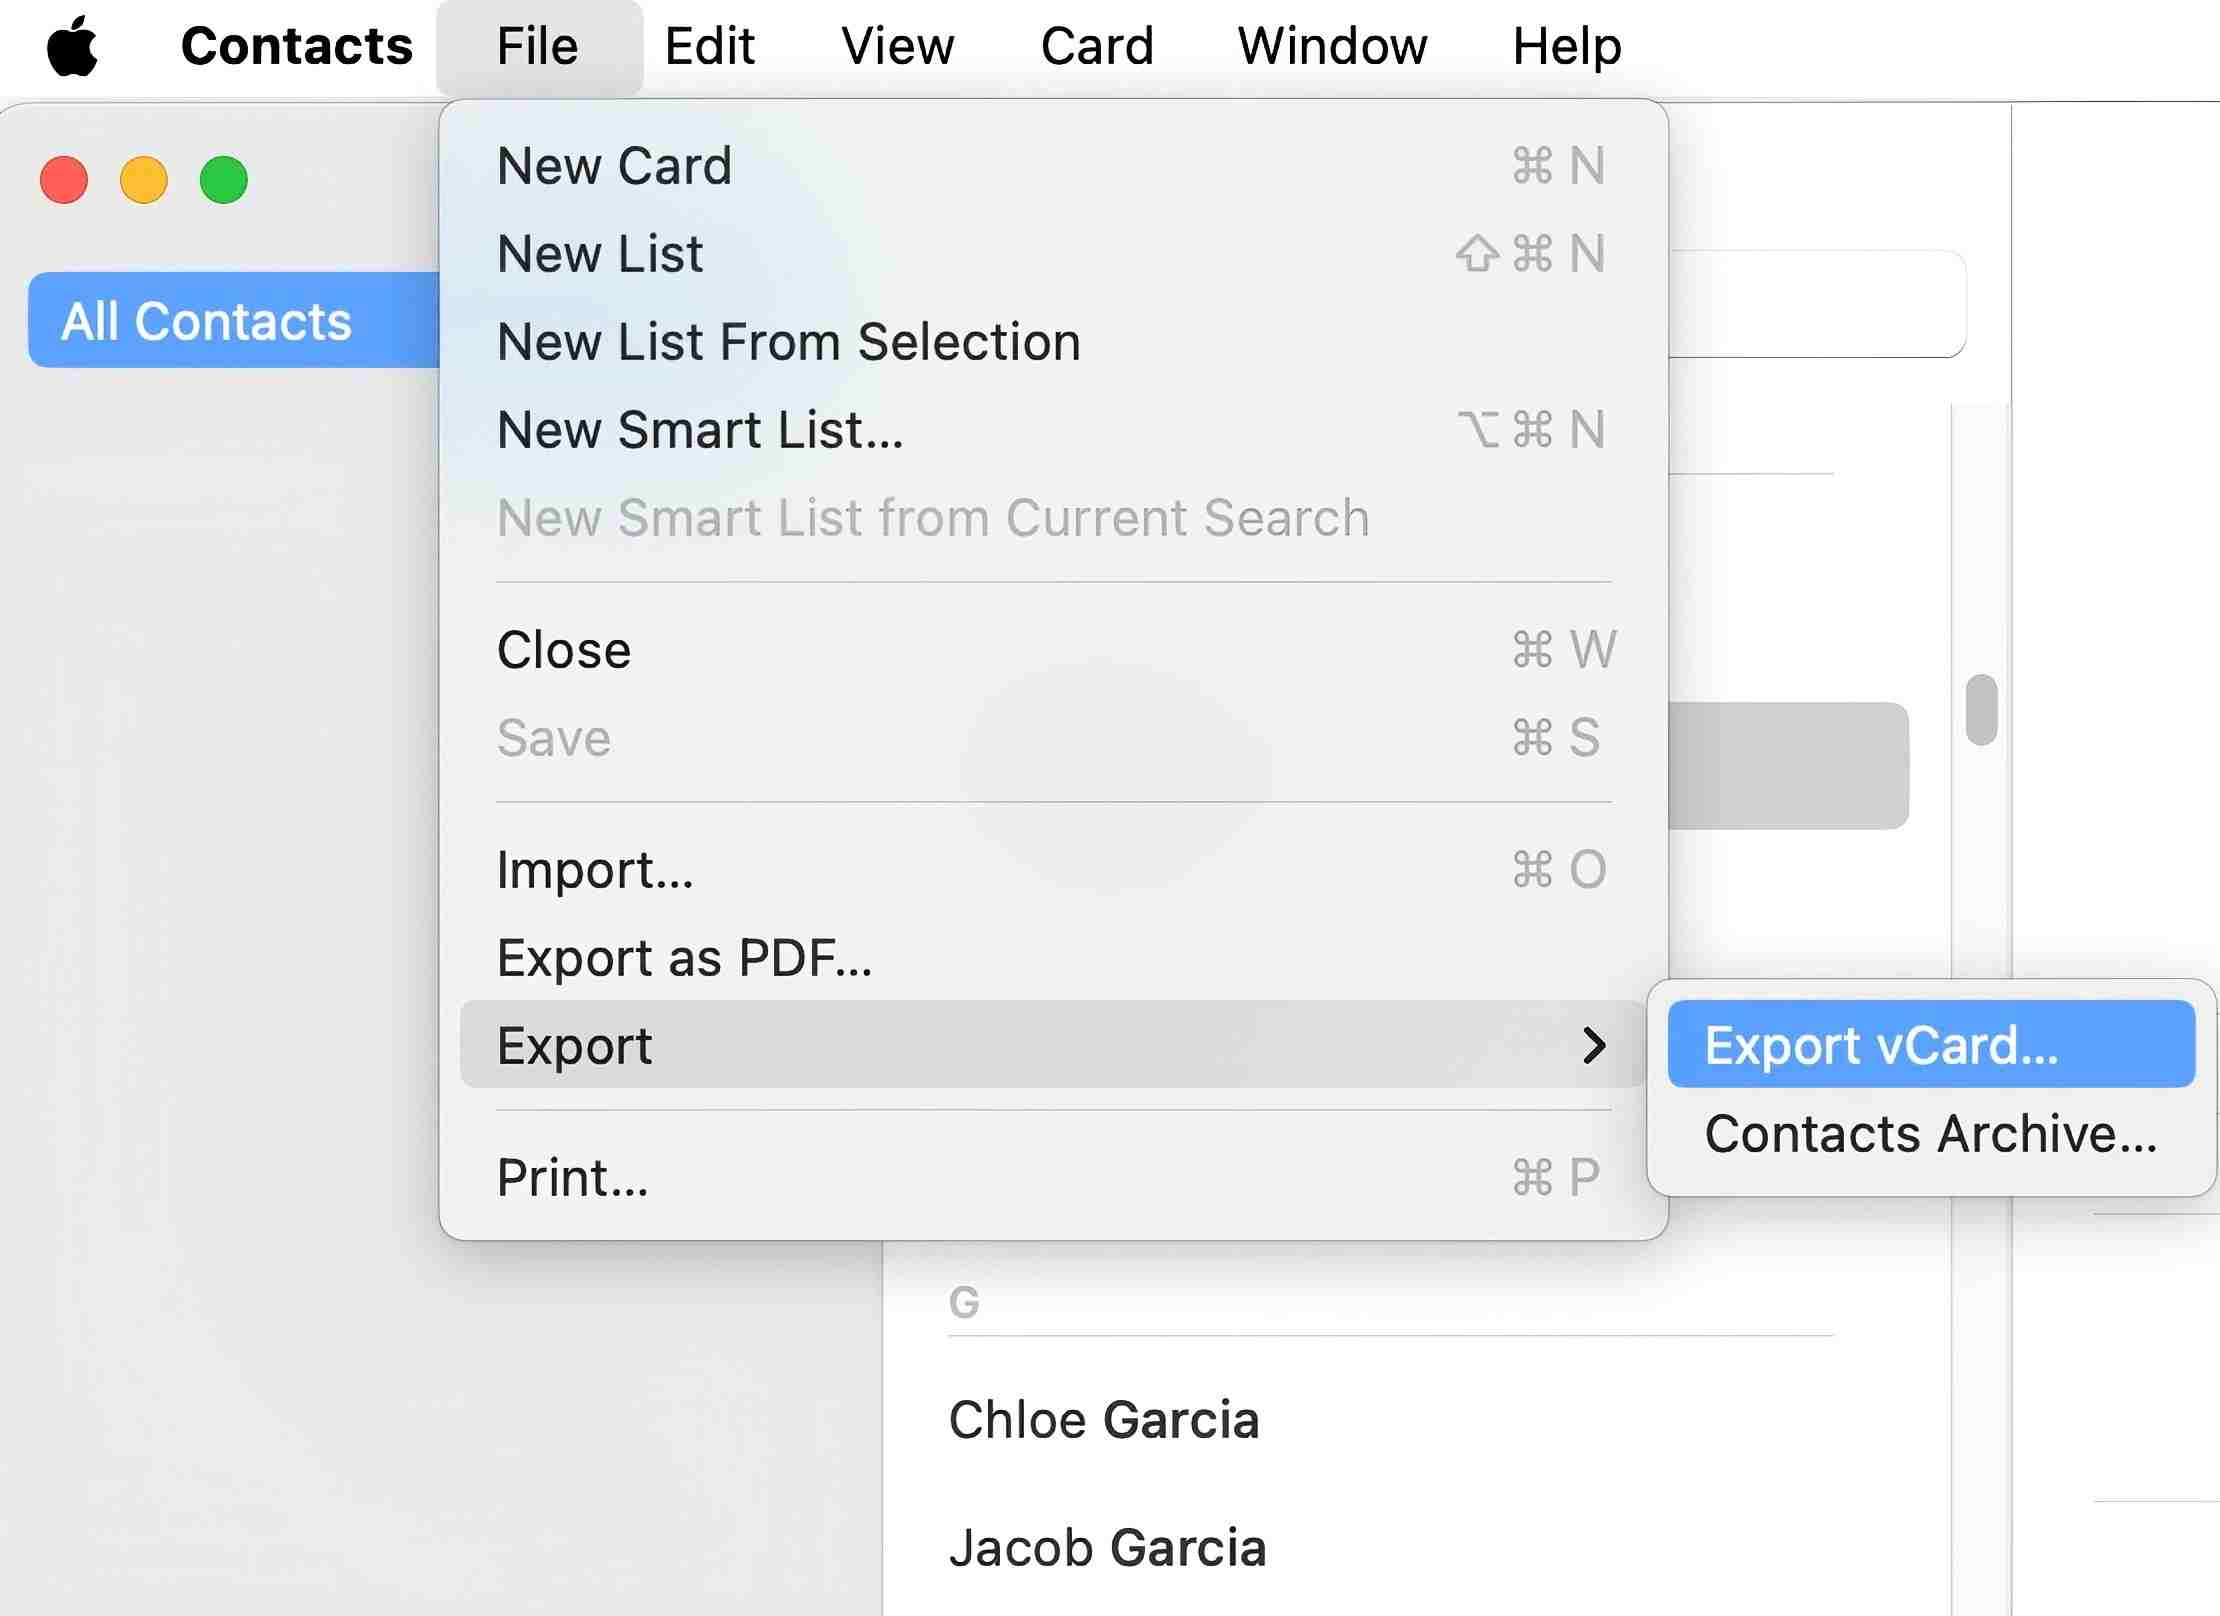
2. In the left sidebar, click on All Contacts.
3. In the upper-left corner, open the File menu. Choose Export > Export vCard.
4. Click Save in the dialog that appears. This will export your contacts to a vCard.
5. Open a web browser and visit tribulant.com/vcard-csv.
6. Click Choose File. In the dialog that appears, select the vCard file that is exported in step 4. Click Open.
7. Click the Format dropdown menu. Choose CSV or Gmail (CSV) according to your needs.
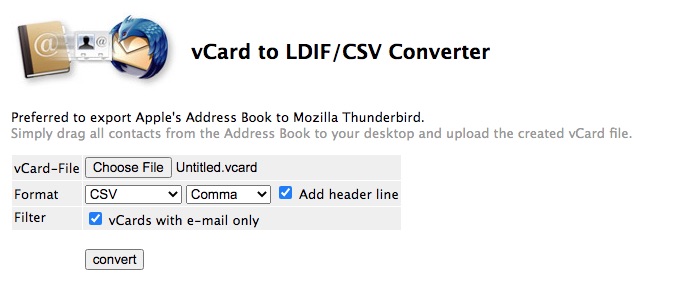
8. This step can be optional. If you have chosen CSV instead of Gmail (CSV), then click the drop-down menu on the right and choose Comma. Also, select the Add header line checkbox.
9. Click Convert.
The exported CSV file is usually in the Downloads folder.
If you choose CSV as the format in step 7, then two customization options will be available. It’s recommended to do the customization by following step 8. If you choose Tab or Semicolon instead of Comma or if you don’t select the Add header line checkbox, the CSV file is very likely to be incompatible with certain apps and services.
FAQs
What's the easiest way to export all Mac contacts to CSV?
The easiest way to export all Mac contacts to CSV is using Cisdem ContactsMate. Before exporting, it’s recommended to scan for duplicate contact cards and clean them up. What’s more, choosing to export only valid fields or custom fields can make your exported CSV file more organized.
Why does an address book have difficulty working with the exported CSV file?
If you receive an error message when uploading or importing the exported CSV file to a service or app's address book, the most likely cause is a compatibility issue. It also might be internet or server problems, which is rare though.
How to edit a CSV file to make it compatible with a certain service or app?
With Method 2 and Method 3, there’s a possibility that the exported CSV file is not (well) supported by certain services and apps. You can edit such a CSV file to make it more compatible.
1. Go to the service or app that you want to import the CSV file to.
2. Download a CSV template if available.
If such a template is not provided, you can create one. Create a contact in this service or app first (and fill out as many as contact fields as possible) and then download the contact as a CSV file.
3. Open the CSV file containing your Mac contacts.
4. Open the template in an app like Excel or Numbers.
5. Compare and edit the column headers in the CSV file. Make it match the column headers in the template.
Alternatively, you can copy the contact information from the CSV file into the corresponding columns in the template.
Conclusion
After you export Mac contacts to CSV, you can import these contacts to an app or service that supports CSV as the import format or keep the CSV file as a backup of your contacts. This article discusses three export methods available. I hope it can help you find the way that is the most efficient and best fits your needs.

With a passion for tech and writing, Sarah joined Cisdem, where she focuses on creating articles about using utility tools to enhance file management and simplify contact management.

Adrian Li is Cisdem’s Chief Engineer and serves as the editorial advisor for Duplicate Finder and ContactsMate. His work and insights have been featured in leading tech publications such as Fossbytes, TUAW, Redmond Pie, SafetyDetectives, and BestForAndroid.
Jörg Langer
Thank you! I directly use the first method, is straightforward and useful. Your guide is clear.
crork fiverr
jRExv7 Thank you for every other great post. Where else may anyone get that type of information in such a perfect method of writing? I ave a presentation next week, and I am at the look for such information.
fiverr crorkservice
FXUwh6 Just Browsing While I was surfing today I noticed a great article concerning
Handynummer Orten
If you want tab-separated, instead of File Export to CSV from Numbers, simply select the cells with the data, command-c to copy, and in an open document in a text editor, command-v to paste. Then save with the desired file suffix.
Dyson
If you want tab-separated, instead of File Export to CSV from Numbers, simply select the cells with the data, command-c to copy, and in an open document in a text editor, command-v to paste. Then save with the desired file suffix.
Hugh Appelgren
Im obliged for the blog article. Cool.
Insurancewhisper.com
This is one awesome article post.Really looking forward to read more. Awesome.