


How to Find and Delete Duplicate Photos in Windows 11 Easily: 4 Ways
Updated on June 11, 2026
 3.7K
3.7K
 1
1


3.7K
1
No robots used,
this article has been written and edited by our team under strict editorial guidelines.
Duplicate photos can quickly pile up on a PC, taking up a lot of storage space and cluttering your photo library. Manually finding and removing them can be time-consuming, especially when they are scattered across different folders or drives.
The good news is that Windows 11 users have several effective ways to locate and delete duplicate photos. This article provides step-by-step instructions to help you easily find and delete duplicate photos on your Windows 11 PC.
Which Method is Best for Finding Duplicate Photos in Windows 11?
Before getting started, it's important to understand the types of duplicates you may have.
Exact duplicate photos are two or more photos that are exactly identical, regardless of their file names. While similar photos may look similar or look the same to the naked eye but are different in sizes, formats, or resolutions.
The table below compares the four methods covered in this guide.
| Method | Finds Exact Duplicates | Finds Similar Photos | Ease of Use | Best For |
|---|---|---|---|---|
| Cisdem Duplicate Finder | ✅ | ✅ | Easy | Quickly finding and removing large numbers of duplicate and similar photos |
| Microsoft Photos | Limited | ❌ | Easy | Finding a small number of duplicate photos with a built-in tool |
| File Explorer | Limited | ❌ | Moderate | Manually cleaning up a few duplicate photos |
| PowerShell | ✅ | ❌ | Advanced | Finding exact duplicate photos using command-line tools |
Method 1. Use Cisdem Duplicate Finder (Fastest & Most Accurate)
If you have thousands of photos stored across different folders or drives, using a dedicated duplicate photo finder is the best option.
Cisdem Duplicate Finder automatically identify duplicate photos, including those with different filenames. It also finds similar photos, helping you effortlessly pick the best shots to keep and get rid of redundant ones.
In addition to duplicate photos, it identifies duplicate videos, audio files, documents, archives and other duplicate files on Windows 11.
Below are the steps.
1. Install the duplicate photo finder.
Download and install Cisdem Duplicate Finder. Open it.
 Free Download Windows 10 or later
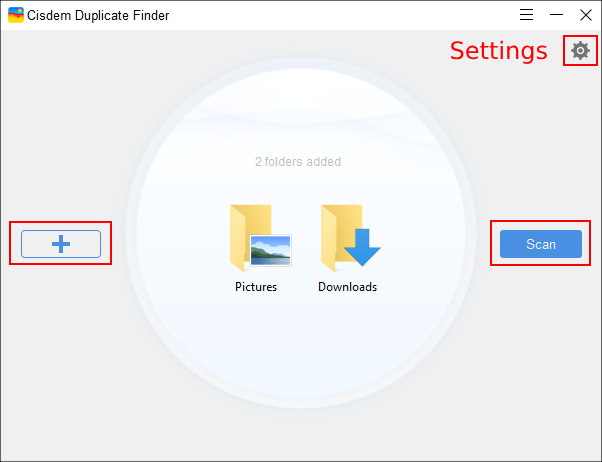
2. Add the folders or drives you want to scan.
Drag and drop folders or drives into the app. Or use the Add button.
You can add one or multiple locations, such as:
- Pictures
- Downloads
- Disk D
- External drives
- SD cards
3. (Optional) Customize scan settings.
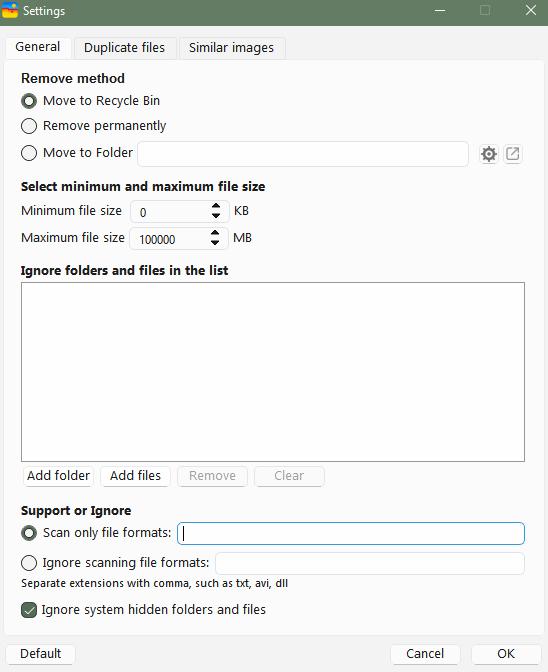
Click the Settings icon in the top right corner. In Settings, you can exclude files and folders from scanning by specifying the path, file size range, or extension, and do more.
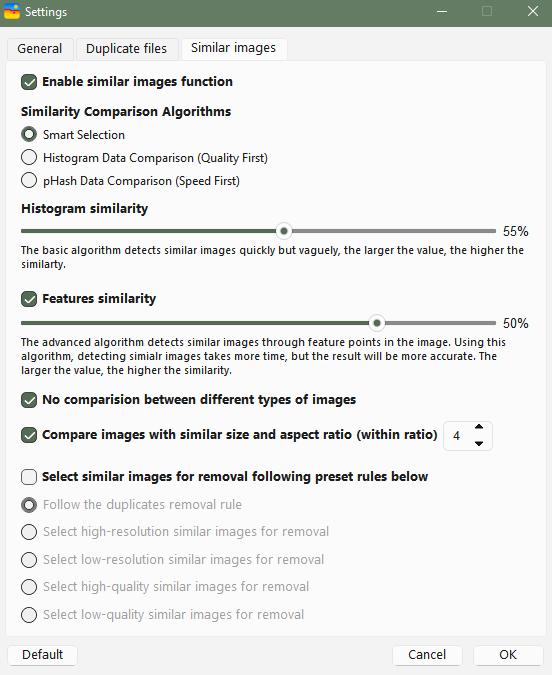
To enable similar image detection, select the checkbox next to it.
Click OK to save your settings.
4. Scan for duplicate photos.
Click Scan to start searching for duplicate photos in Windows 11.
5. Review the results.
When the scan is complete, the results window will appear.
The Images tab displays all the found duplicate photos. The Similar Images tab displays similar photos.
You can preview photos side by side and compare their details before deleting them.
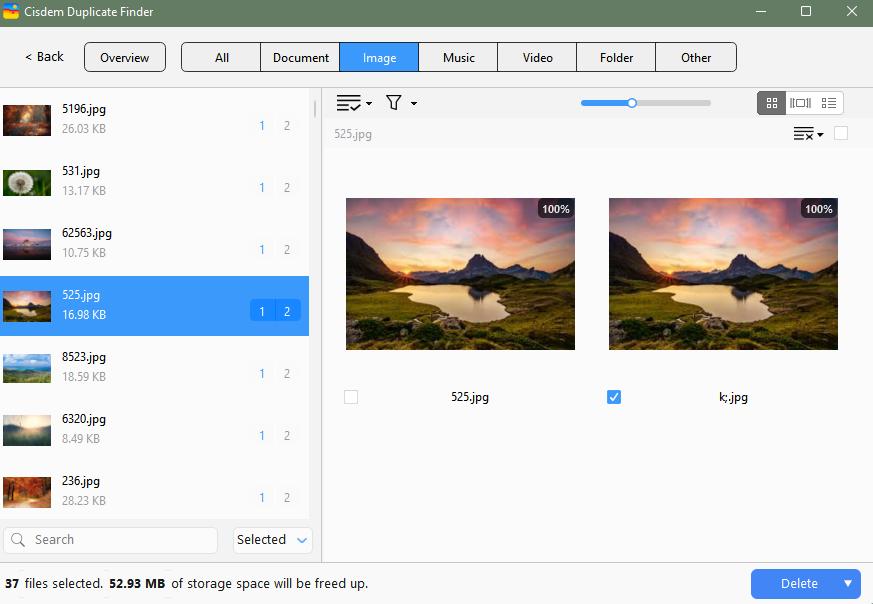
6. Delete duplicate photos in bulk.
In each set of duplicate files, the app has automatically selected all but one item for deletion. Manually adjust the selection if needed.
Also, there are preset rules for mass selection. On the left, choose the sets that you want to apply a rule to, and then click the List icon to choose a rule.

Now click Delete in the bottom right corner to delete all selected duplicates at once. Confirm the deletion.
The deleted files go to the Recycle Bin, allowing easy restoring of deleted files when needed.
Method 2. Use the Windows 11 Photos App
Microsoft Photos is the default app on Windows 11 to view and organize photos.
It supports photos from local folders (e.g., Pictures), external devices, OneDrive, and iCloud Photos. You can see the added source(s) in the navigation bar on the left.
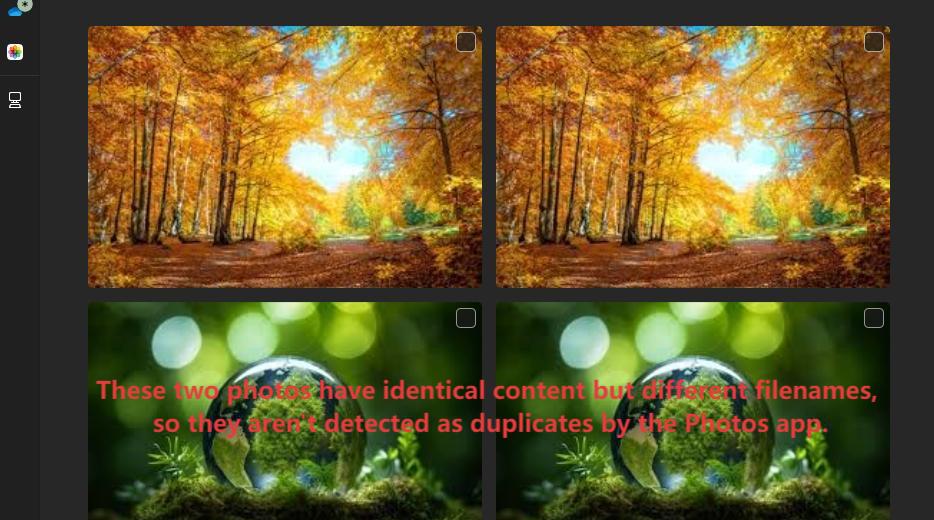
This app includes a built-in duplicate detection feature. When two or more photos are completely identical (including file name, file size, and file content), Photos can successfully find them and display a Duplicate icon on the photo thumbnail.
However, this method has several limitations:
- It doesn't detect duplicate photos with different file names.
- It doesn't detect similar photos.
- Duplicate photos must be reviewed and deleted manually.
Below is how this method works.
1. Open the Photos app on your Windows 11.
2. Click the 3-line menu in the upper-left corner. Click Gallery.
3. Click Add folder and add the folders that may contain duplicate photos.
Tip: The Pictures folder is usually added automatically.
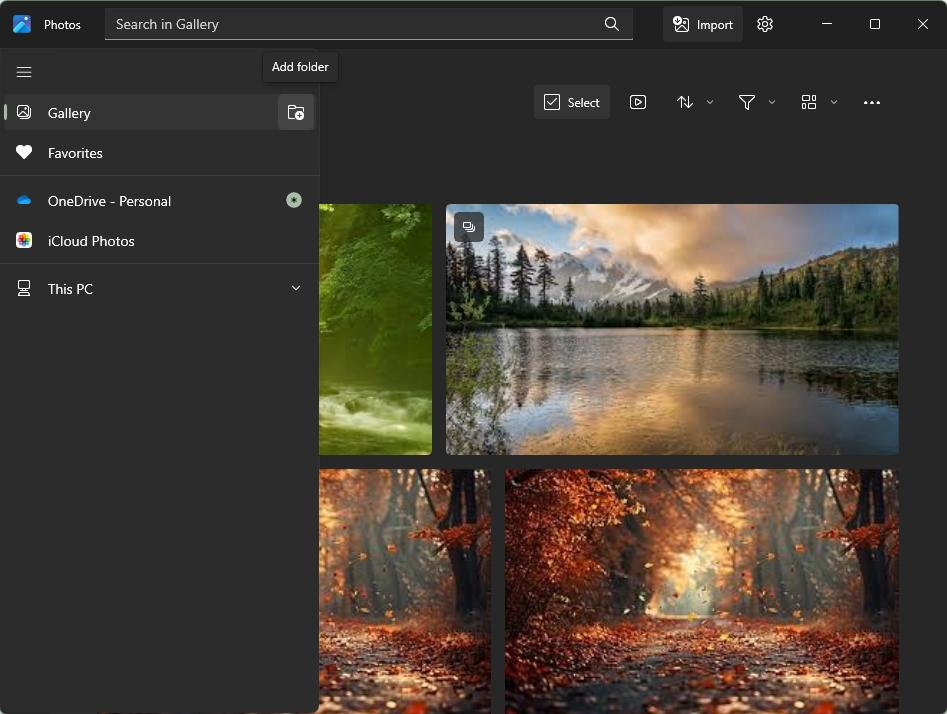
4. In the left panel, click Gallery to see all your photos.
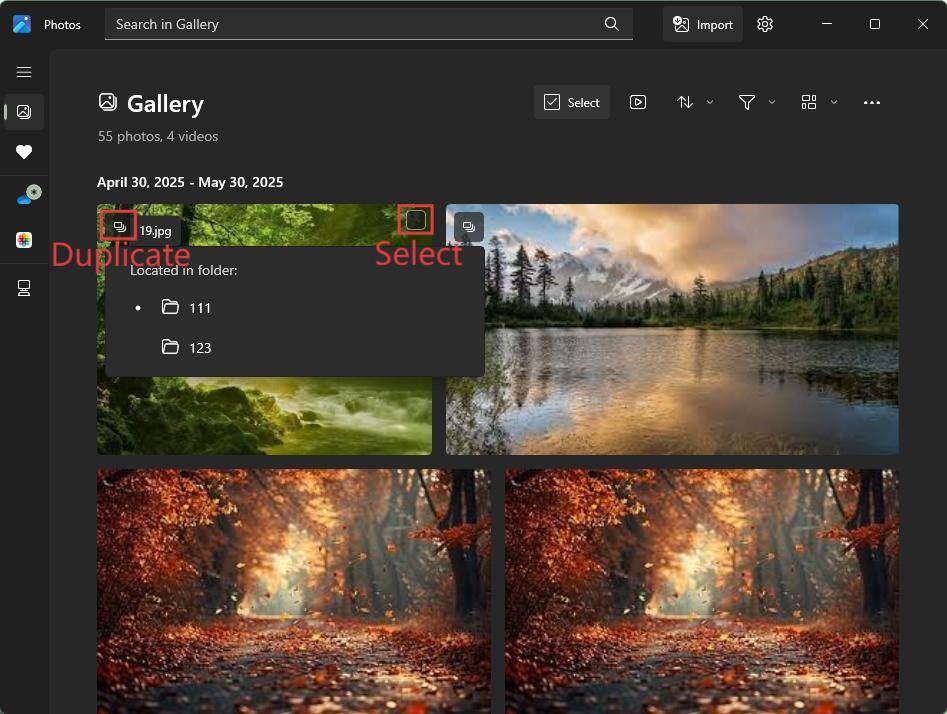
5. Browse through your photos. If you see there’s a Duplicate icon (3 overlapping squares) ![]() in the thumbnail of a photo, it means that this photo is a duplicate. You can select it for removal. Select other unwanted duplicates.
in the thumbnail of a photo, it means that this photo is a duplicate. You can select it for removal. Select other unwanted duplicates.
Tip: In a set of duplicates found by the Photos app, the items are exactly the same. Generally, it’s okay to delete either version.
6. Click the Trash icon at the top, and confirm the deletion.
The selected duplicates will be removed from the source folder(s) and disappear in the Photos app. You can find them in your Recycle Bin.
Method 3. Use File Explorer (Manual Method)
You can manually get rid of the duplicates in your photo collection using File Explorer, but the process can take time and efforts. You'll need to browse through thousands of files to find and select the duplicate photos in them.
Here’s the good news. There are some tips to help make the process quicker and easier.
This method can work with This PC (not recommended), a drive, or a folder (recommended).
Below are the steps.
1. Open File Explorer. Navigate to the folder in which you want to find duplicate pictures.
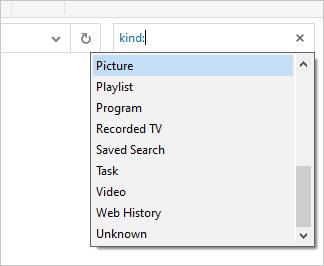
2. In the search box in the top right corner, enter “kind:=picture”, which will display all the images in this folder, including those in subfolders.
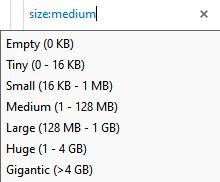
If you want to ignore small-sized duplicate photos such as thumbnails and icons, enter “kind:=picture size:medium” instead. This will display all the images that are between 1-128MB in size in this folder.
3. In the toolbar at the top of the File Explorer window, choose Sort > Name or Sort > More > Size (or Date taken).
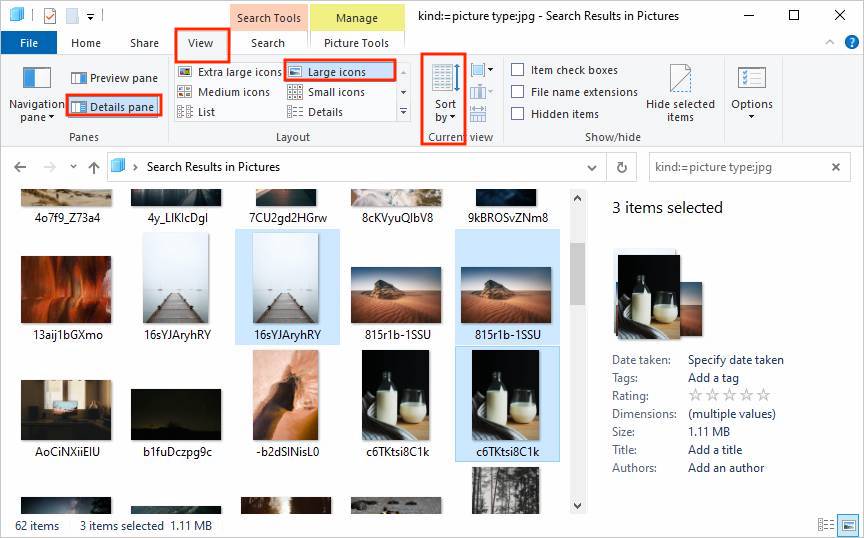
4. In the toolbar, choose View > Large icons (or Extra large icons), then choose Show > Details pane.
5. Identify duplicate images by comparing photo content and details.
6. Select the duplicates that you don’t want to keep, then click the Delete icon in the toolbar.
The deleted photos will be moved to the Recycle Bin.
This manual method is free and doesn’t require you installing third-party tools. But it’s best suited for smaller folders. For faster and more accurate results, a dedicated duplicate photo finder for Windows is more recommended.
Method 4. Use PowerShell (Advanced Users)
This method uses PowerShell, which is built-in to Windows 11. It helps calculate the hash value of each file in a specified folder and then compare their hash values. If the photos have the same hash values, they’ll be identified as duplicates. This identification method is the most accurate.
For users who are tech-savvy, this method can be effective.
However, for those who are not tech-savvy, this method can be challenging. Also, this method doesn’t provide a direct way to view the found duplicates.
1. Open PowerShell.
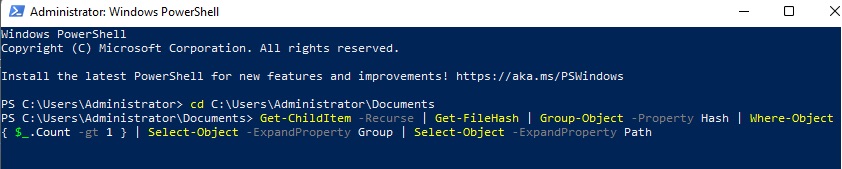
2. Specify the folder using the cd command. For example, if you want to find duplicates in the Pictures folder, enter the following command.
cd C:\Users\Administrator\Pictures
If the folder name has spaces, you need to use quotes. Below is an example.
cd C:\Users\Administrator\Desktop\"test photos"
3. Press the Enter key.
4. Enter the following snippet and then press the Enter key to calculate the hash values.
Get-ChildItem -Recurse | Get-FileHash | Group-Object -Property Hash | Where-Object { $_.Count -gt 1 } | Select-Object -ExpandProperty Group | Select-Object -ExpandProperty Path
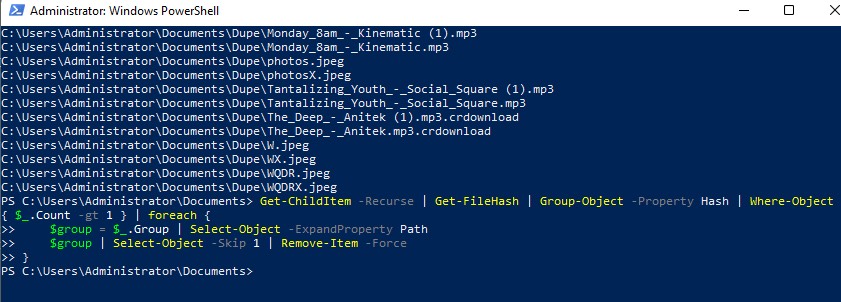
5. PowerShell will list the detected duplicates, set by set. Since it only provides file paths, if you want to check them, you need to copy and paste the path of an individual photo to File Explorer to be able to view it.
6. Enter the following snippet and then press the Enter key to delete all but the first item in each set of duplicate photos. This will eliminate all duplicates at once.
Get-ChildItem -Recurse | Get-FileHash | Group-Object -Property Hash | Where-Object { $_.Count -gt 1 } | foreach { $group = $_.Group | Select-Object -ExpandProperty Path $group | Select-Object -Skip 1 | Remove-Item -Force }
Important: Unlike the 3 methods above, these files will not go to the Recycle Bin but will be permanently deleted, which means there is no easy way to recover them.
FAQs
Is there a built-in duplicate photo finder in Windows 11?
No. Windows 11 doesn’t come with built-in duplicate photo finder. However, the Microsoft Photos app can detect exact duplicates with the same file names, file size, and file content.
What’s the best method to delete duplicates from a large photos library?
With a large photo library, it’s not possible to find and delete all duplicates by hands. Therefore, using a dedicated duplicate photo finder is the best option. The tool must have fast scanning speed and provide accurate scan results. Cisdem Duplicate Finder is exactly what you need.
Can I recover duplicate photos that I accidentally deleted?
Yes. In all methods covered in this article except the last one (using PowerShell in Windows 11), deleted duplicate photos are first moved to the Recycle Bin by default. You to easily restore them if needed.
Conclusion
To keep your photos organized and free up space on your Windows computer, it’s a good idea to clean up duplicate photos regularly. This article discusses four ways to find duplicate photos in Windows 11 and delete them in bulk or individually. The first method is the most efficient and user-friendly. The latter three methods are built-in to Windows and free to use.

Written by
Sarah Miller
With a passion for tech and writing, Sarah joined Cisdem, where she focuses on creating articles about using utility tools to enhance file management and simplify contact management.

Approved by
Adrian Li
Adrian Li is Cisdem’s Chief Engineer and serves as the editorial advisor for Duplicate Finder and ContactsMate. His work and insights have been featured in leading tech publications such as Fossbytes, TUAW, Redmond Pie, SafetyDetectives, and BestForAndroid.
Loved the article, share!
Comments (1)
Leave a Reply
September 16, 2025
Delete Duplicate Files on External Hard Drive on PC and Mac: Steps and Tips
February 03, 2026
Is It Safe to Delete Duplicate Files? A Detailed Guide
Stefan Winners
I used File Explorer before but found it too cumbersome. Now I know there are faster ways. Thanks for your guide!