

4 Ways to Downgrade macOS from Sequoia to Sonoma Without Losing Data
 4.6K
4.6K
 1
1


Being thrilled at the latest updated macOS 15 operating system --- Sequoia, you Mac users might go ahead of the rest to experience its fantastic features, but realize that this newly developed system also comes with bugs that make it irritating to use. These bugs are usually reported to be stuck apps, battery drain, slow response, system freezing and crashing, etc.
Feel regretful of the upgrade? Want to downgrade macOS Sequoia to the more stable Sonoma while worrying about data loss? Just walk through this article to learn how to safely revert from macOS 15 Sequoia to macOS Sonoma without losing data.
 Cisdem Data Recovery for Mac
Lost Data after macOS Downgrade? Recover!
- Restore data lost due to macOS downgrade, upgrade, reinstallation
- Support recovery of 200+ file types: images, videos, audios, docs, archives, emails, etc.
- Rescue trash emptied, permanently deleted, formatted and missing files
- Repair corrupted or unplayable videos (mp4, mov, avi, m4v and so on)
- Retrieve data from both internal and external hard drive, performing equally well
- Preview recoverable items before recovery
- Recover recently and permanently deleted files from iCloud
- Recover data to local drive or cloud platforms (Dropbox, OneDrive, pCloud, Box)
 Free Download macOS 10.9 or later
 - Preparations before Downgrading macOS Sequoia to Sonoma
- Method 1: Downgrade macOS Sequoia to Sonoma with Cisdem
- Method 2: Use Time Machine Backup to Downgrade macOS Sequoia
- Method 3: Revert from macOS Sequoia to Sonoma with Bootable Installer in Recovery Mode
- Method 4: Downgrade macOS Sequoia to Sonoma by Factory Reset
- What if You Lost Data after macOS Downgrade?
Preparations before Downgrading macOS Sequoia to Sonoma
Prior to seeking solutions on degrading macOS Sequoia back to Sonoma, some crucial preparatory work can’t be left out, which are listed as follows.
- Take a backup of your system data.
After macOS Sequoia downgraded to its previous build, all the system data will be erased forever. So, creating a backup of your current data is the key point to prevent losing data when degrading macOS system. It is recommended to utilize the built-in Time Machine feature, an external USB drive or an automatic cloud service to do the backup and manually restore data from the backups afterwards. - Maintain a good Internet connection.
Make sure that your Mac is connected to a stable and relatively fast Wi-Fi or Ethernet. This is to avoid interference in the downgrade process from Sequoia to Sonoma. - Keep your Mac plugged into power.
The Mac to be degraded should be kept powered in, so that uninstalling macOS Sequoia and reinstalling macOS Sonoma can be done smoothly free from disturbing.
How to Downgrade macOS Sequoia to Sonoma Without Losing Data?
After the preparations mentioned above have been made, this section will deliver 4 feasible methods of downgrading macOS Sequoia to Sonoma with no data loss. Read on to pick the most suitable one for your case.
Method 1: Downgrade macOS Sequoia to Sonoma with Cisdem
Cisdem Data Recovery for Mac is a professional-grade tool to downgrade macOS versions, using its helpful feature of creating a bootable macOS installer. Moreover, it’s also designed with a couple of more functions, such as backing up files before downgrading macOS Sequoia to Sonoma, restoring lost data after a macOS downgrade (see details in the later part), update, installation, etc. To degrade macOS from Sequoia to Sonoma, you’re required to prepare a USB flash drive larger than 16 GB beforehand.
Free Download macOS 10.9 or later
How to downgrade mac OS without losing data?
- Insert the USB into your Mac.
- Open Cisdem Data Recovery, select macOS Installer.
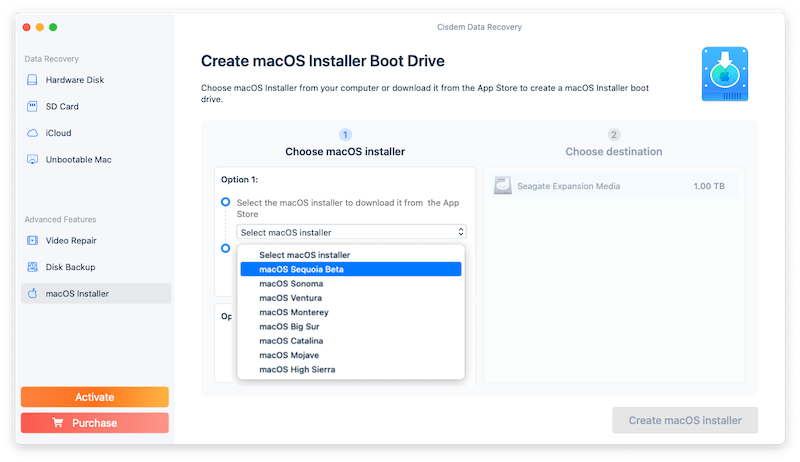
- Choose the macOS Sonoma installer to download it from App Store, click Refresh to get the downloaded installer. Or add the Sonoma installer from Mac disk if you have downloaded one.
![downgrade sequoia with cisdem 01]()
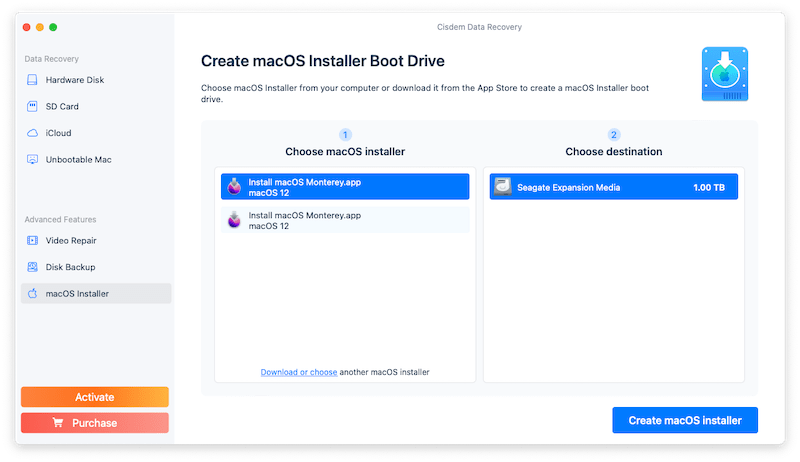
- Select the USB drive as destination, click “Erase and create” from the pop-up window to format it, then choose Create macOS installer button.
![downgrade sequoia with cisdem 02]()
- When the creating process is done, click Finish.
- Boot your Mac into Recovery mode, select the USB drive as startup disk, reinstall the macOS Sonoma version to downgrade current Sequoia to Sonoma.
Method 2: Use Time Machine Backup to Downgrade macOS Sequoia
On condition that Sonoma Time Machine backup has been enabled before upgrading to macOS Sequoia version, this method is achievable as the most straightforward one to rollback to Sonoma. Otherwise, head for the rest 2 ways. Here’s the tutorial with Time Machine.
- Connect the Time Machine external drive to your Mac.
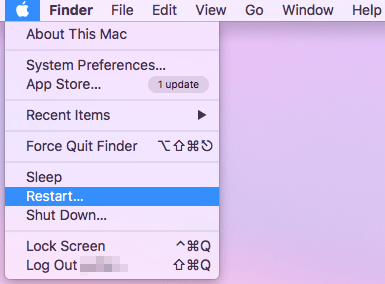
- From the Apple menu bar, click Restart.
![macos time machine 01]()
- Go to boot selection screen. This will vary depending on different Mac models.
- For Apple Silicon-based Mac: Hold down the power button until startup screen shows. Then click Options > Continue.
- For Intel Mac: Keep pressing Command + R until the Apple logo appears.
- Choose Restore From Time Machine Backup > click Continue button.
![macos time machine 02]()
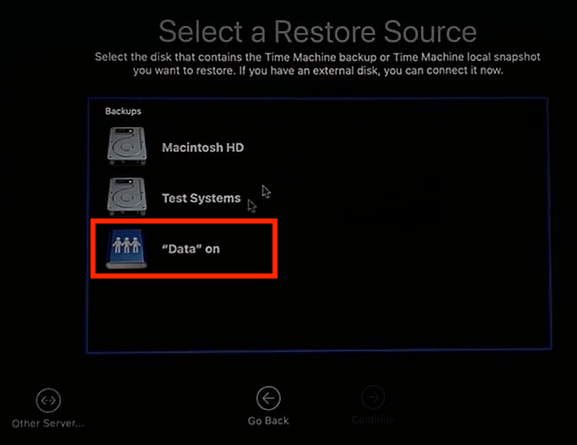
- Select the disk containing the Time Machine backup > click Connect icon, then enter password.
![macos time machine 03]()
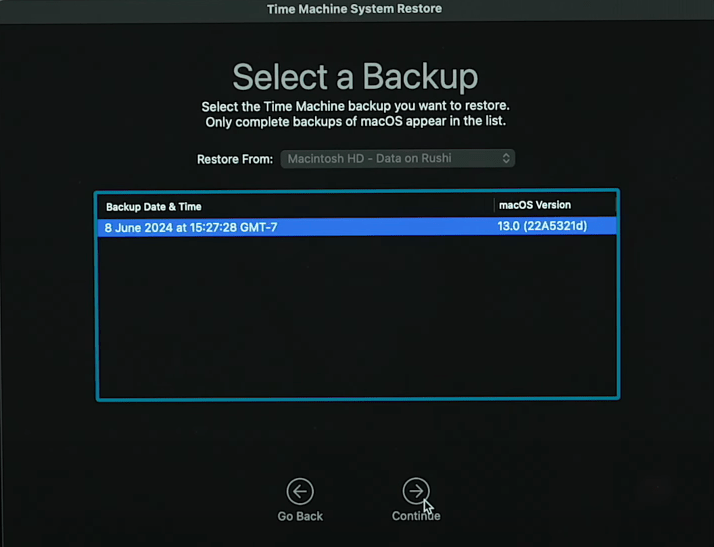
- Choose a recent macOS Sonoma backup > click Continue.
![macos time machine 04]()
- Wait patiently till the downgrade finishes.

Method 3: Revert from macOS Sequoia to Sonoma with Bootable Installer in Recovery Mode
Provided that Sonoma Time Machine backup is unavailable, another approach with no worry of losing data is to create a bootable drive and install macOS Sonoma in Recovery Mode. With multiple steps, it would be possibly more complicated than the first solution, but a higher success rate of downgrading is guaranteed. Let’s see how.
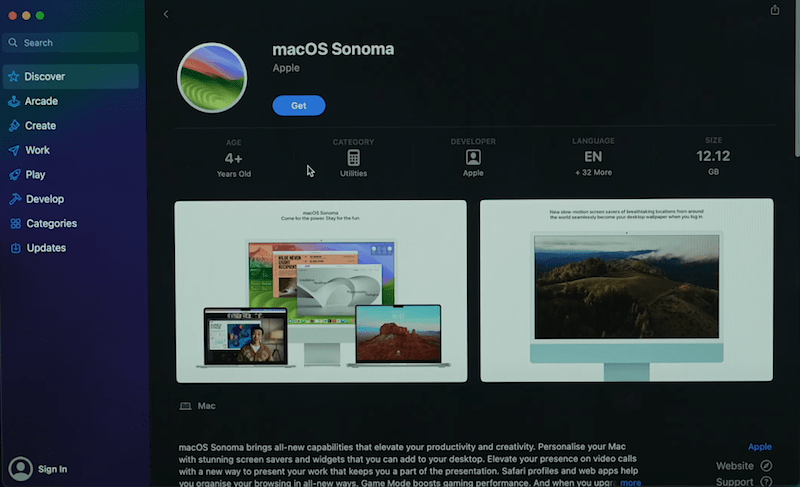
- Go to Mac App Store, search for macOS Sonoma, click Get button to download it onto your Mac first.
![downgrade sequoia in recovery mode 01]()
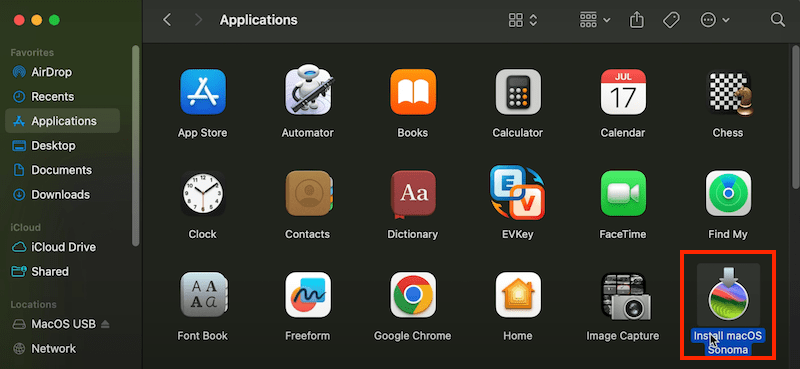
- Once the download completed, the macOS Sonoma installer will get into your Applications folder.
![downgrade sequoia in recovery mode 02]()
- Plug an USB drive to your Mac, it will be used to create a bootable macOS installer.
- Find Disk Utility on your Mac using spotlight feature, and open the app to erase the USB drive for clean installation.
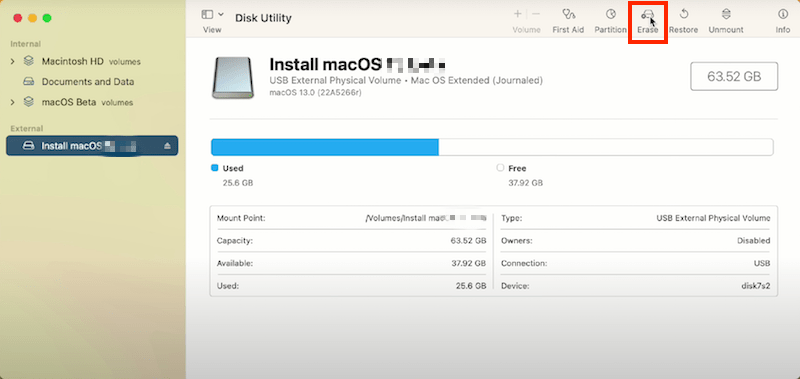
- Go for the drive on the left sidebar under External > select Erase from the top toolbar.
![downgrade sequoia in recovery mode 03]()
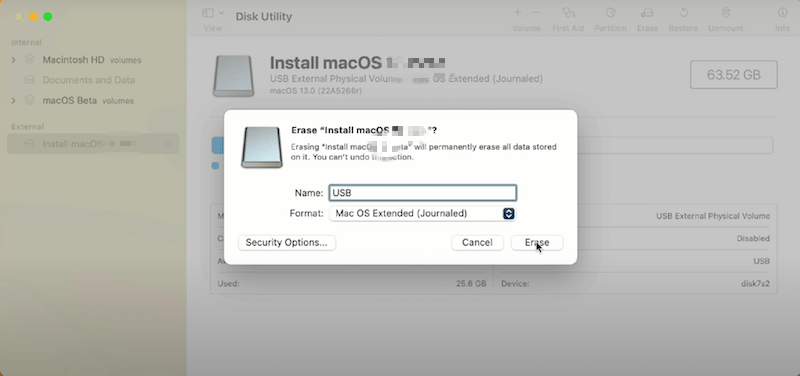
- A dialog box will pop up. Select Mac OS Extended (Journaled) as the format. Also change the USB drive name to a simpler one for further use. Here we use USB. Then click Erase button.
![downgrade sequoia in recovery mode 04]()
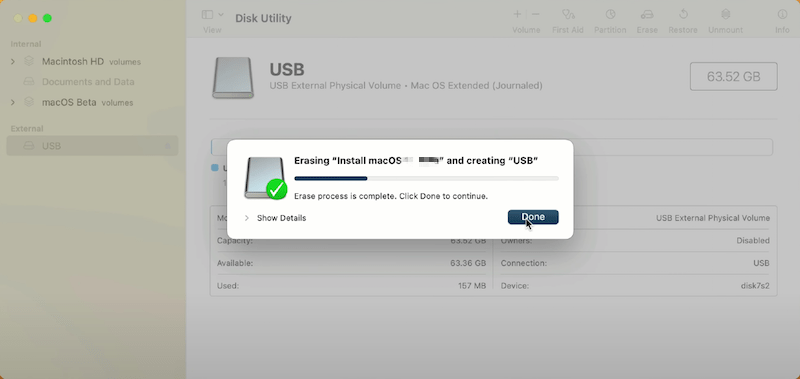
- When the Erase process completes, click Done to continue. Now the USB drive has been prepared.
![downgrade sequoia in recovery mode 05]()
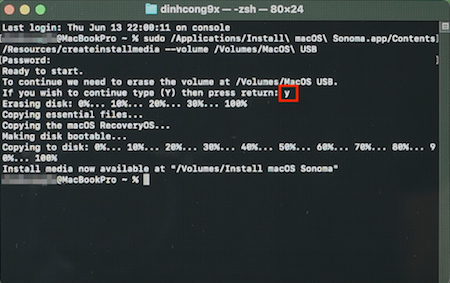
- Launch Terminal on the Mac using Spotlight, copy and paste the command “sudo /Applications/Install\ macOS\ Sonoma.app/Contents/Resources/createinstallmedia --volume /Volumes/USB”. You should replace USB with your drive name if you have another one.
![downgrade sequoia in recovery mode 06]()
- Enter password and type Y to copy the macOS to your disk.
![downgrade sequoia in recovery mode 07]()
- Turn off your Mac, then boot it into Recovery mode.
For Apple Silicon M1 Mac: immediately hold the Power button until you see the installer drive on screen with volumes.
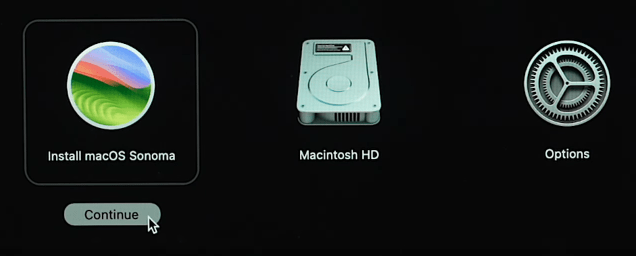
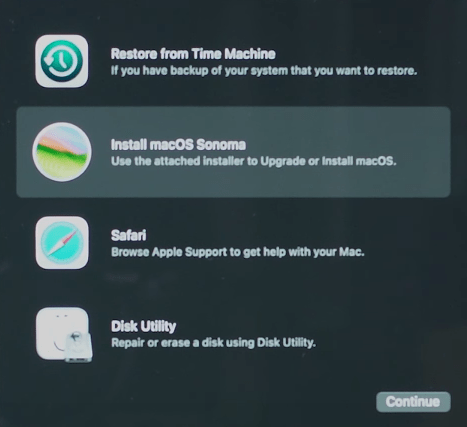
For Intel-based Mac: immediately hold down the Option (Alt)+R key to detect your installer drive. - Choose Install macOS Sonoma > click Continue.
![downgrade sequoia in recovery mode 08]()
- Select Install macOS Sonoma > click Conitue to start downgrading your macOS from Sequoia to Sonoma.
![downgrade sequoia in recovery mode 09]()
- Follow the prompts given by the system to install macOS Sonoma on your Mac.

Method 4: Downgrade macOS Sequoia to Sonoma by Factory Reset
Suppose that the factory-shipped macOS version was Sonoma, Mac factory reset is the easiest way to move back towards macOS Sonoma from Sequoia. If the Mac is restored to factory settings, its operating system is restored to the raw macOS build as well. Meanwhile all the settings, media and data on this Mac will be wiped off completely. Therefore, do remember to back up your data before downgrading. As below is the step-by-step guide of factory reset.
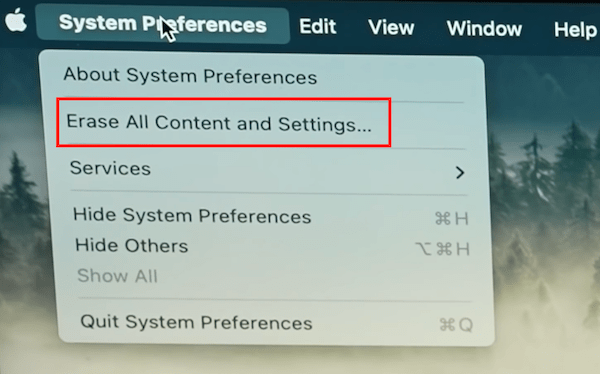
- Click on the Apple icon at the top left corner of your Mac screen > select System Preferences.
![macos factory reset 01]()
- Click the exact text again on the menu bar > choose Erase All Content and Settings > enter your Mac user password to confirm.
![macos factory reset 02]()
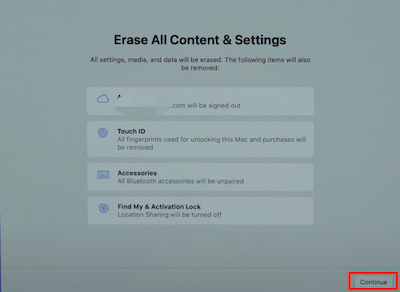
- Click on Continue button > enter your Apple ID password to sign out of your Apple ID.
![macos factory reset 03]()
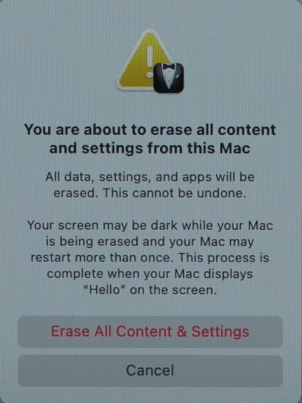
- Choose the red words Erase All Content & Setting to start factory resetting.
![macos factory reset 04]()
- Wait till the following interface appears. At this point your macOS system has been degraded back to Sonoma successfully.
![macos factory reset 05]()

What if You Lost Data after macOS Downgrade?
It is repeatedly stressed that useful data are supposed to be backed up before macOS downgrade for fear of losing them. However, data loss after downgrade still happens, which may result from improper human actions or other unexpected situations occurred at any moment during the downgrading.
So what can we do if losing data after macOS downgrade? A specialized third-party data recovery software must be your top priority.
Among plethora of data recovery tools on the Internet, Cisdem Data Recovery for Mac deserves to be a nice choice. This software is capable of restoring files lost due to a variety of reasons, such as system upgrade/downgrade/reinstallation, unintentional format, malware attack, power surge and so on. With clear interface and straightforward operation, users could deal with any heavy-duty data retrieval with no need of professional knowledge on data recovery, in addition, it can repair damaged video files that saved on your Mac, external hard drive or SD card.
Here’s the guide on how to recover lost data after macOS downgrade with no hassle.
- Free download and install Cisdem Data Recovery on Mac.
Free Download macOS 10.9 or later - Go to Hardware Disk > select the Mac drive used to store your lost data > click “Search for lost files” button.
![cisdem data recovery 01]()
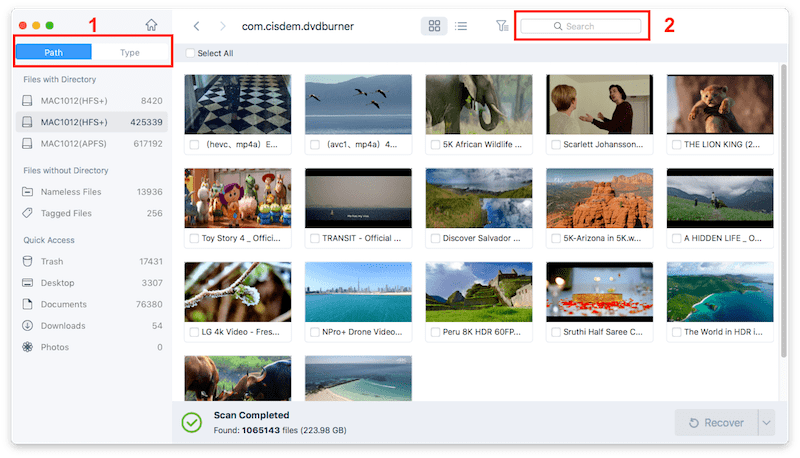
- After both quick scan and deep scan, recoverable items will be displayed at the left sidebar. Choose Path or Type to preview the found files. You can use the filter tools or search bar to quickly locate specific files.
![cisdem data recovery 02]()
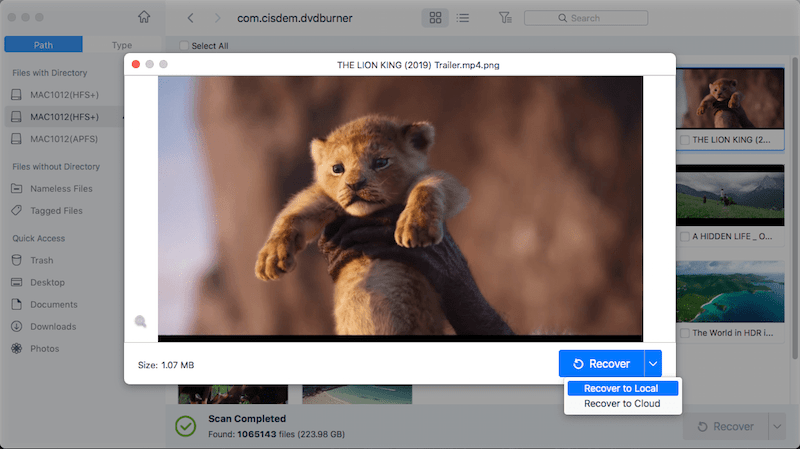
- Pick out your wanted files > click “Recover” button to restore them.
![cisdem data recovery 03]()

Final Words
To downgrade macOS 15 Sequoia to Sonoma, dedicated downgrading tool, Time Machine backup, bootable installer in macOS Recovery mode and Mac factory reset, can be used according to different occasions. Backup initially is the key to do the downgrade without losing data.
If files are missing after macOS downgrade unfortunately, just try the helpful software --- Cisdem Data Recovery to rescue them back.

Connie Yu has been a columnist in the field of data recovery since 2011. She studied a lot of data loss situations and tested repeatedly to find a feasible solution tailored for each case. And her solutions are always updated to fix problems from the newest systems, devices and apps.

JK Tam is the lead developer at Cisdem, bringing over two decades of hands-on experience in cross-platform software development to the editorial team. He is now the lead technical approver for all articles related to Data Recovery and DVD Burner.
Leon
Thanks for such helpful tips! I have downgraded my Mac operating system successfully by following the last method introduced in this blog.