


Cisdem Duplicate Finder for Windows User Guide
 13.0K
13.0K
 0
0


Cisdem Duplicate Finder is a software that helps you release the space on your PC, it can find and delete both the duplicate files and similar photos fast and accurately. To facilitate your use of Cisdem Duplicate Finder, below is a guide to help you to get started.
Getting Started
Online Installation
Cisdem Duplicate Finder for Windows uses an online installer, which requires an active Internet connection during installation.
1. Download the Cisdem Duplicate Finder installer.
 Free Download
2. Double-click the downloaded .exe file to launch the installer.
3. Follow the on-screen instructions to complete the installation.
4. Once the installation is finished, launch Cisdem Duplicate Finder and start finding duplicate files.
Note:
Please make sure your Internet connection is stable during the installation process. The installer will download the required program files automatically.
Offline Installation
If your computer does not have an Internet connection, you can download the offline installation package below
After downloading the offline package:
1. Transfer the installation package to the target computer.
2. Double-click the installer to start the installation.
3. Follow the setup instructions to complete the installation.
Note:
The offline package contains all required installation files, so an Internet connection is not needed during installation.
Activation
After installing the program, you need to activate the program if you want to use the full version features.
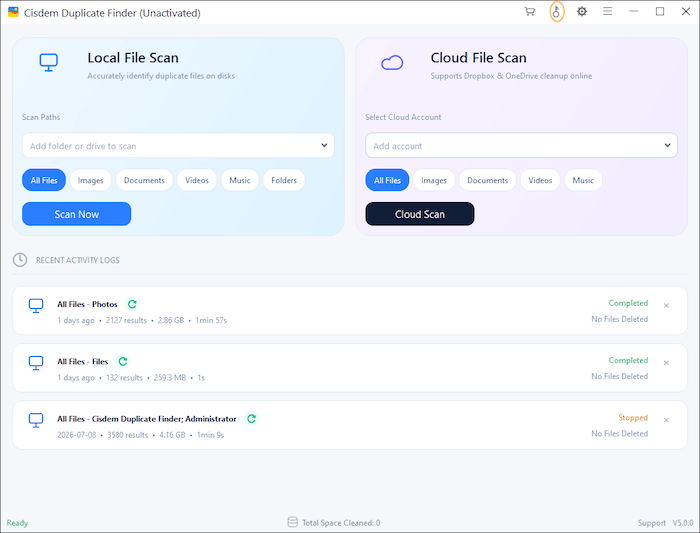
1. Find Cisdem Duplicate Finder on the desktop or in the folder where you installed it, double click to run it, and then click the key icon at the right upper corner.
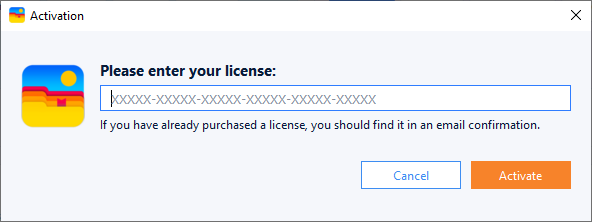
2. Copy-n-paste the license code into the popped-up window, click Activate.
Find Duplicate Files
Step 1 Select local folders or drives to scan
Click “+ Add Folders or Drives” from the “Scan Path” drop-down menu, then select the folders or drives you want to scan.
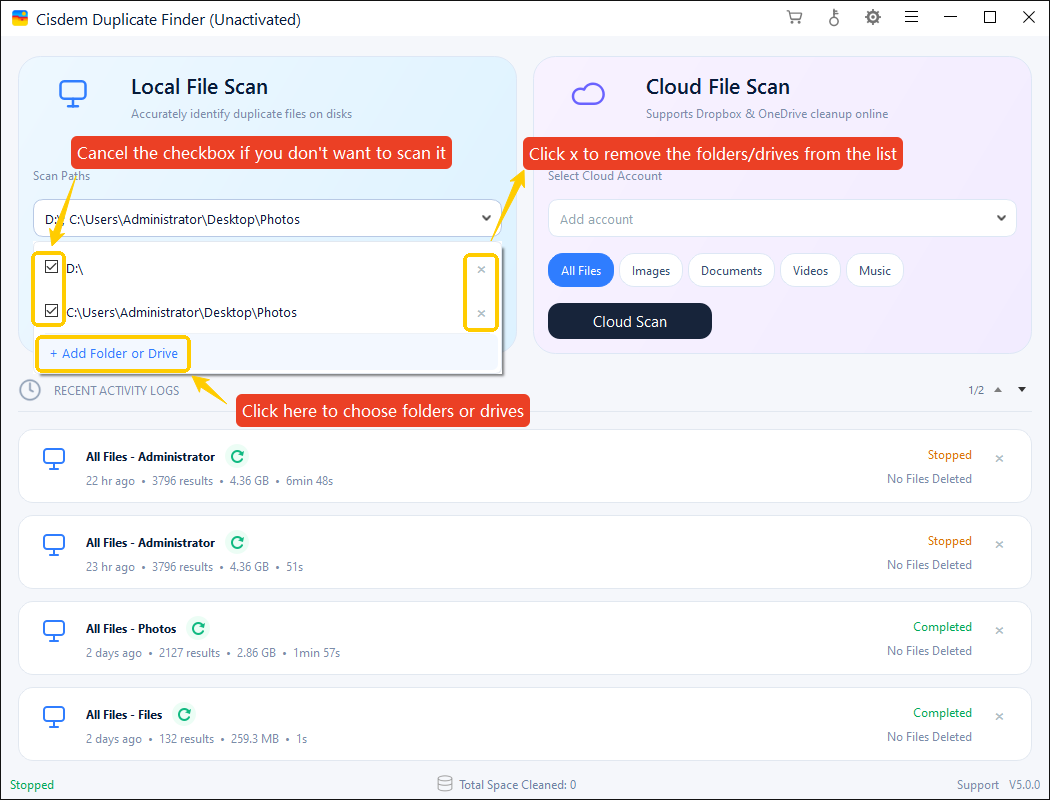
Most Windows users install the operating system on the C: drive. To prevent accidental deletion of important system files, Cisdem Duplicate Finder does not recommend scanning the entire C: drive, please select user profile folder instead.
Step 2 Search for Duplicate Files
Click "Scan Now", Cisdem Duplicate Finder starts scanning duplicates from the selected folders and drives.
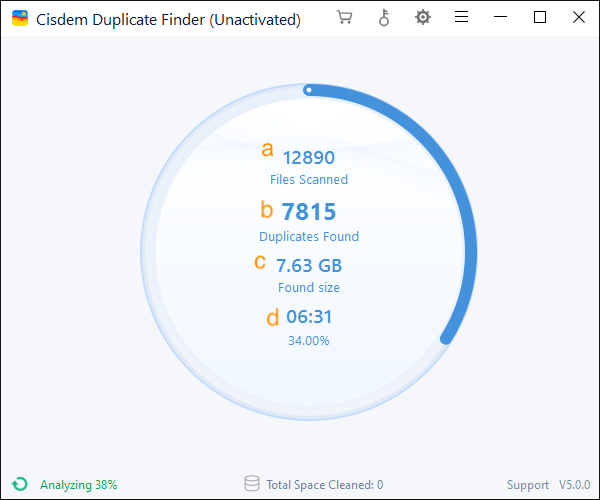
a. Displays the total number of files scanned by Cisdem Duplicate Finder.
b. Displays the total number of duplicate files and similar images detected by Cisdem Duplicate Finder. Please note that this count includes both duplicate files/images and their original files.
c. Displays the total size of the duplicate files and similar images detected by Cisdem Duplicate Finder. The size calculation also includes the original files.
d. Displays the scan progress and the time elapsed during the scanning process.
Step 3 Review and Select Files for Deletion
After the scan is complete, review the detected duplicate files and similar images, then select the files you want to remove.
Select exact duplicate files
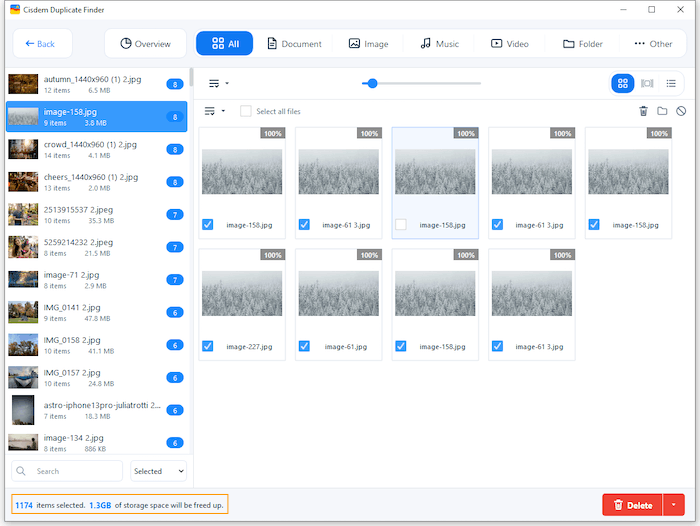
By default, Cisdem Duplicate Finder automatically selects duplicate copies for deletion while keeping one copy in each duplicate group.
You can review the selections and manually select or deselect files before deleting them.
The number of files selected for deletion is displayed in the lower-left corner. Review this number before clicking the Delete button.
To cancel the automatic selections: Press Ctrl + A, or right-click and choose Select All Groups to select all groups. Then click  at the top and choose Deselect All.
Note: There are two Selection Rule buttons . The upper button applies a selection rule to the groups selected in the left panel, while the lower button applies a selection rule only to the current group displayed on the right.
Select similar images
Unlike exact duplicates, similar images are not automatically selected for deletion because they may differ in composition, quality, or content. Cisdem identifies the similarity between images and displays a similarity percentage for each image. We recommend reviewing the images before deleting them to ensure you keep the ones you want.
To select similar images in bulk:
- Select one or more image groups in the left panel. You can drag across multiple groups, press Ctrl + A, or right-click and choose Select All Groups to select all groups.
- Click .
- Choose a rule to automatically select images for deletion.
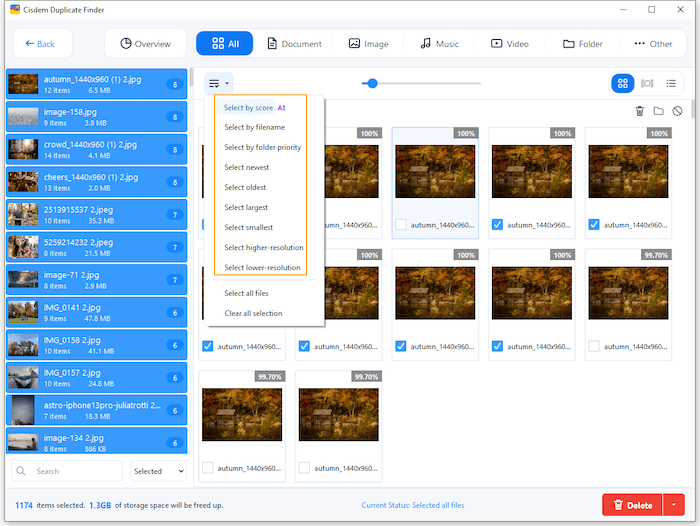
Available selection rules include:
- Select by Score: Automatically scores each image based on its visual and technical quality and selects the lower-scoring images for deletion, helping you keep the best-quality images.
- Select High-Resolution: Selects higher-resolution images for deletion.
- Select Low-Resolution: Selects lower-resolution images for deletion.
- Select High-Quality: Selects higher-quality images for deletion.
- Select Low-Quality: Selects lower-quality images for deletion.
Tips: Always review automatically selected similar images before clicking Delete.
Review Files in Different Views

You can switch between Thumbnail, List, and Info views to review your scan results.
You can also sort results by Name, Size, Count, Type, or Selected to quickly find the files you want to review.
Step 4 Delete Selected Duplicate Files and Similar Images
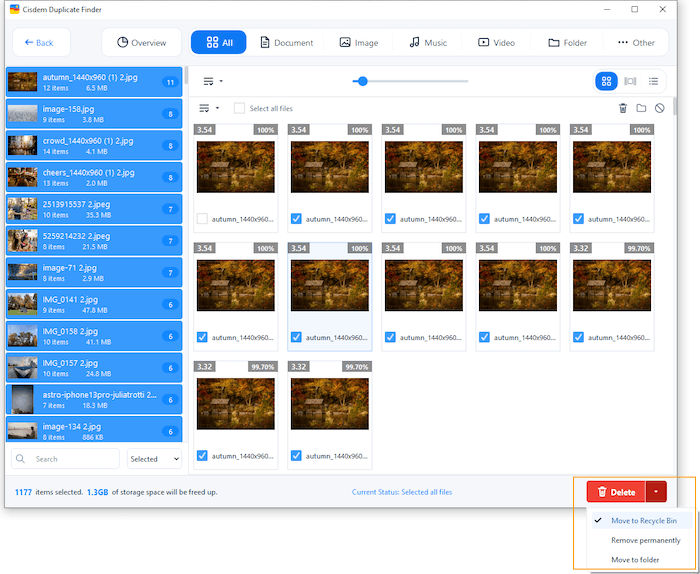
Click the Delete button to delete all marked files using the removal method selected in Preferences.
Alternatively, click the triangle icon next to the Delete button and choose one of the following options:
- Move to Trash
- Move to Folder
- Permanently Delete
Find Duplicate Music in iTunes
iTunes, as a free and easy-to-use music application, it is loved not only by Mac users, but also by Windows users. Same as the Mac version, iTunes for Windows also saves the music files into a Media folder, so if you want to delete the duplicate music files, you need to import the Media folder into Cisdem for scanning.
Step 1 Import the Media folder into Cisdem, click the Scan button to start detecting the duplicate songs.

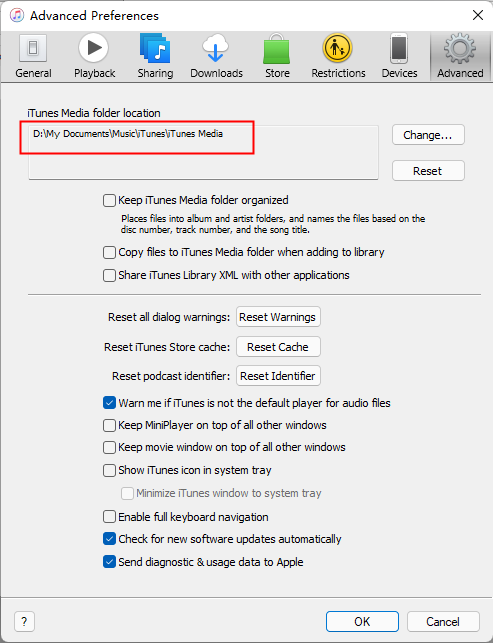
Tips: If you don't know where the iTunes Media folder locates, you can run iTunes, click Edit > Preferences, click into the Advanced option, then you will see the location of iTunes Media folder.
Step 2 When the scan completes, click the Delete button to clear the duplicate songs in a click.

Tips:
Cisdem will only help you remove duplicate songs from the Media folder, if you want to completely delete those duplicate songs, please reference the sentences below:
1. Why can I still play those deleted music files after deleting them with Cisdem?
The duplicate music files are removed to Recycle Bin by default, and iTunes can automatically trace those deleted music files in the Recycle Bin when you play them in iTunes, so you need to permanently remove them from Recycle Bin if you don't want to play them in iTunes any more.
2. How can I remove the deleted music files from Music Library?
Step 1 Create a new playlist (such as playlist 1) by selecting ‘New Playlist’ in the File menuin iTunes, and then add all your songs to playlist 1;
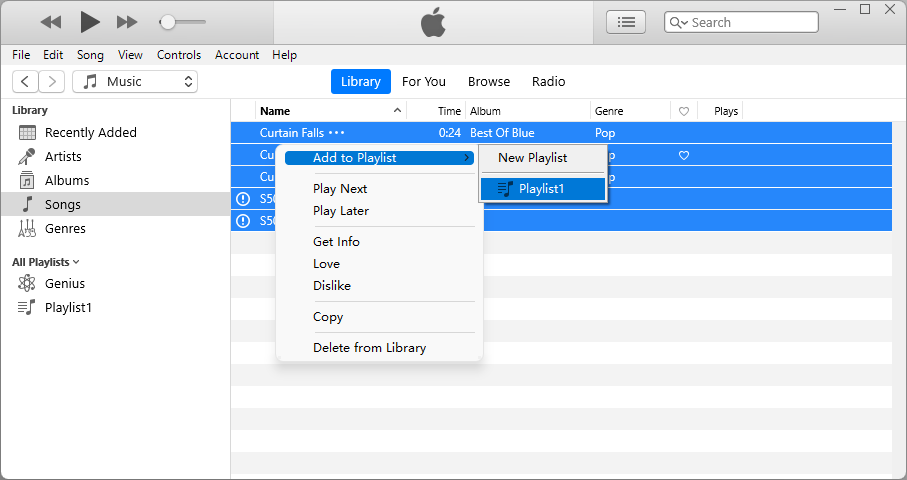
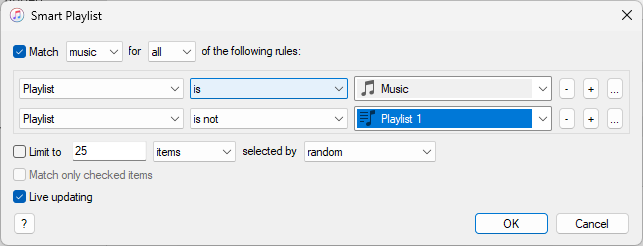
Step 2 Create a smart playlist by selecting New Smart Playlist

Apply the rules listed in the below screenshot. By default, iTunes will list only one row as a rule. Press the plus button at the right in that row to create the second rule. Click OK.
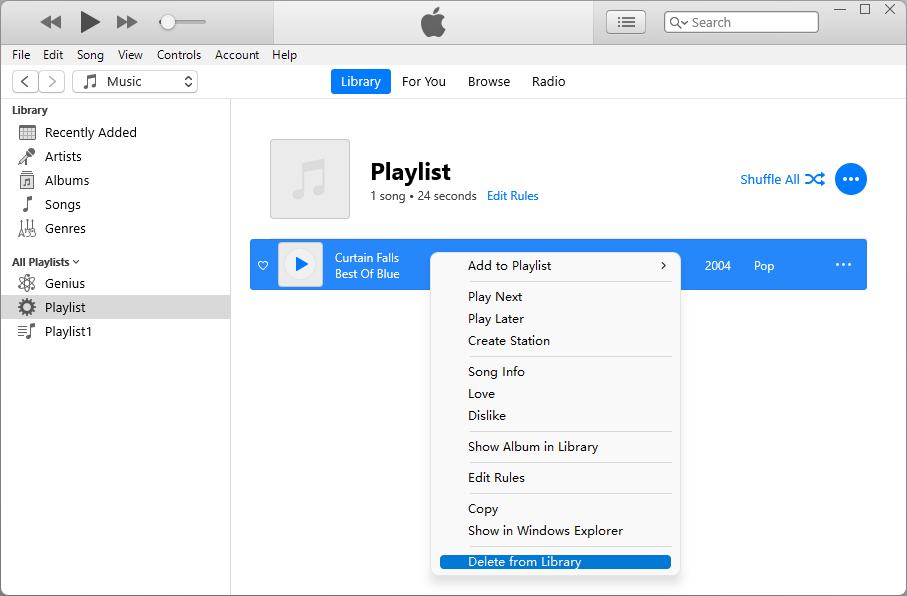
Step 3 All the deleted songs will be moved to the newly created smart playlist, press Ctrl+A to highlight all of them and select "Delete from Library" to delete them from your Music library.
Find Duplicates in OneDrive and Dropbox
In addition to local folders and drives, Cisdem Duplicate Finder for Windows can scan your OneDrive and Dropbox accounts for duplicate files and similar images.
Step 1 Import Files from OneDrive or Dropbox
- Click + Add Account from the Select Cloud Account drop-down menu.
- Select OneDrive or Dropbox.
- Sign in to your account on the authorization page and allow Cisdem Duplicate Finder to access your files.
- After authorization, click Back to Application.
- Select the folders or directories you want to scan, then add them to Cisdem Duplicate Finder.

Step 2 Scan for duplicates and similar images
Click Scan to start scanning the selected OneDrive or Dropbox folders.
Please keep your Internet connection stable during the scan. Scanning time depends on the number and size of files in the selected folders.
Step 3 Review and Delete Selected Files
When the scan is complete, review the detected duplicate files and similar images, then select the files you want to remove.
- Exact duplicate files: Cisdem Duplicate Finder automatically selects duplicate copies for deletion while keeping one copy in each duplicate group.
- Similar images: Similar images are not automatically selected for deletion. You can review them manually or select a suitable selection rule to mark them in bulk.
For more information about reviewing scan results and using selection rules, see Step 3: Review and Select Files for Deletion.
Click Delete to remove the selected files.
Tips
- Make sure your Internet connection is stable while scanning or deleting files.
- Files deleted from OneDrive or Dropbox are moved to the corresponding cloud service's Recycle Bin/Trash, where they can be restored if necessary.
- Cisdem Duplicate Finder automatically selects exact duplicates for deletion. For similar images, you need to review and select them manually or use a selection rule.
- To select similar images in bulk, press Ctrl + A to select all groups in the left panel, then choose a suitable selection rule.
Customize Scan Settings
In order to meet the needs for different users, you are allowed to do some customized settings by clicking 

General: You can use this option to change scan settings.

1. Remove method: Cisdem Duplicate Finder removes duplicate files to the Recycle Bin by default, you can also select to remove permanently or move to a specific folder.
2. Scan and Ignore: This option lets you choose which file formats to scan or exclude from scanning.
3. Select minimum and maximum file size: This option allows you to set a range of the file sizes to scan.
4. Ignore folders and files in the list: Click Add Folder or Add Files to select the folders and files you want Cisdem to exclude from scanning. Any files or folders you choose to Ignore from the scan results will also be added to this list.
5. Cache Directory: This option lets you choose where Cisdem stores scan data, such as scan results and cloud drive thumbnails. If the default cache directory does not have enough free space, you can change it to another location.
6. Ignore system hidden folders and files: It is checked by default to avoid deleting the system files.
7. You can click  to reset the settings to the original ones.
Duplicate files: Set rules to automatically select duplicate files for removal.

Do not auto select: Select this option to prevent Cisdem Duplicate Finder from automatically selecting duplicate files for deletion after a scan is complete.
Select duplicates for removal by filename: This is a defaulted option. For example, if there are two duplicate files, one of the files is named as Document, and the other one is named as Document 1, then Document 1 will be priority selected to remove.
Select newest duplicates for removal: The latest created duplicates will be priority selected to remove.
Select oldest duplicates for removal: The earliest created duplicates will be priority selected to remove.
Select duplicates for removal from prioritized location: You can set the path here, if the duplicates belong to one of the setting paths, it will be priority selected to remove. The larger the value, the higher priority to delete.
Note: The value of the path that are not added into the list is 0, the default value of the added path is 1, if you don't want to delete the duplicates from a path, you can set the value as -1. What's more, if you only want to delete the duplicates from a path, you can just add this one path into the list and set the value as 1.
Similar Images: Set the similarity level for scanning and define rules to automatically select similar images for removal.
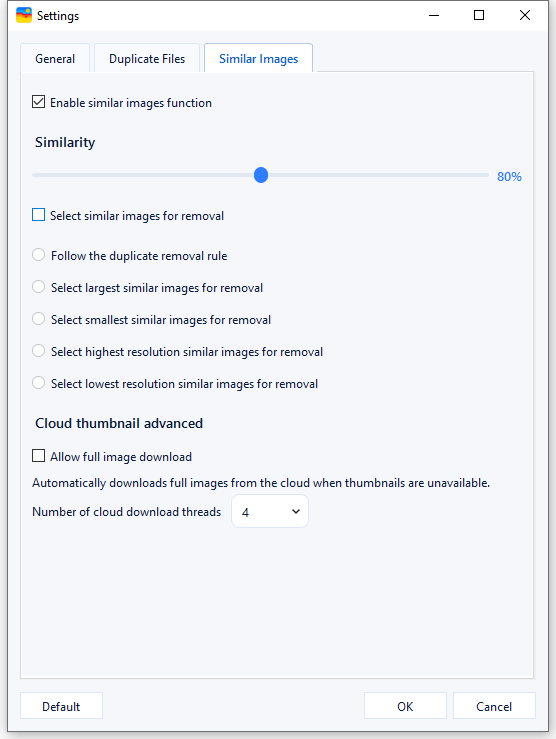
1. Enable similar images function: This option is enabled by default, if you don’t want to detect the similar images, you can cancel this option before scanning.
Similarity: Set the similarity threshold for detecting similar images. A higher similarity level results in fewer images being identified as similar, vice versa.
2. Select similar Images for removal: This option is disabled by default. Enable it if you want Cisdem to automatically select similar images for removal after the scan is complete. You can then choose a preset rule below for automatic selection.
Follow the duplicates removal rule: Follow the rule that you’ve selected under the Duplicate files tab.
Select high-resolution similar images for removal/ Select high-quality similar images for removal: If you want to save the space on your hard drive, you can select this option to remove images with higher resolution or higher quality.
Select low-resolution similar images for removal/Select low-quality similar images for removal: If you want to keep sharper photos, you can select this option.
Update Cisdem Duplicate Finder
We always suggest users to use the latest version of the program.
When you launch Cisdem Duplicate Finder, Cisdem will auto check for updates.
Also, you can click  > Check for Updates to manually update it.


Traci Gordon has worked as a tester in a software company for 8 years, she believes that the best software should be a tool that can help users accomplish what they need with the simplest steps.

Adrian Li is Cisdem’s Chief Engineer and serves as the editorial advisor for Duplicate Finder and ContactsMate. His work and insights have been featured in leading tech publications such as Fossbytes, TUAW, Redmond Pie, SafetyDetectives, and BestForAndroid.