

How to Record Desktop Audio with or without Audacity
 56
56
 0
0


Trying to record a Zoom meeting, game audio, or background music from a webpage? Audacity often just picks up microphone noise instead of your computer's internal audio.
To fix this, Windows PC users simply need to switch audio host to Windows WASAPI (Loopback). Mac users, however, must route sound through a virtual driver like BlackHole to bypass Apple's strict audio security locks.
This article walks you through exactly how to record system audio with Audacity. Prefer to skip the technical setup? I also cover an easy alternative.
 Cisdem VideoPaw
Tired of Audacity Issues? Record Desktop Audio Easily!
- Record computer audio without extra setup
- Capture system sound from browsers, apps, games, and meetings
- Record internal audio and microphone separately or together
- Save audio recordings in MP3, WAV, M4A, FLAC, and more
- Record in high quality
- Display completed recording list
- Also record screen and webcam
- Schedule recordings in advance
- All-in-one: convert, merge, edit, compress recordings, download videos, rip Blu-rays/DVDs
 Free Download macOS 10.15 or later
  Free Download Windows 11/10/8/7
How to Record Desktop Audio with Audacity (Easy Fix)
Choose your operating system below to set up the recording configurations, or scroll straight for instant troubleshooting fixes.
Steps to Record PC Audio with Audacity on Windows
To record computer audio, you have to tell Windows to digitally route the audio stream right back into the software. The setup only takes about a minute. Here is the exact workflow.
1. Download the software from the official Audacity Windows download page. Note: If you don't know which one to choose, download 64 bit installer. It's a standard version for Windows 10/11.
2. Fire up Audacity and find the large "Audio Setup" button at the top toolbar.
3. Go to "Audio Setup > Host > change MME or DirectSound to Windows WASAPI". Note: It's important. Older hosts only look for external hardware, but WASAPI allows Audacity to intercept digital sound directly from your sound card before it reaches your ears.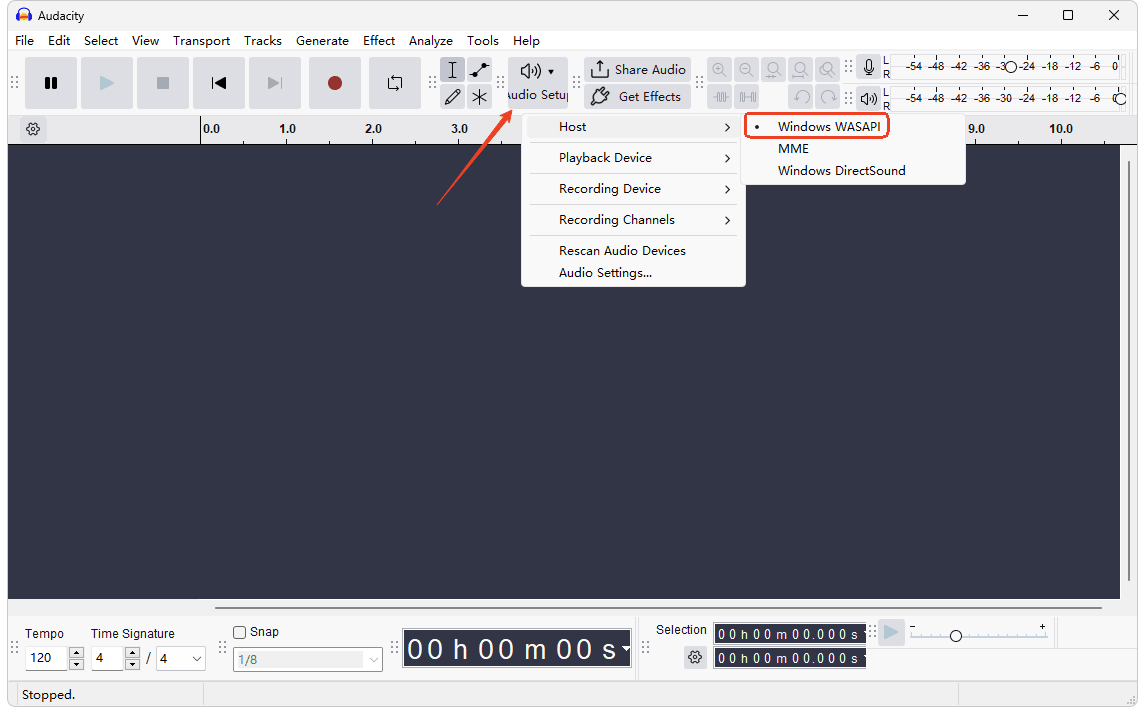
4. Click "Audio Setup", hover over “Playback Device”, pick your real speakers or headphones, e.g., Speakers (Realtek Audio).
5. Click "Recording Device", and look for whatever speakers or headphones you are currently listening to. Ensure the device you select ends with (loopback).
Heads up: Using your laptop's main Speakers (loopback) can sometimes cause digital distortion or crunchiness. If that happens, plug in headphones before opening Audacity, and select Headphones (loopback) instead. The signal is usually much cleaner.
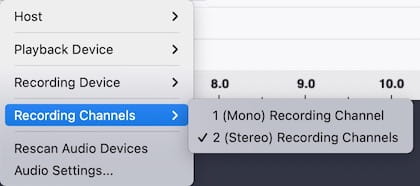
6. Click "Audio Setup" again, go to choose "Recording Channels > 2 (Stereo) Recording Channels".
7. Click the red "Record" button.
8. Flip back to your source and get your audio playing on PC. You should see the blue waveforms drawing across the screen.
Heads up: The first time I hit record, the red cursor sat at 0 seconds and wouldn't move. I thought the app was broken. Turns out the WASAPI loopback driver freezes the timeline until your computer actually starts playing sound.
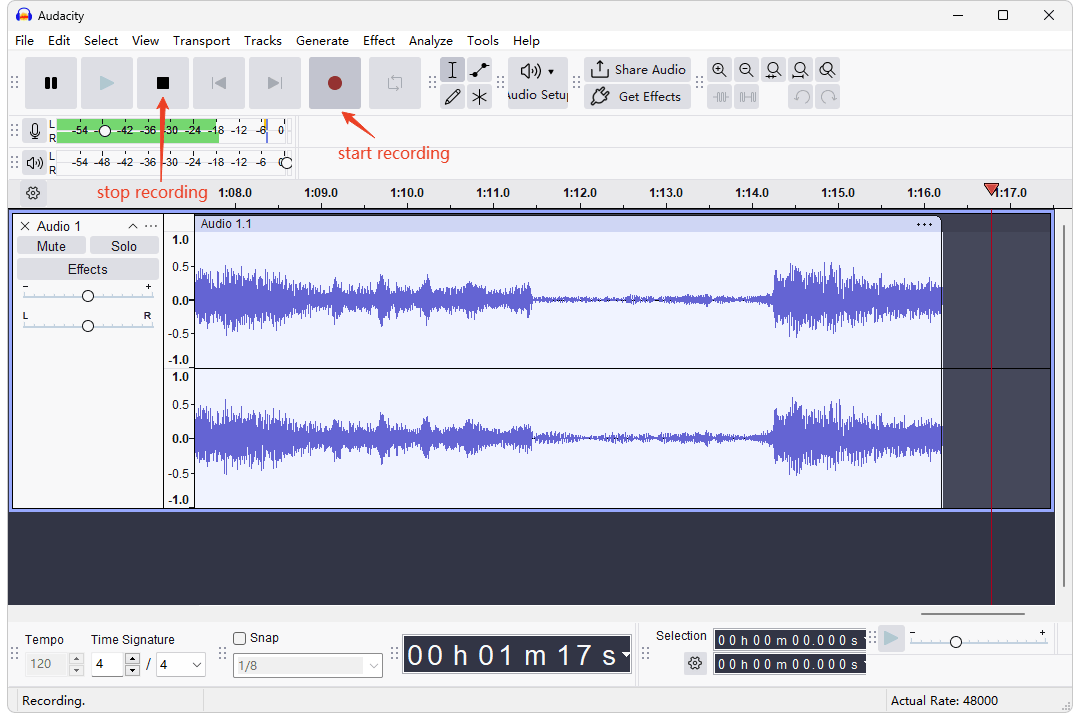
9. Press the Spacebar on your keyboard or click the square stop button to finish recording.
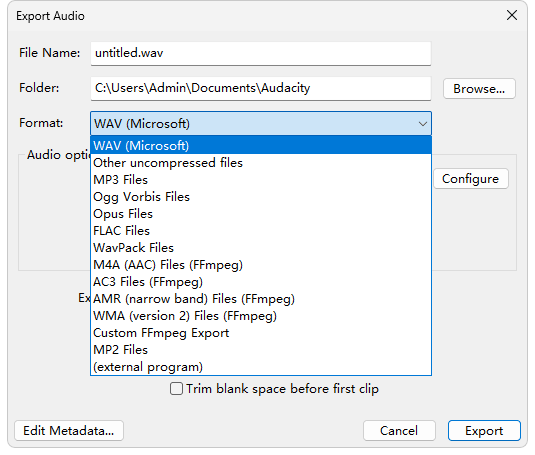
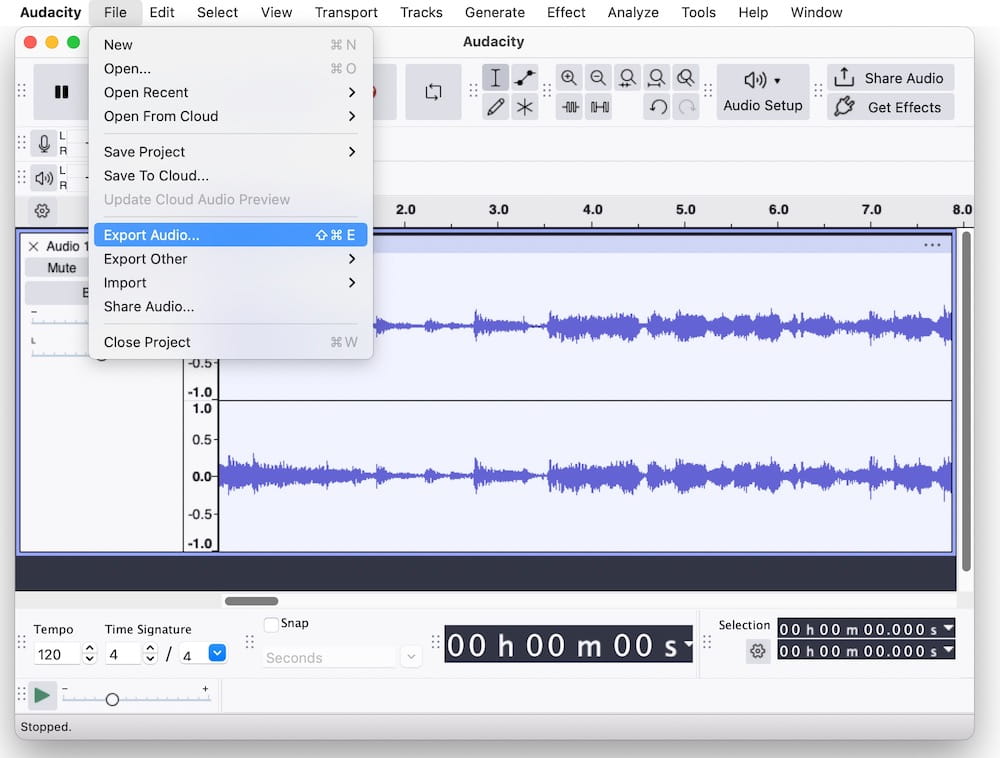
10. Go to "File" in the top menu bar, choose "Export Audio", click "Export to computer", set output options and export the recording file.
Steps to Record Internal Audio with Audacity on Mac
Getting internal sound on a Mac is just more of a hassle than on Windows. Due to Apple's strict sandboxing and Core Audio privacy rules, macOS completely blocks apps from directly snooping on your own system sound. So Audacity requires a virtual bridge to capture desktop sound. Here is how I finally got Audacity to capture my Mac’s desktop audio.
First, Install a Virtual Audio Driver
Skip old tools like Soundflower or paid apps like Loopback. I use BlackHole because it's free, open-source, and runs great on all mordern Macs.
The developer has replaced the old email-registration download system with a direct link inside their official Discord server or a Terminal command.
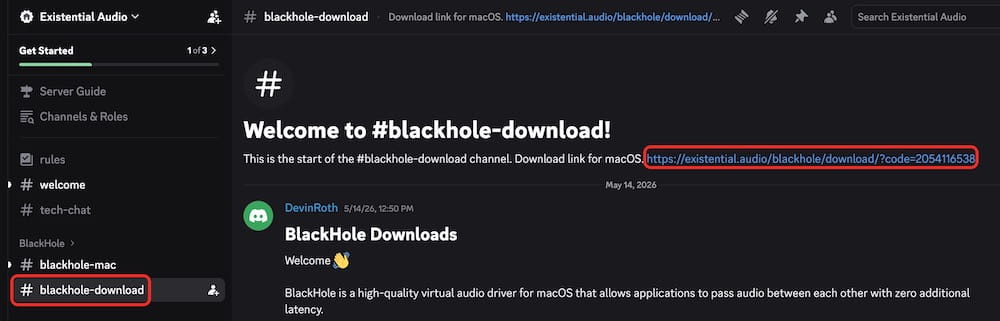
- Go to https://existential.audio/blackhole/. Click "I can't afford to donate" option.
- Click the official invite link to join the Existential Audio Discord community (discord.gg/WV8bTXRUdu).
- Once inside, navigate to the #blackhole-download channel on the left sidebar.
- Click the download link to go to download BlackHole 2ch.
![]()
- Double-click the .pkg file in Downloads, then follow the prompts to install.
- Once it's done, restart your Mac to register the new driver.
Tip:
If you want Audacity to capture your Mac computer sound while you still hear it through your headphones or speakers, you need a way to send the audio to both places at once. A multi-output device does exactly that.
- Open Audio MIDI Setup app. You'll find it in Finder > Applications > Utilities.
- Click the "+" at the bottom left and choose "Create Multi-Output Device".
- On the right, pick "Built-in Output" as your Master Device.
- Check the Use box next to "Built-in Output" (or whatever speakers you're using) and also next to "BlackHole 2ch".
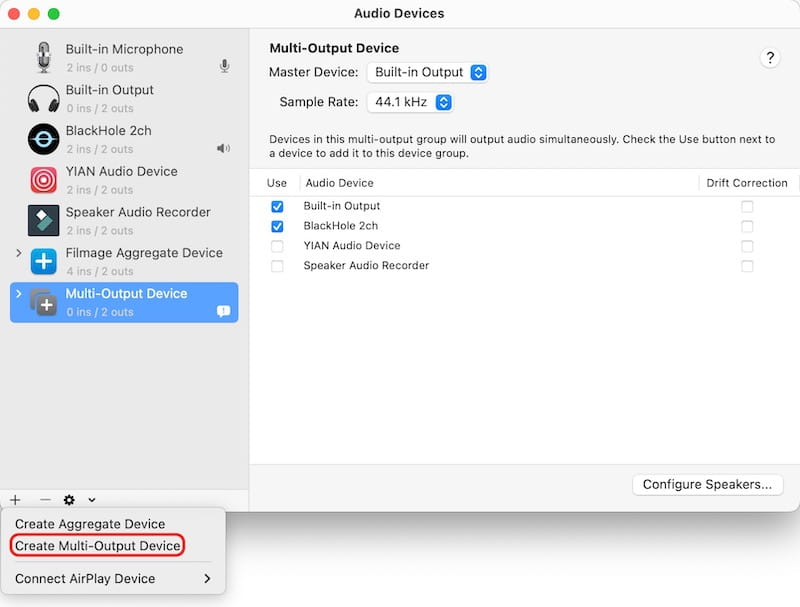
- On the left sidebar, right-click your new Multi-Output Device and choose "Use This Device For Sound Output".
Then, Start Recording with Audacity
1. Get the app from official Audacity Mac download page. For Apple Silicon Macs, click ARM 64 dmg. For Intel Processors, click x86_64 dmg. Install and opeb it.
Heads up: Ignore the "MuseHub" recommended link to avoid bloated bundle apps, and skip the "Universal dmg" because it wastes disk space and crashes on older macOS versions.
2. Head to the top toolbar and click the “Audio Setup” button.
3. Select your headphones or built-in speakers as the Playback Device.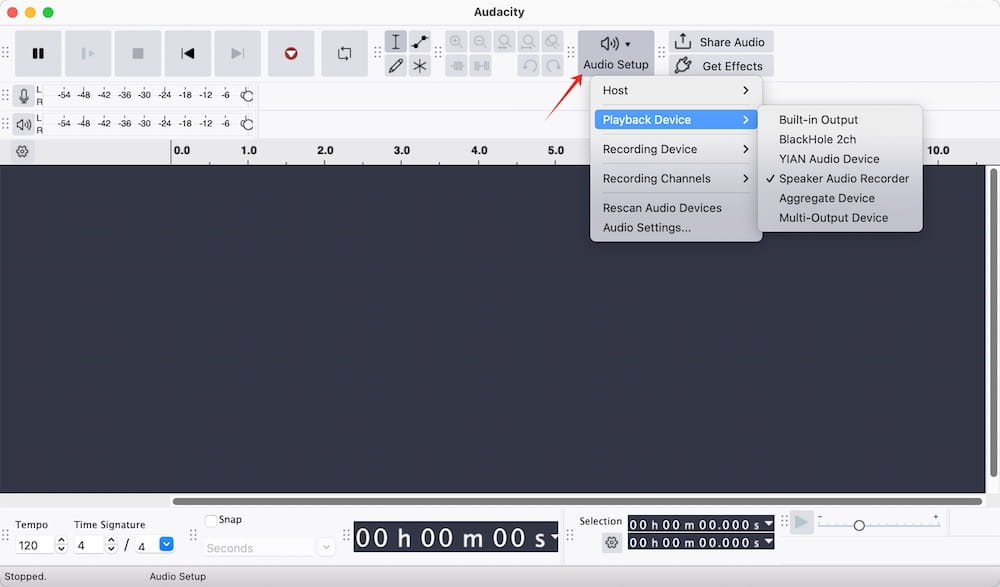
4. Go to “Recording Device”, and select “BlackHole 2ch”.
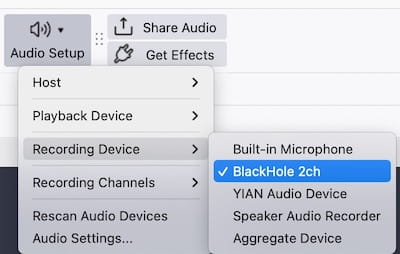
5. Under that same menu, set your “Recording Channels” to 2 (Stereo).
6. Open your web browser or media app and pull up the video or track you want to rip.
7. Click the red “Record” button in Audacity to start recording system audio.
8. Play the track you’d like to capture on Mac.
9. Stop recording and export the audio file.
Troubleshooting: Fix Audacity Audio Recording Issues
1. How to kill the screaming echo loop
Hear a screaming, delayed echo when you hit record? This happens because Audacity is trying to play back the exact live audio it is currently capturing, creating an instant audio feedback loop.
The Fix: Go to the top menu, click "Transport > Transport Options", and make sure "Enable audible input monitoring" is unchecked.
Note: In older versions of Audacity, this feature was called "Software Playthrough of input".
2. How to fix "Error Code -9996: Invalid Device"
On Windows: This usually happens with Realtek drivers when your sound card and Audacity have mismatched channel settings (stereo vs mono).
The Fix: Click “Audio Setup > Recording Channels” and switch between 1 (Mono) and 2 (Stereo).
On Mac: Error -9996 is rare on macOS. It can happen when a virtual device drops out, say, unplugging headphones after opening Audacity.
The Fix: Go to "Transport > Rescan Audio Devices" to refresh the connection without restarting.
3. Why does Audacity record total silence?
If everything looks correctly configured but Audacity only records nothing, your operating system's security wall is blocking the software from listening to the audio stream. Both Apple and Microsoft treat internal audio routing as "Microphone" access. You have to manually give Audacity permission.
The Fix:
On Windows, navigate to "Settings > Privacy & Security > Microphone", and toggle on both “Microphone access” and “Allow desktop apps to access your microphone”.
On Mac, go to "System Settings > Privacy & Security > Microphone" and turn on the toggle next to Audacity.
4. How to fix recording freezes or stop
By default, Audacity, your operating system, and your audio device all use 44,100 Hz (44.1 kHz) if you haven’t changed anything. A mismatch between these three can cause freezing, dropped audio, or other recording issues.
The Fix: Make sure all sample rates match.
In Audacity: Go to "Preferences > Audio Settings > Project Sample Rate".
In Windows: Go to "Settings > System > Sound > Device Properties > Additional Device Properties > Advanced” tab. Check the “Default Format” sample rate.
In macOS: Open Audio MIDI Setup, select your audio device, and check the “Format” sample rate.
If they already match, restart Audacity or your computer.
Alternative: How to Record Computer Audio without Audacity
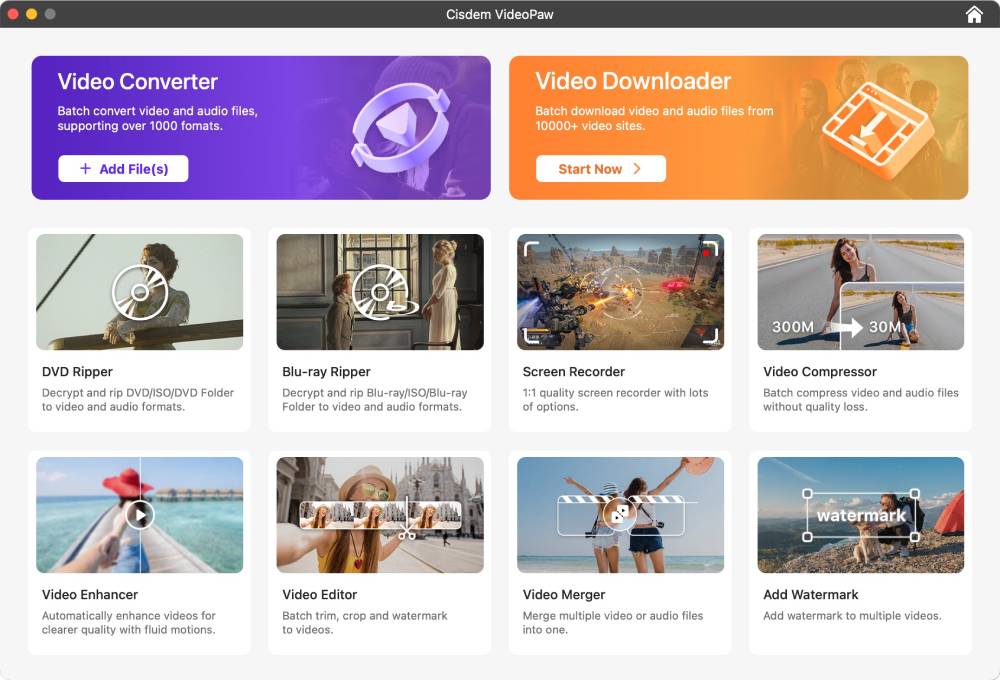
If Audacity is too much hassle, just use a dedicated desktop recorder. Cisdem VideoPaw does recording really well. It gives you high-quality screen capture, webcam overlays, real-time drawings, and scheduled recording timers.
For sound capture, the app lets you record with a single click. It captures internal system sound and microphone together or separately, and save directly to MP3, M4A, or WAV. No extra setup, no errors, it works instantly.
Steps to Record Desktop Audio with Cisdem VideoPaw
1. Download, install, and launch Cisdem VideoPaw.
Free Download macOS 10.15 or later Free Download Windows 11/10/8/7
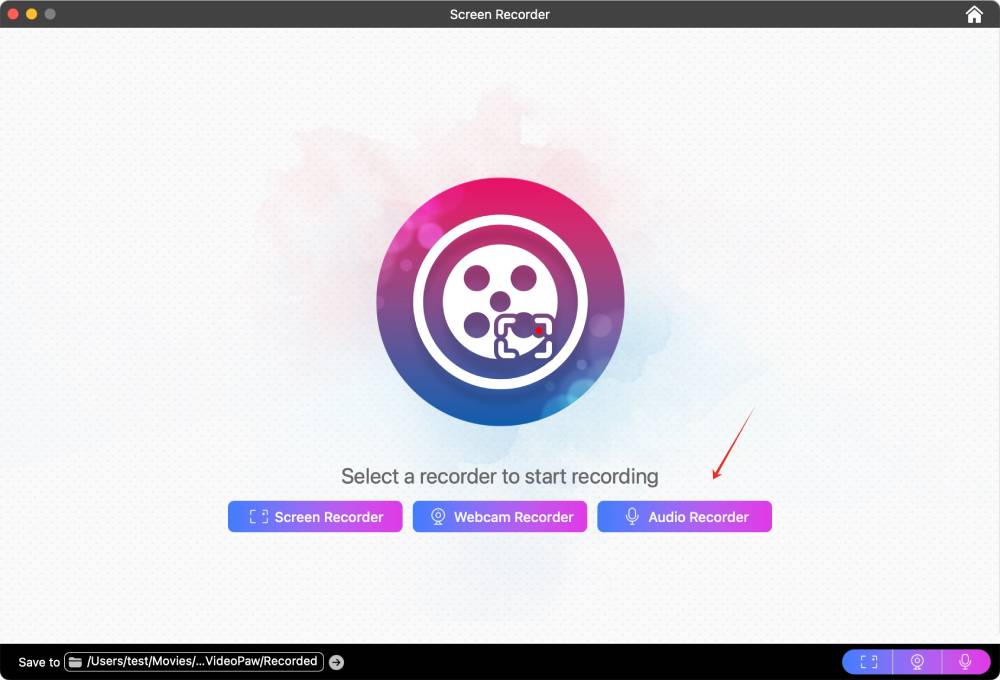
2. Click the Screen Recorder module on the main interface.
3. Select the Audio Recorder button from the three options in the center of the screen.
Heads up: The first time you use it, a privacy prompt will pop up. Just click "Open", then go into system settings and let the app use your microphone.
4. Configure your audio source settings in the control panel. By default, it captures both your microphone and internal system audio. If you want a clean recording of your computer sound without outside room noise, click the microphone icon turn it off.
5. Click the output audio format.
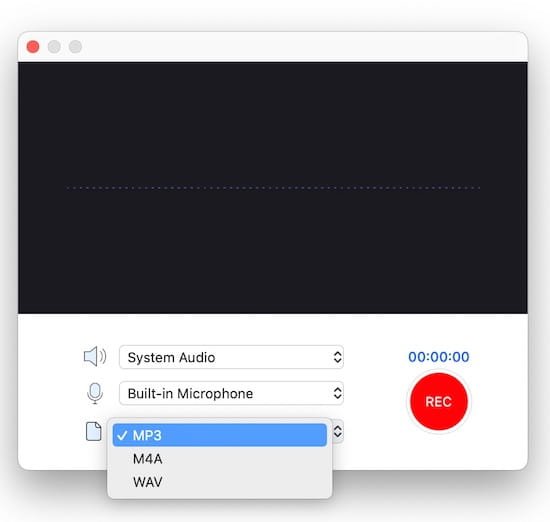
6. Hit the large red REC button first to start capturing, then trigger your computer audio playback immediately.
7. Stop recording, the track will appear in the recording list. Click the folder icon to locate your output audio file quickly.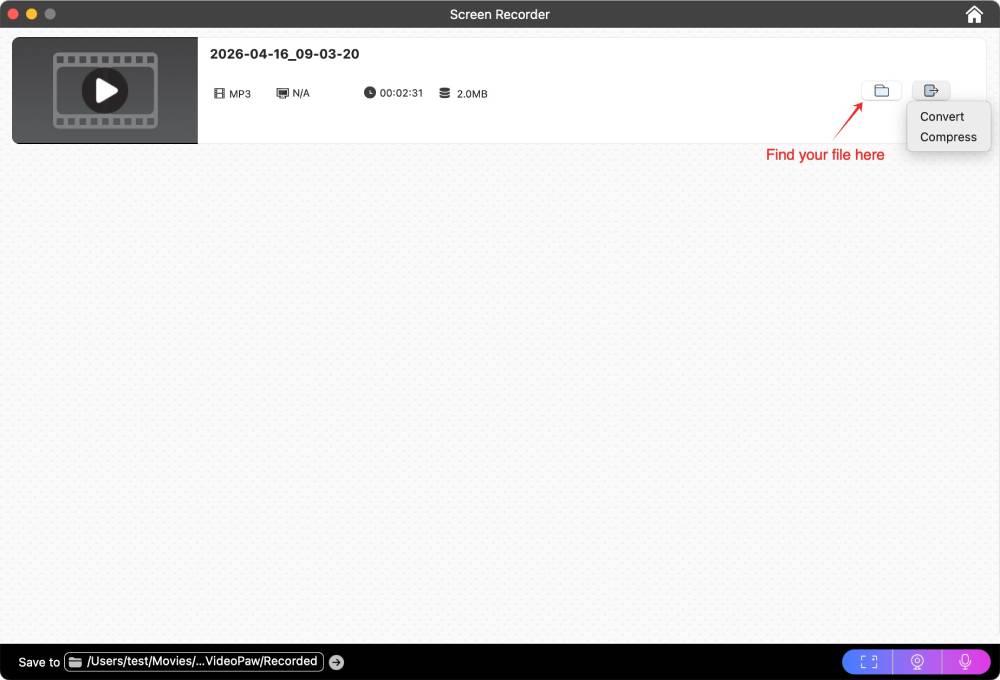
Tips:
- You can use the Record Timer in Settings to automatically record screen with computer audio on a set schedule or duration. Then use VideoPaw's Converter to extract audio from the video.
- Need to further process your audio recordings? You can easily switch to modules like Converter or Compressor to trim, merge, convert, or compress your files.
Conclusion
Recording desktop audio doesn't need to be a pain. If you're up for a free and flexible setup, learning how to use Audacity with Windows WASAPI or routing sound on a Mac is totally worth it. But if you just want to skip all the freezing and glitching, grab apps like Cisdem VideoPaw and be done with it. Either way, you're ready to capture your computer's sound.

Emily is a girl who loves to review various multimedia software. She enjoys exploring cutting edge technology and writing how-to guides. Hopefully her articles will help you solve your audio, video, DVD and Blu-ray issues.

Ryan Li is a senior developer at Cisdem. Since joining the company in 2017, he has led the development of Cisdem VideoPaw and now serves as the editorial advisor for all articles related to Video Converter.