

How to Lock Photos on Mac with Password in Easy Ways
 125.6K
 11
11


Cisdem AppCrypt
Lock Photos on Mac


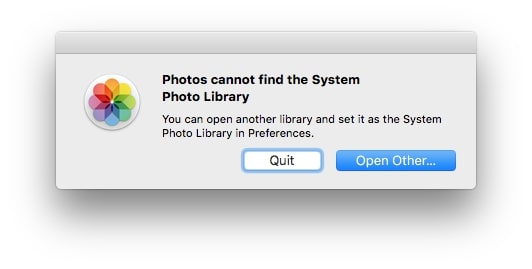
Your Photos library on Mac may contain images you don’t want others to see. But if you share your Mac with a friend or colleague, or send it in for repair, anyone who opens the Photos app may be able to access them. Even some Mac apps can requests access to your Photos library.
macOS itself doesn't offer a simple built-in way to lock Photos with password. But you still have other options. This article will show you 4 ways to lock photos on Mac.
 Cisdem AppCrypt
Lock Photos and Other Apps with Password
- Lock individual apps, like Photos and Messages, with password
- Offer an option to automatically relock apps after a period of inactivity
- Record failed attempts to open locked apps and optionally take a picture of the intruder
- Also block websites and pages with password
- Let you block specific sites, URLs with certain words, or all sites except a few
- Let you lock apps and block websites permanently or at scheduled times
- Easy to use
- Hard to bypass
- Help with privacy protection, parental controls and productivity
- Available for Mac, Windows, iPhone and iPad, Android
| Method | Compatible with | Lock | Best for |
|---|---|---|---|
| AppCrypt | macOS 10.15 or later | Entire Photos app | Users who want to lock the entire Photos app with a hard-to-bypass password and records failed attempts by intruders |
| Hidden album | macOS 13 or later | Hidden and Recently Deleted albums in Photos app | Users who prefer a built-in solution to lock specific sensitive photos in the Photos app |
| F-Vault | macOS 10.13 or later | Photos library and photos in folders | Users who want to password protect a specific library or picture folder |
| Disk Utility | All macOS versions | Photos library and photos in folders | Advanced users who don’t mind a more technical setup |
Method 1. Lock Photos on Mac with AppCrypt
Applies to: macOS 10.15 or later
If you want the easiest and most reliable way to keep your photos private on Mac, Cisdem AppCrypt is a great option. It can password protect the entire Photos app on MacBook Air, MacBook Pro, and other Mac computers. Once locked, nobody can open the Photos app or view your photos without the correct password.
Steps to lock Photos on Mac with AppCrypt:
1. Download and install AppCrypt.
 Free Download macOS 10.15 or later
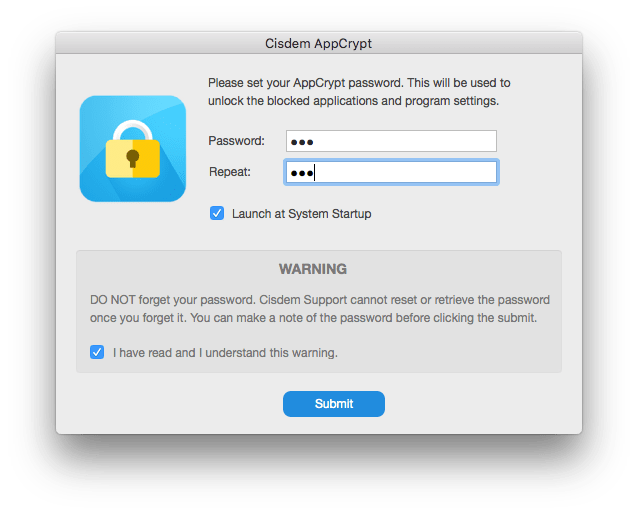
2. When you open it for the first time, set a password.
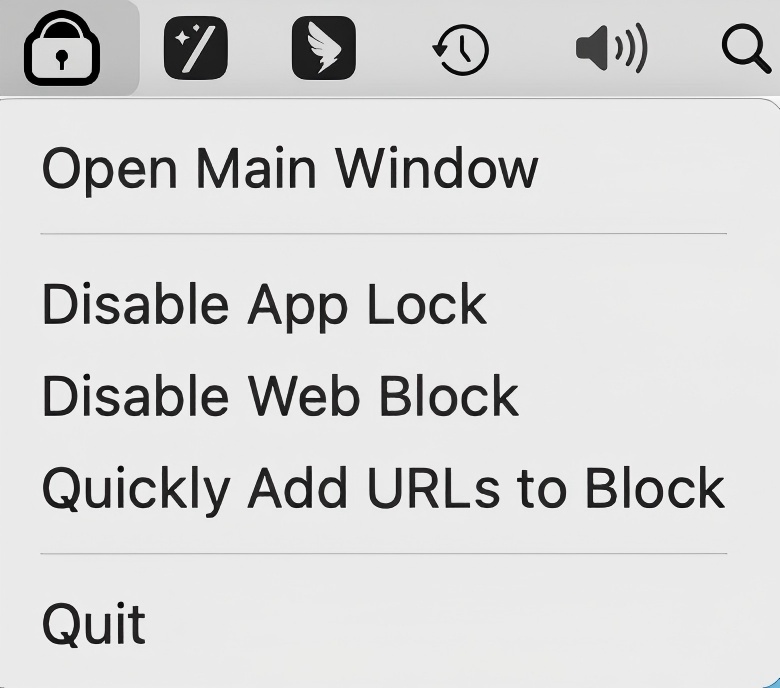
3. Click the lock icon in the menu and choose Open Main Window.
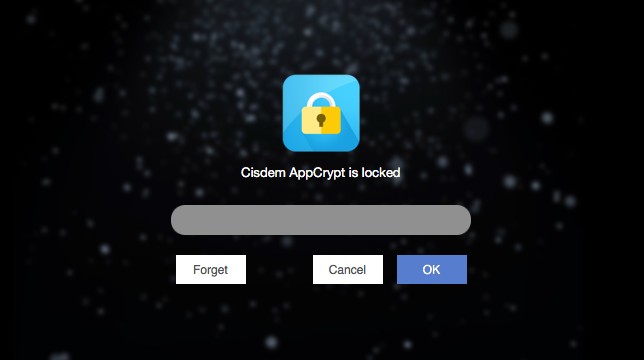
4. Enter the password to access the main window.
5. Under the App Lock tab, click the Add icon  .
.
6. To lock Photos on Mac, select Photos and click Open.
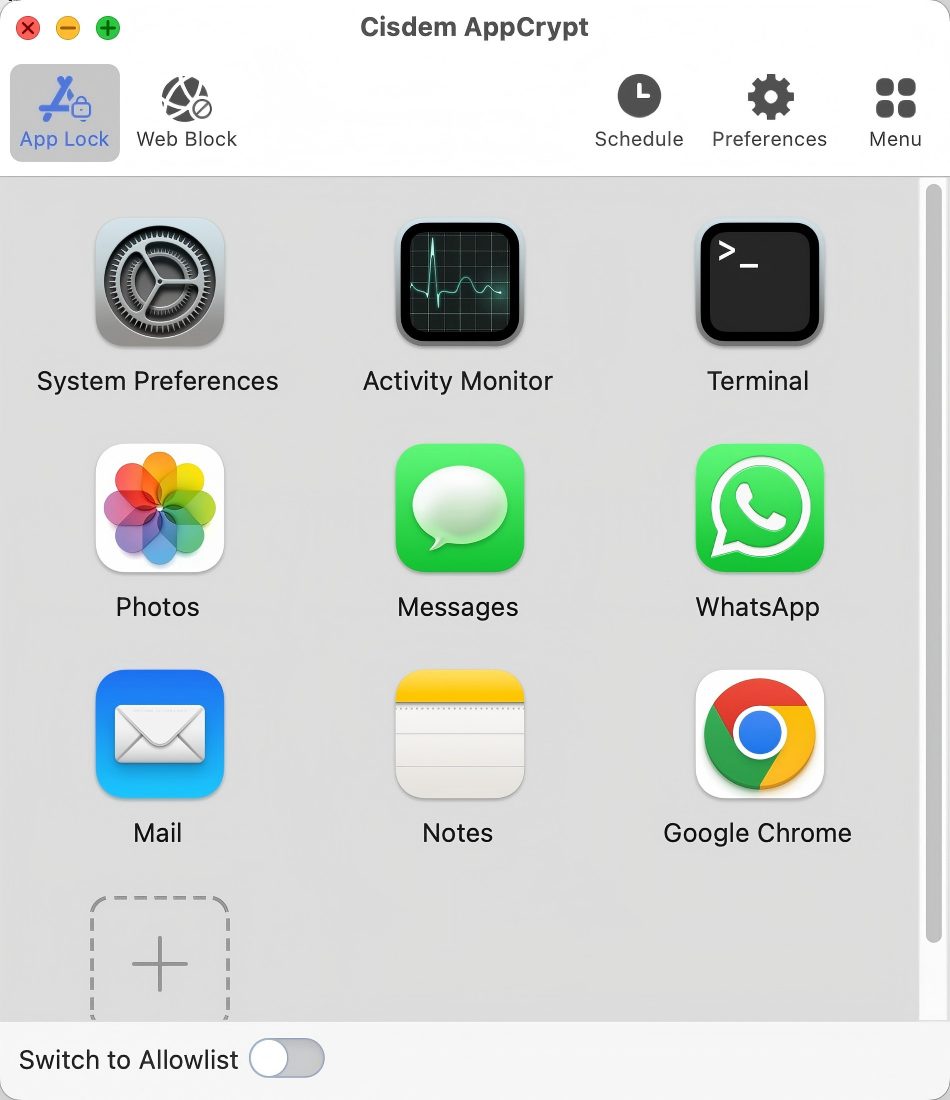
Alternatively, you can drag Photos into the App Lock tab.
From now on, Photos will always be locked as long as AppCrypt is running. When one tries to open Photos, it won’t open, and a dialog box will pop up asking for the password.
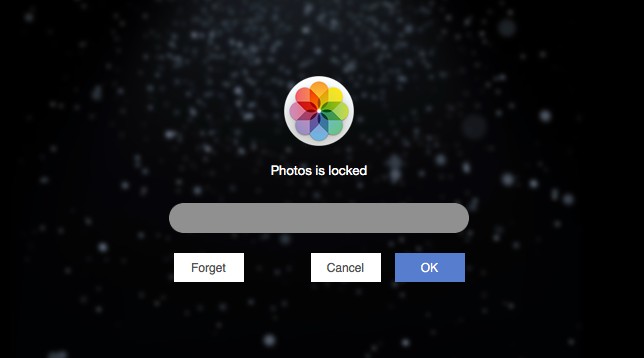
| Action | Result |
|---|---|
| Enter the correct password | Photos unlocked. |
| Enter an incorrect password |
Photos still locked. AppCrypt records the failed attempt and takes a photo of the person trying to intrude (if you have enabled photo taking in Preferences). |

Tip . How to prevent the lock from being bypassed?
It’s recommended to take the following steps to further enhance security:
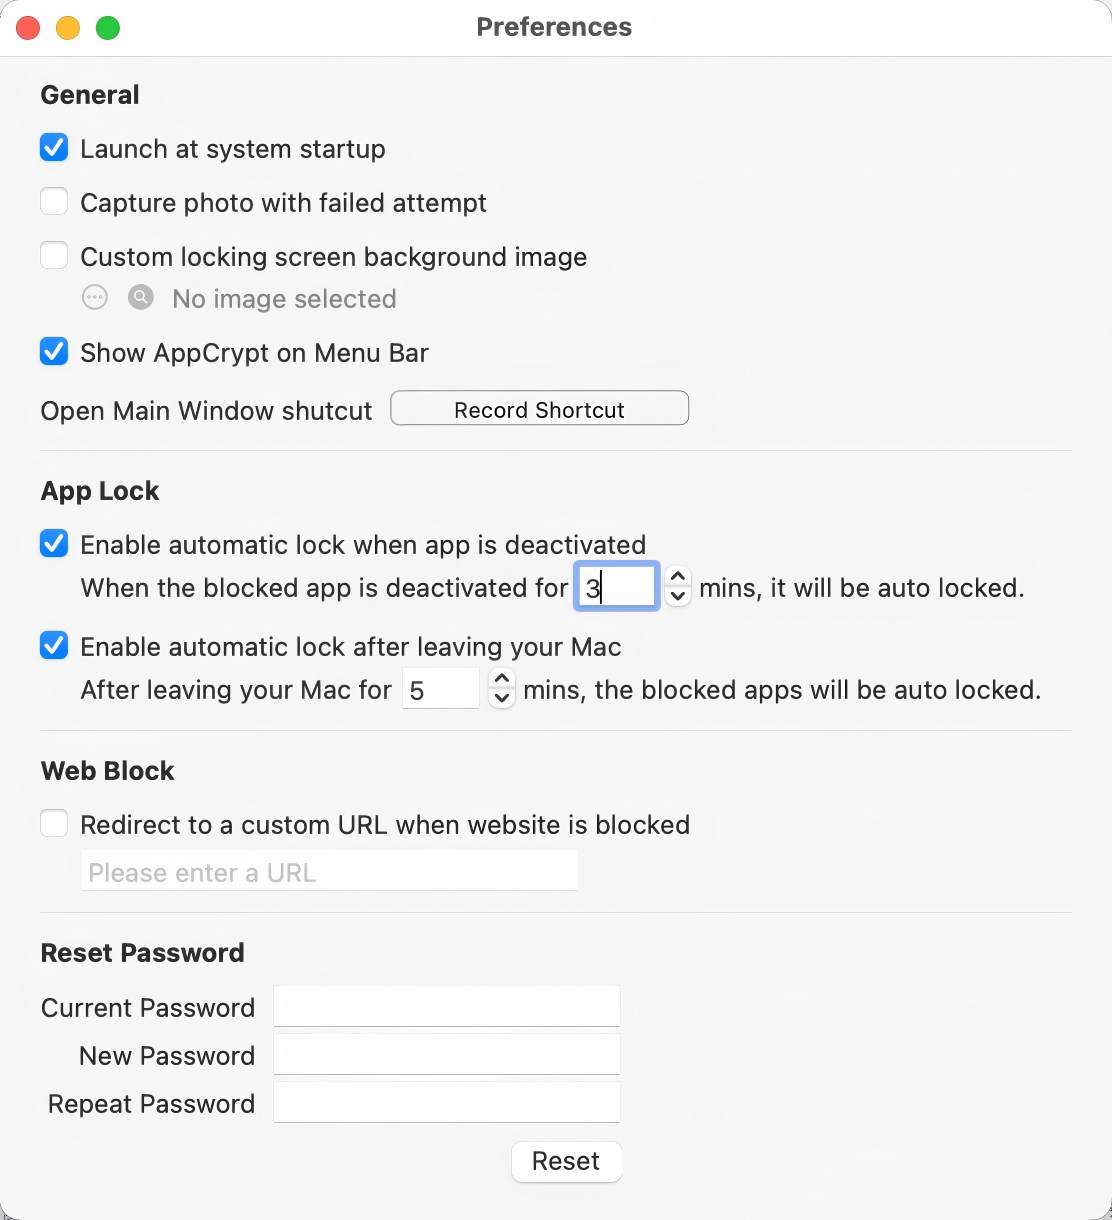
(1) Enable Launch at System Startup
When setting up AppCrypt for the first time, select the “Launch at System Startup” checkbox. This ensures that AppCrypt runs automatically and locks the Photos app immediately after your Mac starts. You can also enable this option later in Preferences.
(2) Lock several macOS system apps
It's also recommended to additionally lock the following macOS system apps:
- System Preferences: Prevent others from bypassing restrictions by disabling AppCrypt's launch permissions.
- Activity Monitor: Stop others from force-quitting AppCrypt.
- Terminal: Prevent technical users from modifying or terminating AppCrypt via the command line.
(3) Set a strong password
Set a strong password that's hard to guess. And do not share your password with others. Without the correct password, no one can unlock the Photos app, quit AppCrypt or uninstall it.
▶️Watch the video below to see how to lock Photos on your MacBook Air, MacBook Pro, iMac, or Mac mini with AppCrypt.
Method 2. Lock hidden photos on Mac with Apple’s built-in feature
Applies to: macOS 13 Ventura or later
If you don’t want to lock the entire Photos app, Apple offers a built-in way to protect specific photos on Mac. First, move the photos you want to lock to the Hidden album. Then lock the Hidden album with your Mac login password or Touch ID.
Although you can move all photos in your library to the Hidden album and lock them this way, newly added photos won’t be locked automatically. You'll need to manually hide them each time. So this method is more suitable for users who only want to lock specific photos (like ID images) rather than the entire Photos library.
Note: To make the steps easier to follow, I set the Photos app to show the Hidden Photos album in the left sidebar. You don’t need to do this on your own Mac.
Steps to lock hidden photos on Mac with Apple’s built-in feature:
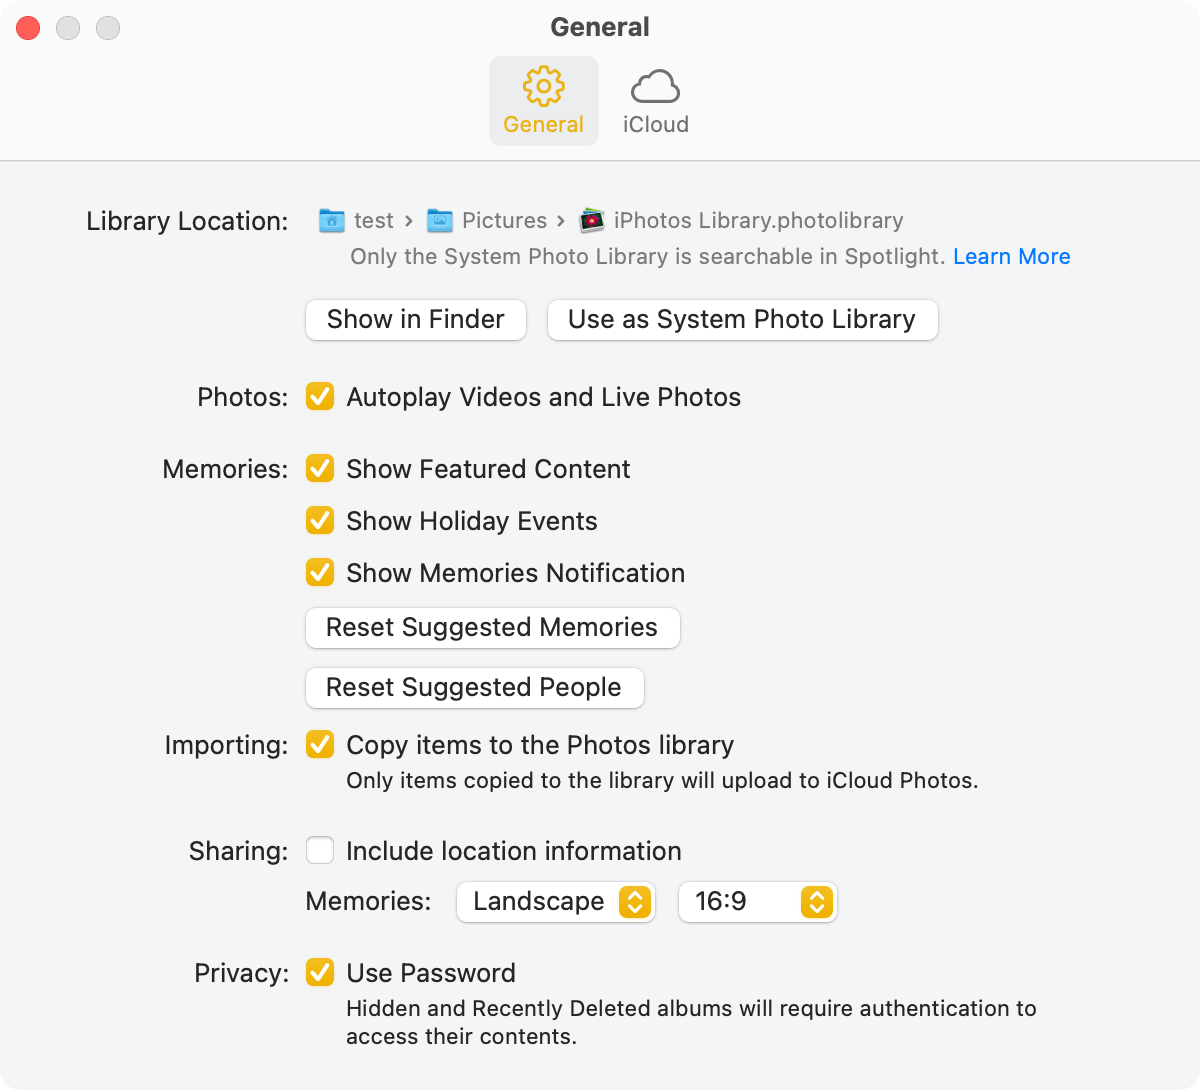
1. Open the Photos app and go to Settings. (Settings is called Preferences in macOS 12 Monterey or earlier.)

2. Under the General tab, select the Use Password checkbox in the Privacy section. (On a Mac with Touch ID, like a MacBook Pro, select the Use Touch ID or password checkbox instead.)
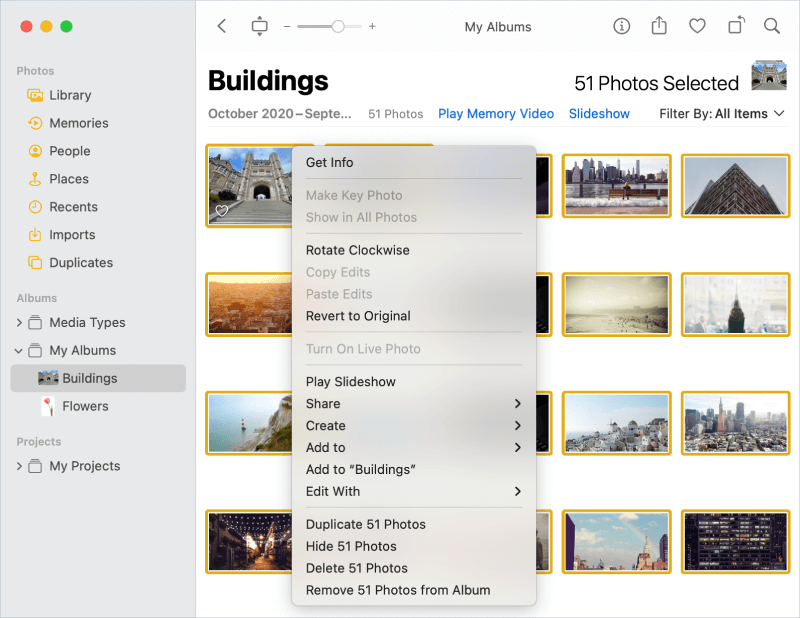
3. Do any of the following things.
- To be able to lock all photos, choose Library in the sidebar and then select all photos.
- To be able to lock certain photos, choose Library in the sidebar and then select specific photos.
- To be able to lock all photos in a certain album, choose the album in the sidebar and then select all photos.
4. Control-click (or right-click) and then choose Hide [number] Photos. Click Hide in the message that appears.
Now the photos are hidden and locked in the Hidden album. You can see a Lock icon next to the Hidden album in the sidebar.
To unlock photos, click Hidden in the sidebar and then click View Album. This will bring up a dialog, which asks one to enter the password. If one doesn’t know the password, one can’t see the locked photos. You yourself can easily unlock photos with the password or Touch ID.
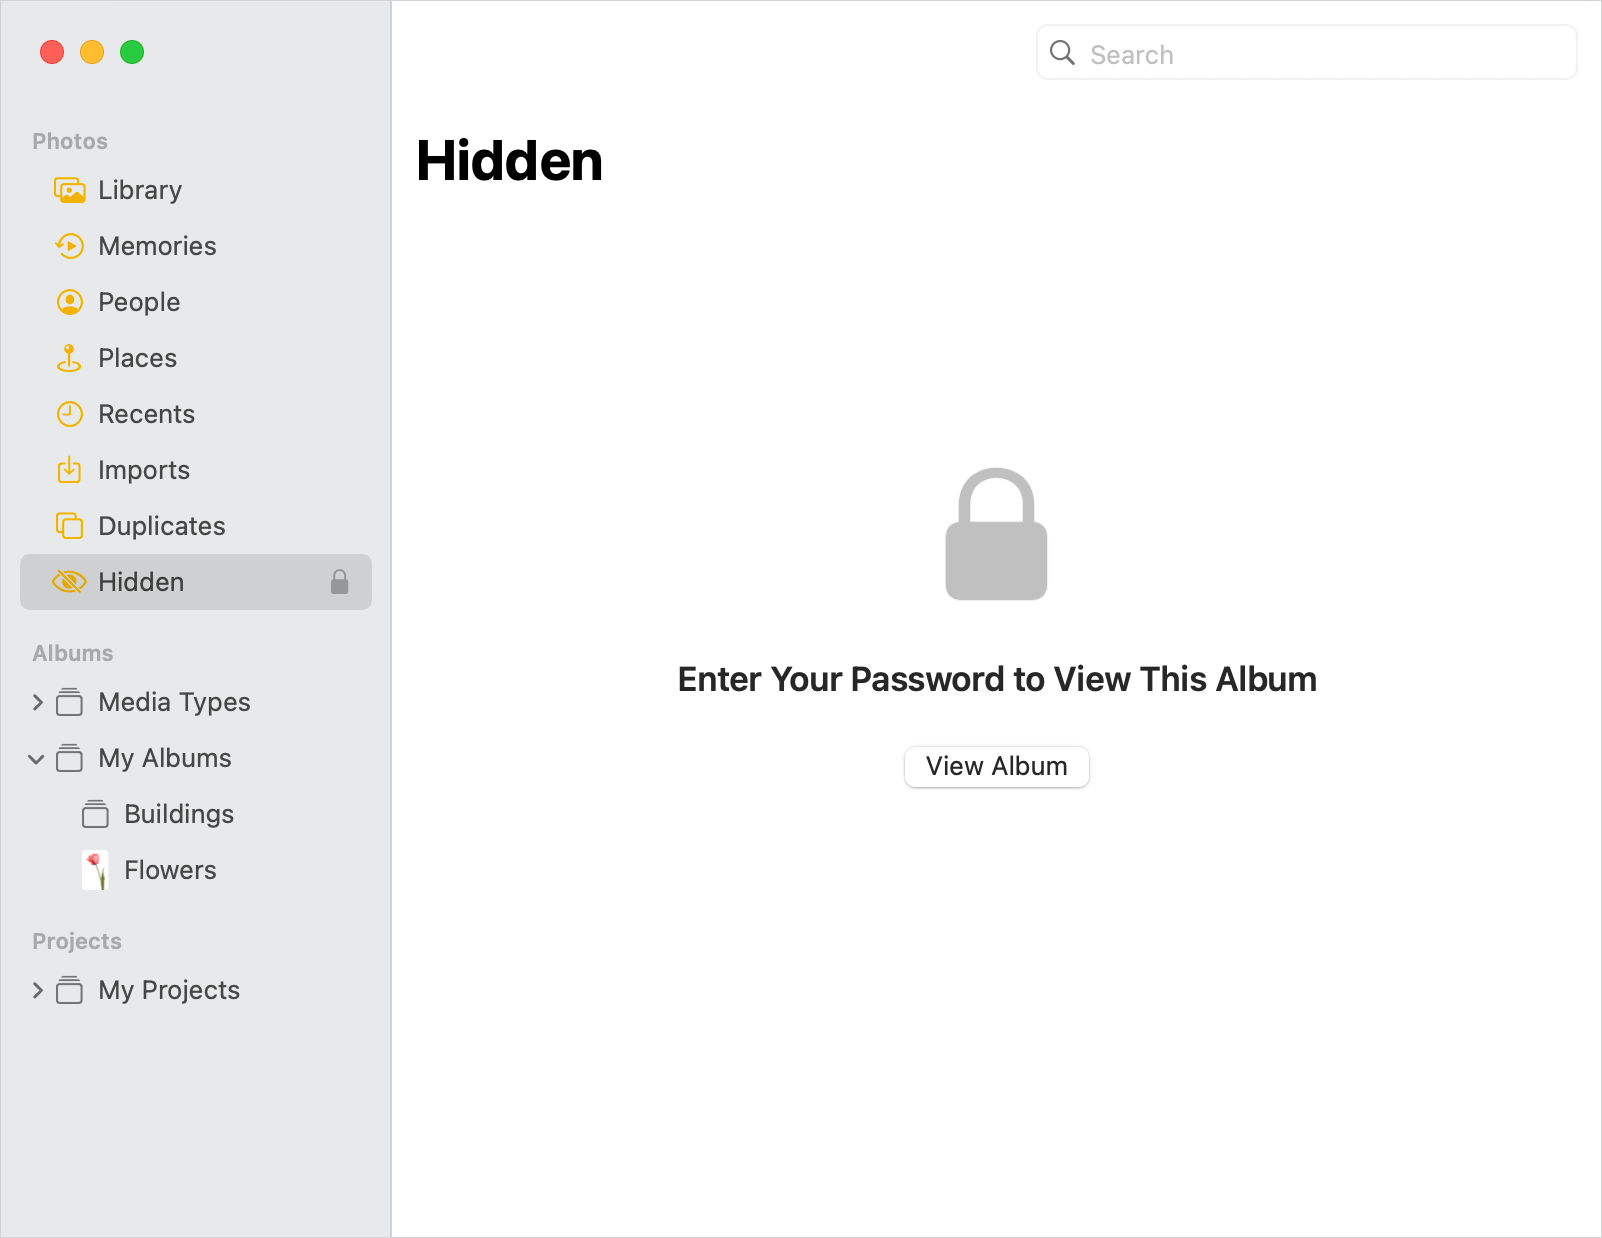
When the Hidden album is unlocked, an Unlock icon will appear next to it instead. To lock this album again, just click the Unlock icon, which will turn into a Lock icon.
To remove the lock from photos, just unhide them.
Note: The Recently Deleted album will also be locked if you select the said checkbox in Settings. This means that photos deleted in Photos app will be locked.
Method 3. Lock photos on Mac with F-Vault
Applies to: macOS 10.13 High Sierra or later
This method is about how to put a lock on your photos using a photo vault app, whether the photos are in a folder on your Mac or the Photos library.
It’s a great option if you don’t need to view your photos often. Once locked in F-Vault, photos are not easily accessible.
Steps to lock Photos on Mac with F-Vault:
1. Download and install F-Vault.
2. The first time you open it, set a password. If you want, you can set an email to recover the password in case you forget the password.
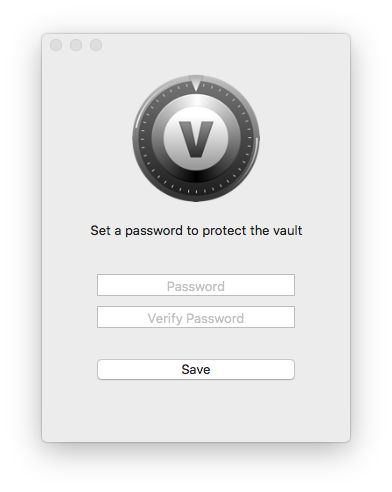
3. Now you are presented with the Default vault. If you want, you can rename it to “photo vault for Mac” or something else.
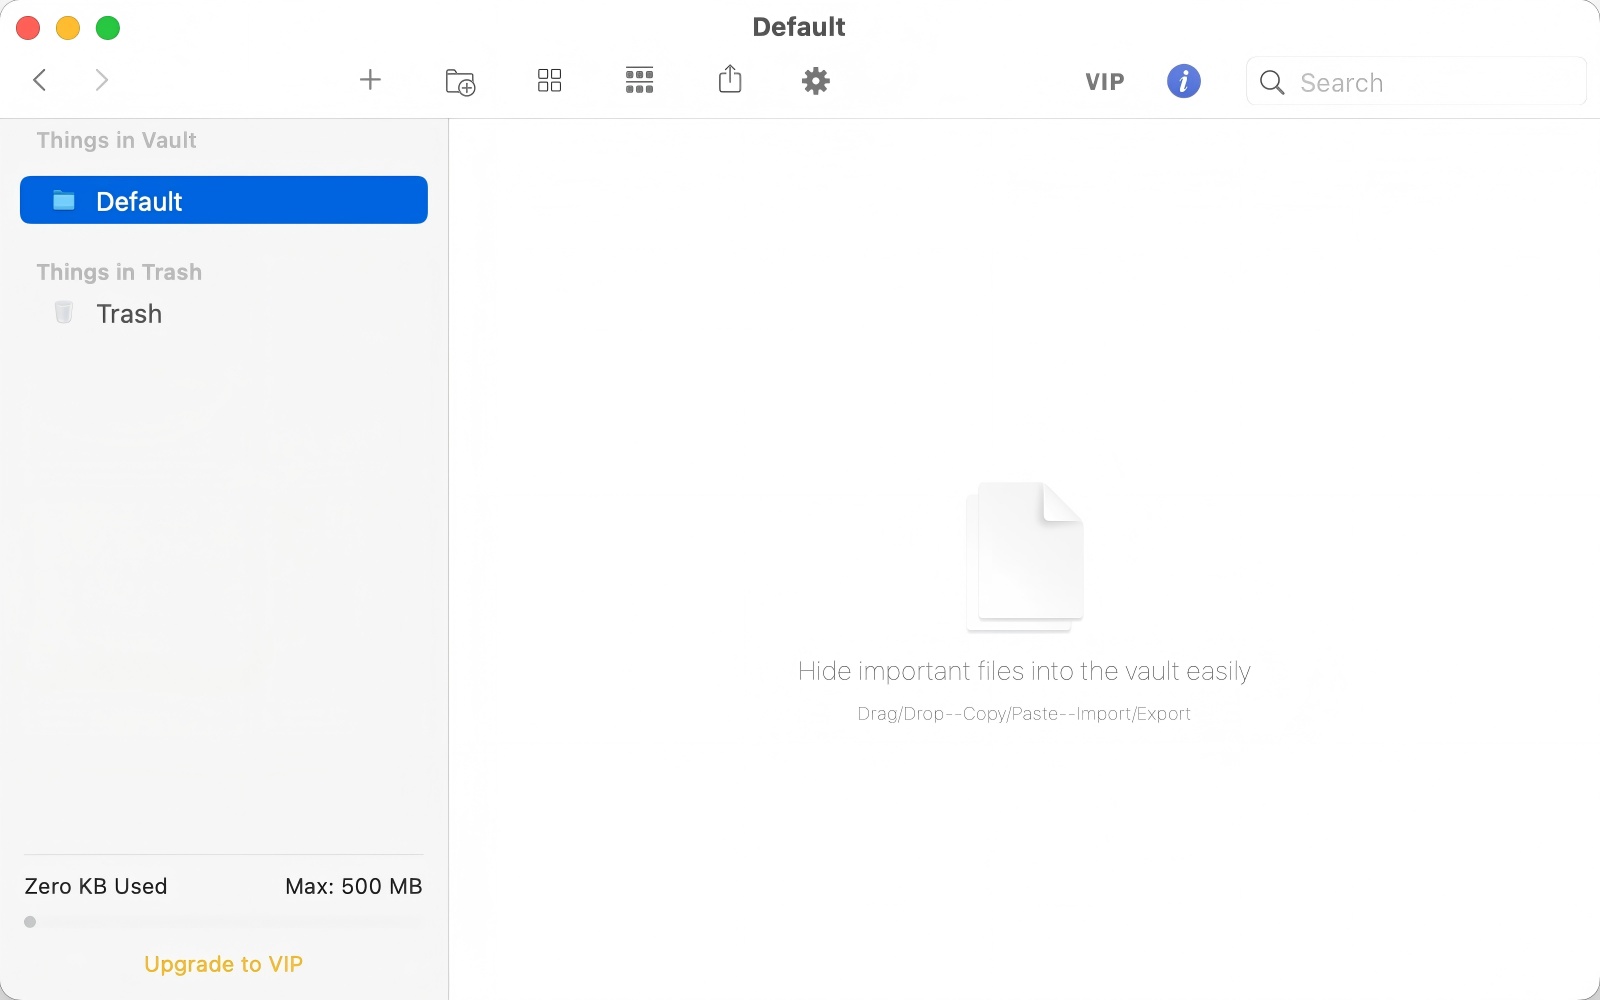
4. To lock your Photos library, go to Mac’s Pictures folder and drag your library into the said vault. To lock a folder containing your personal photos, drag the folder into the vault.
5. When asked if you’d like to delete the original files, click Delete. Or, you can manually delete the Photos library and folder in Finder.

Now the photos on your Mac are locked in the vault. The Photos library is hidden and protected. When you or someone else tries to open the Photos app, it won’t open because the library can’t be accessed. The folder containing your photos is also hidden and inaccessible.
If you have multiple libraries for Photos and want to protect all of them with password, you can drag them all into the vault.
To unlock your photos, open F-Vault (which requires entering the password) and drag your library and folder from the vault back to where they used to be.
Note: If you are locking photos on MacBook with Touch ID, you can unlock with fingerprint, which is more convenient. To enable it, go to F-Vault’s Preferences and turn on Enable Touch ID.
Method 4. Lock photos on Mac with Disk Utility
Applies to: All macOS versions
Instead of using a photo vault like the one in Method 3, you can prevent access to specific picture folders or Photos libraries on your Mac for free using Disk Utility, an utility included with macOS. This method is less straightforward and a bit technical.
Steps to lock Photos on Mac with Disk Utility:
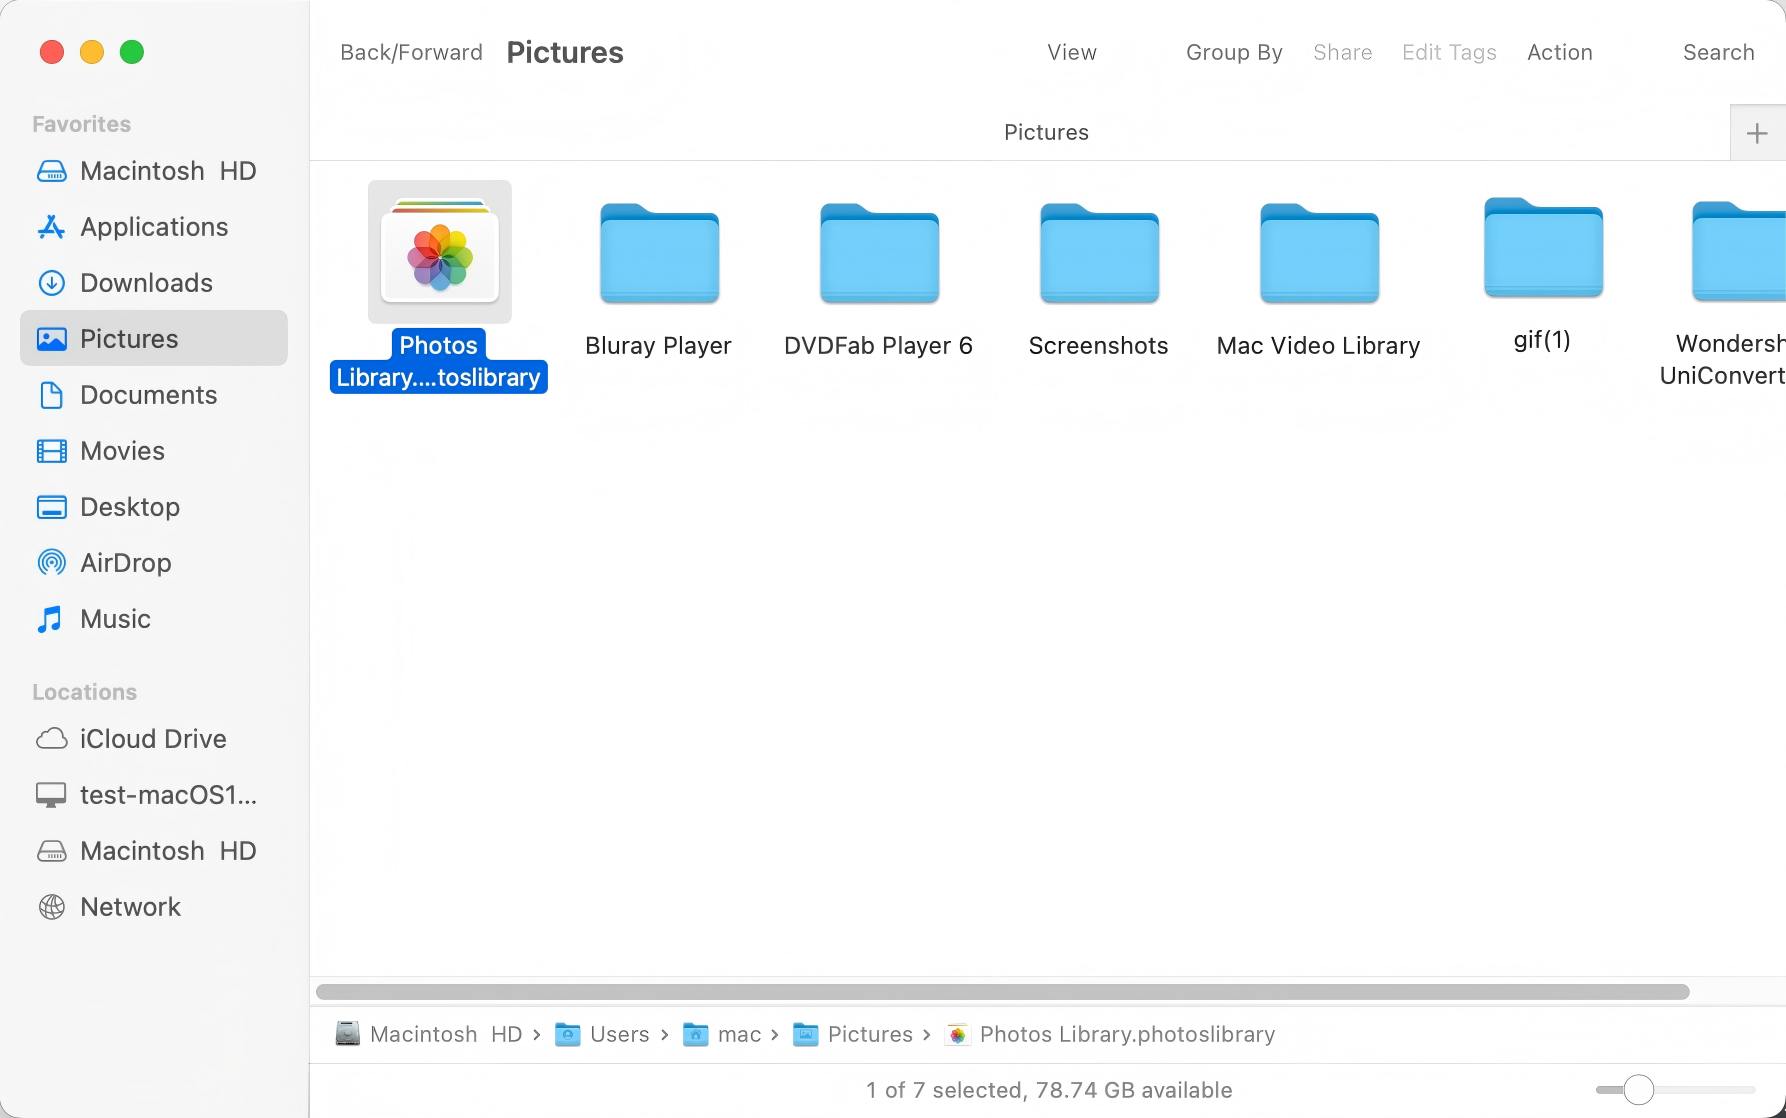
1. Go to Finder on your Mac. Find your photos library in the Pictures folder.
2. Create a folder in the Pictures folder. Move your photos library into the new folder.
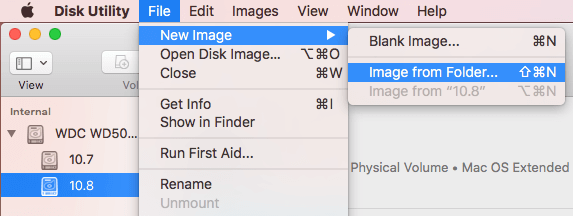
3. Open Disk Utility. In the top menu bar, select File > New Image > Image from Folder.
4. Select the folder that you have just created. Click Choose.
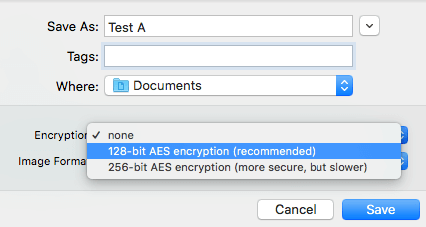
5. Set a filename. Then select the destination location.
6. Open the Encryption dropdown menu. Choose 128-bit AES encryption (recommended). Set a password.
7. Click the Image Format menu and choose the read/write option (or a different option based on your need).
8. Click Save.
Disk Utility will start creating an encrypted disk image, which can take minutes or longer, depending on the size of your pictures folder or Photos library.
9. When the process is done, go to the Pictures folder and delete the folder (including the Photos library within it) created in step 2.
Now the photos on your Mac are locked in the encrypted disk image (with the extension .dmg). It won’t be possible to view the photos in your library anymore until you remove the lock.
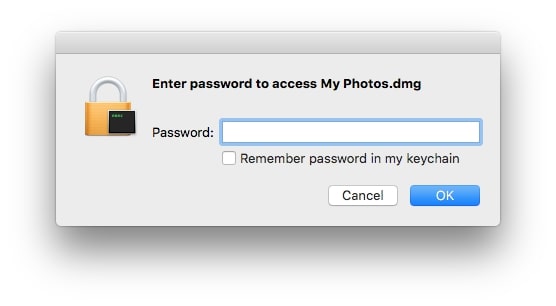
Here’s how to unlock photos and make them accessible again. Double-click the disk image, enter password and click OK. In Finder’s left sidebar, click the disk image under the Devices section. Move your Photos library into Mac’s Pictures folder.
Real-life use cases
♦“I often lend my Mac to my child for homework or games. But the Photos app contains many of my personal photos, some of which are quite private. He might accidentally open apps like Photos just for fun. I'm worried he might see something he shouldn't. How can I prevent this?”
In this case, I recommend using Cisdem AppCrypt to lock Photos on Mac . It allows you to lock the entire Photos app with a password. You can also lock other private apps like Messages and Notes with it.
♦“I have photos of my passport, ID card, etc. stored in Photos on my Mac. But the computer needs to be repaired now. The repairman may be able to see these sensitive information. What should I do?”
If you only want to lock these specific photos, you can use the Hidden Album in the Photos app and combine with the "Use Touch ID or password" feature.
♦“I work in a middle school. I’m constantly leaving my desk to do one thing or another. And sometimes my students sneak into chair and open my macbook to try to look at my photos. Is there any way to automatically protect my privacy?”
Using AppCrypt, you can set the Photos app to be automatically locked when you leaving the computer for a period of time, or when the Photos app is deactivated for a period of time.
Conclusion
macOS does offer ways to help you keep your photos private. For example, the Photos app allows you to hide photos, and it even allows you to lock the hidden photos since macOS Ventura. But sometimes you may want more privacy.
This article talks about how to lock photos on Mac in four ways, two built-in ways and two third-party ways. Depending on the level of privacy you need, you can choose one way or the combination of ways.

Norah Hayes likes to share her tips on how to improve focus and stay motivated at work. She believes it is essential to eliminate all online distractions during work hours.

Ethan Long joined Cisdem in 2015 as a developer and now serves as the editorial advisor for Cisdem AppCrypt. He actively tests and uses Cisdem AppCrypt and other screen-time management tools to ensure AppCrypt meets its promises in real-world scenarios.
Alexandra K
Mac's hidden album can only lock some photos, not all. The first tool is good, simple and easy to use.
Bernd Sälzle
Great sharing! I can lock my photos app and protect my privacy on my mac.
James
I'm not very computer savvy. The first method is straightforward and useful. It's the best for me.
Corey Craft
Installed program a few days ago. Does a better job than using extensions or at least just as well. Thanks, great post! <3. Now I know how to lock photos on mac!!
kronkxz
I love Cisdem AppCrypt. It makes everything much faster and easier. Hope to develop more features in future.
kimmy
Really amazing app. Gave me exactly what I wanted. :)
Ra God Bz
I was going to consider buy the AppCrypt but then I noticed that it's so easy for anybody to just close eject the Appcrypt and then they can by pass typing a password. That's a flaw or am I missing something here
Rosa Reyes
Dear Ra God Bz,The only one reason why ejecting AppCrypt without password is that you have removed one of the four system applications which include Activity Monitor, System Preferences, Console and Terminal from the block list.
Kerr
I noticed that AppCrypt has been updated to v3.0, it is wonderful. I bought this app before, so i can update the app to the new version without any cost. Thanks.
Kerwin
I have many apps that i want to lock. I tried appcrypt, it really worked, i am going to buy one lifetime license.
Sparkle
I have some private photos in my Mac, i really hate someone seeing my photos,but my brother always does so. AppCrypt pulls me out of the dilemma. Thanks.