

Cisdem PDFMaster User Guide
 5.0K
5.0K
 0
0


Cisdem PDFMaster is a solution to solve your PDF problems, which brings together all commonly used PDF tools in one place. With a straightforward interface, you can read, manage and produce your PDF file with the most fast, convenient and affordable way. Below is the main functions of Cisdem PDFMaster for your reference.
- Open, view, read, crop, screenshot and annotate PDF files;
- Manage and organize PDF files by splitting, merging, rotating, comparing and compressing;
- Edit text and image content in PDF file like editable file.
- Recognize interactive form fields automatically and create interactive form fields with multiple form field tools;
- Add or remove permission password from PDF files;
- OCR recognize texts from images or scanned PDF files;
- Convert PDF to a variety of editable file formats;
- Insert Header, Footer and Bates Number on PDF files;
- Batch conversion, compressing, security, watermark, background, header & footer and Bates number;
Get Started
Download & Install
1. You can download the installation package from the link below.
 Free Download macOS 11 or later
Earlier than macOS 11, click here
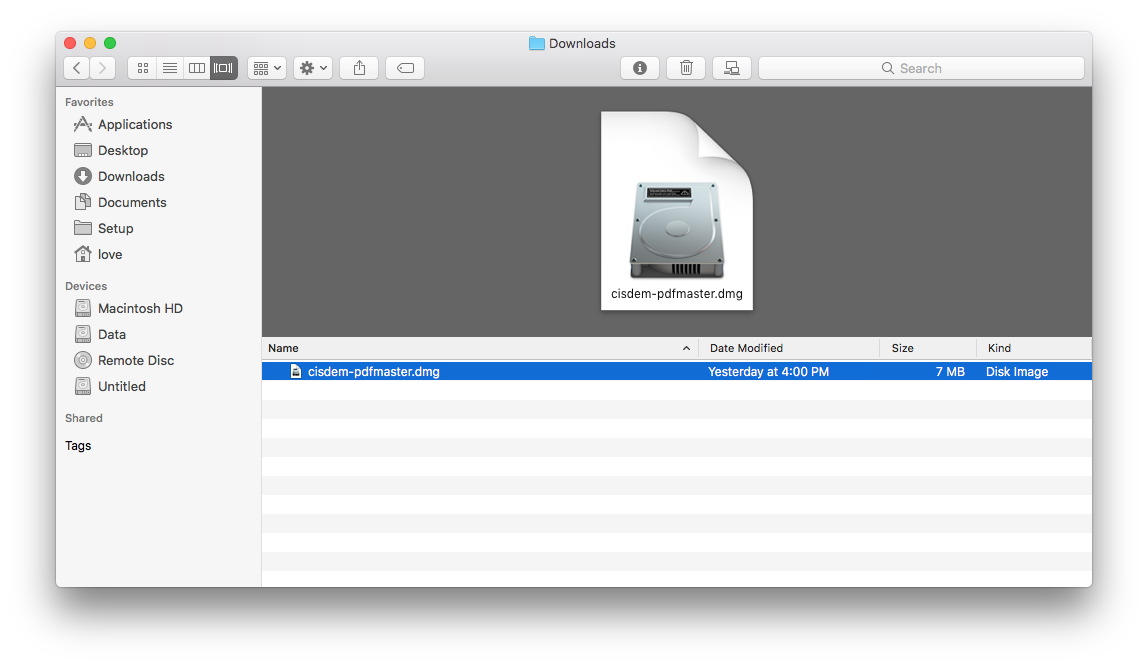
2. Install Cisdem PDFMaster with the downloaded package. Double-click the .dmg file.
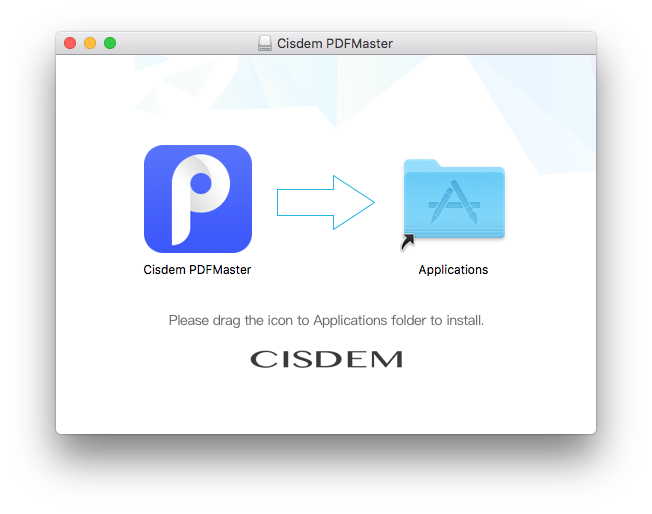
Drag the Cisdem PDFMaster icon to Applications folder.
Activate Full Features
After installing the program, you can apply 7 trial days for testing before making a purchase decision, within the 7 trial days, you can use the full features of the program.
When the trial version expires and you want to use the full features still, you will need to activate the program with your license code.
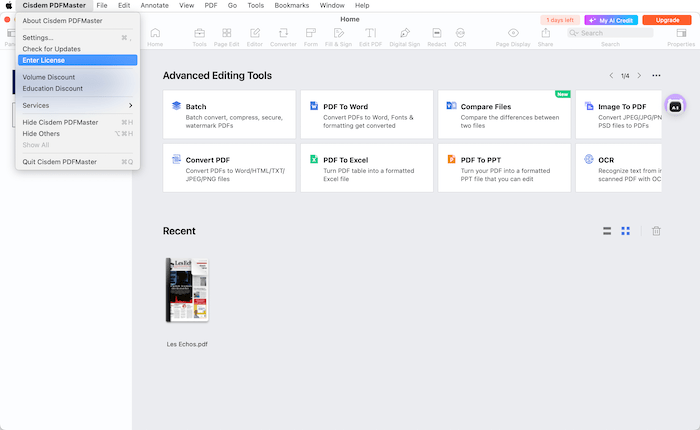
Step 1 Go to Launchpad or applications folder, double click Cisdem PDFMaster to run the program, you can click ![]() > Enter licnese or click Cisdem PDFMaster> Enter licnese
> Enter licnese or click Cisdem PDFMaster> Enter licnese
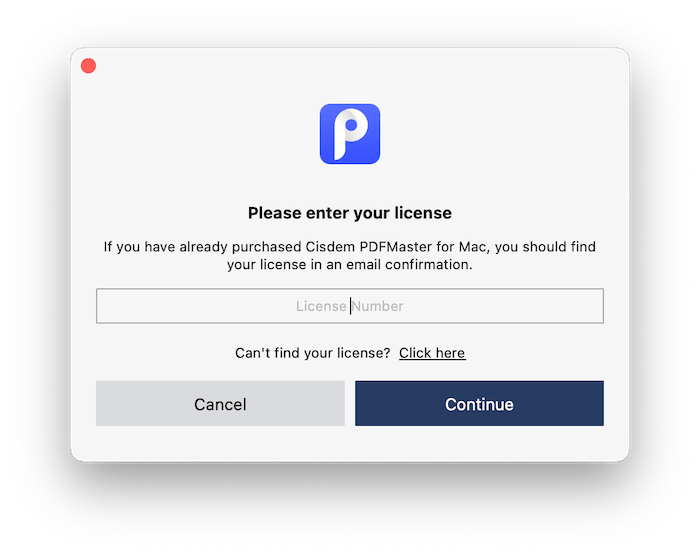
Step 2 Copy-n-paste your license code into the pop-up window, and then click “Activate”.
Activate AI Tools
Cisdem PDFMaster also offers the AI tools for you to translate, rewrite, proofread, translate your documents with an ease and intergrate Deepseek to analyze complex documents.
The credits you've purchased are available after you activate the AI tools with your AI license code, and it expires after 30 days. You will need to user a new AI license code to activate the AI tools after the expiration date.
There are two ways to activate the AI Tools:
1. Click the Robot icon> Enter Lincese
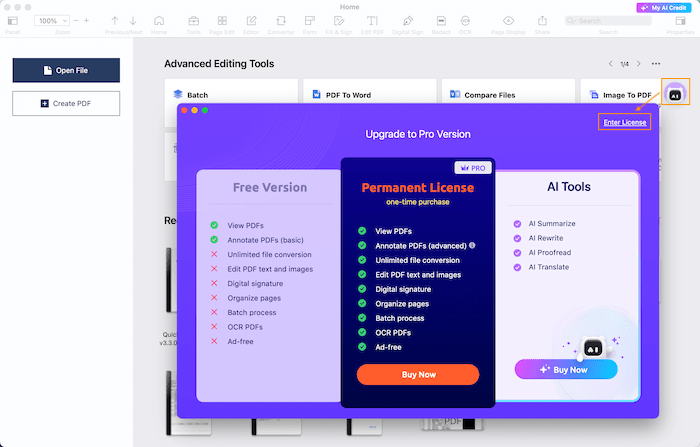
2. Click  > Enter AI License

Open PDF
For your convenience to work PDF files with Cisdem PDFMaster, Cisdem PDFMaster provides several methods for you to open PDF files.
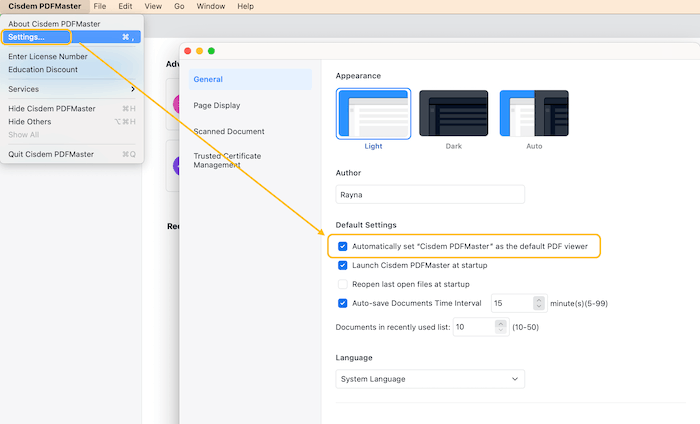
1. Set Cisdem PDFMaster as your default PDF viewer.
Run Cisdem PDFMaster, click Cisdem PDFMaster> Preferences> General, check the option “Set Cisdem PDFMaster as the default PDF viewer”. Then you can directly double click the PDF file to open the PDF file with Cisdem PDFMaster.
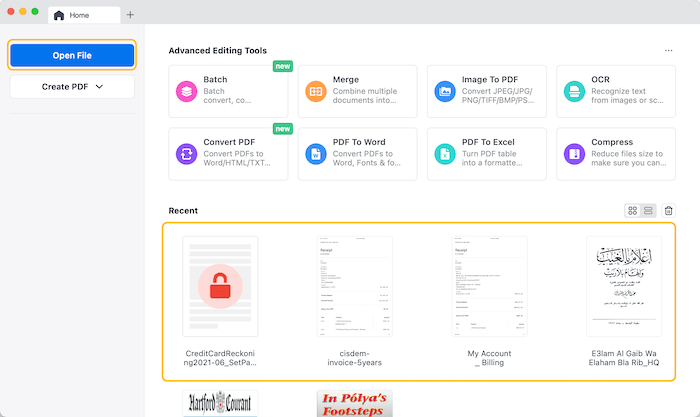
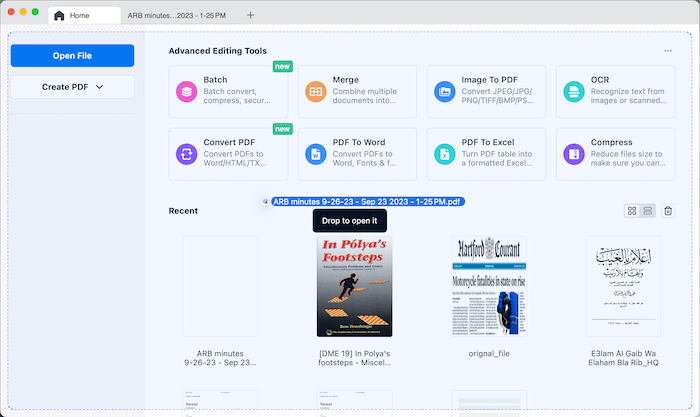
2. Directly click Open Files button or click the target file from the Recent list to open PDF files.
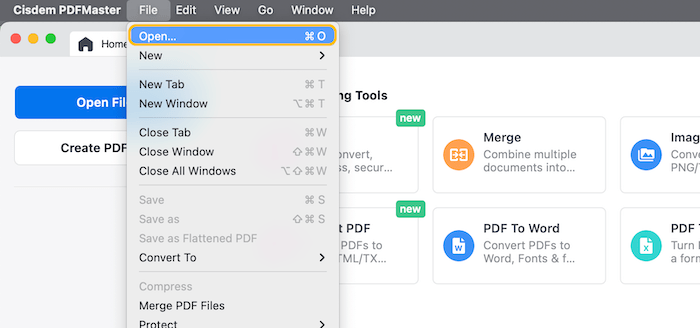
3. Click File> Open or press shortcut keys CMD+O, choose the target PDF files to load.
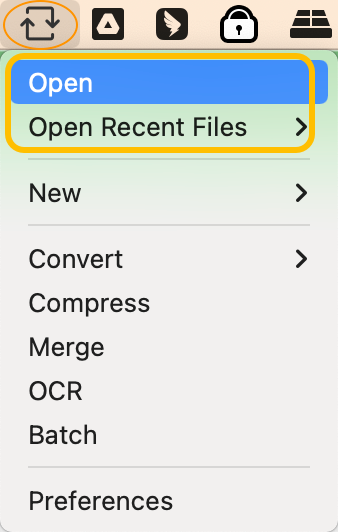
4. Click ![]() on the top menu bar and click Open/Open Recent, choose the target PDF files to open.
on the top menu bar and click Open/Open Recent, choose the target PDF files to open.
5. Drag and drop a PDF file into the Cisdem PDFMaster’s interface.
6. Drag the PDF files on the Cisdem PDFMaster icon in the Dock.
Read PDF
Cisdem PDFMaster is a full functioned PDF reader, you can enjoy the powerful reading experience through the functions below.
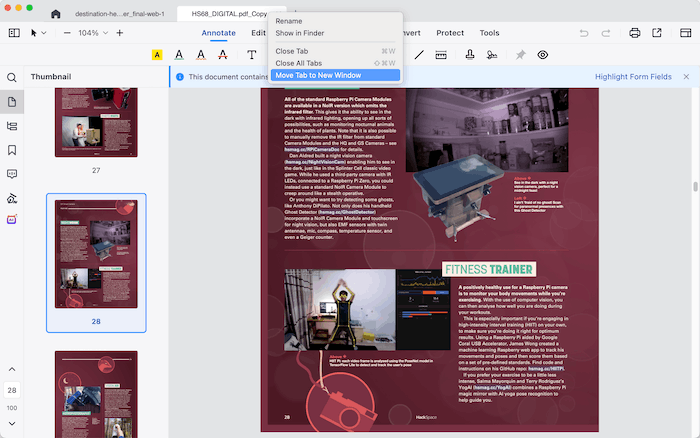
1. View PDFs with multi-tabs/windows
Cisdem PDFMaster opens PDF files in multi-tabs by default, if you want to open a PDF file in a new window, just right click that PDF file'tab and choose "Move tab to a new window" or directly drag that PDF file's tab out from the window.
2. Split View
If you want to compare two PDF files or two parts of the same PDF file, you can use Split View function to view two files/parts side by side with Cisdem PDFMaster. This feature is meaningful for the use of translating text, conducting research, comparing plans, and finalizing contracts.
Step 1 Enable Split view function
You can tap  on the tool bar, then you can find Split View on the left side panel. Or you can click View> Split View, choose Horizontal or Vertical as you need.
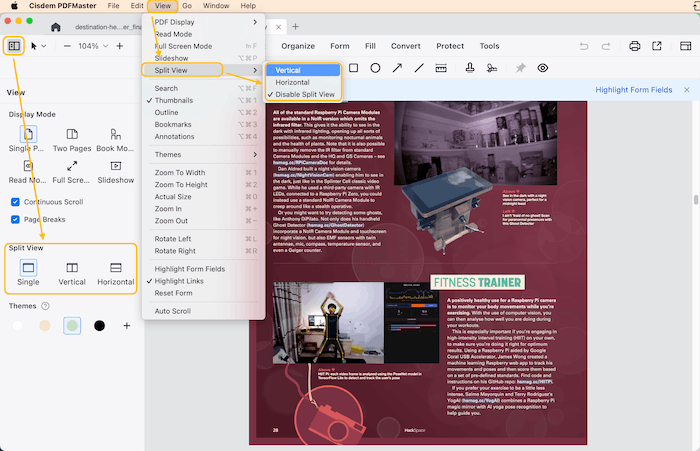
Step 2 Add the file you want to split view and then you can view those files side by side.

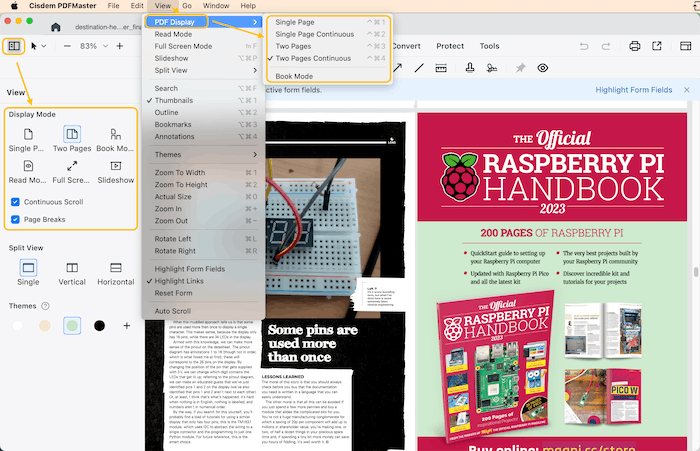
3. Display Mode
The way how to change the document layout while viewing is intuitive, you can find them by tapping on the tool bar or clicking View> PDF Display on the top menu bar.
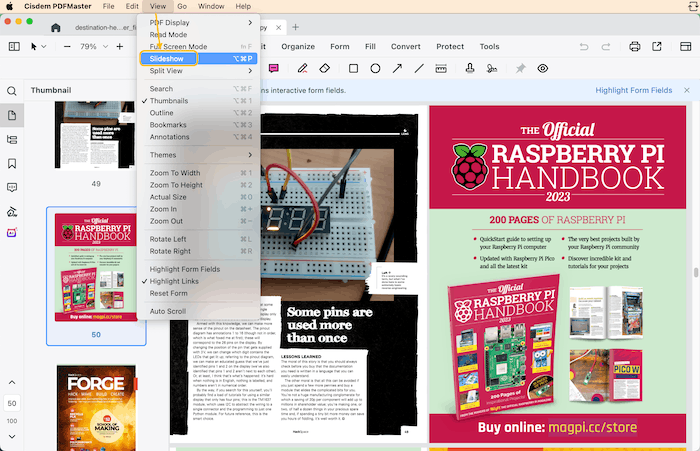
4. Slideshow
You can directly view the PDF file like a Keynote/presentation with the slideshow function of Cisdem PDFMaster.
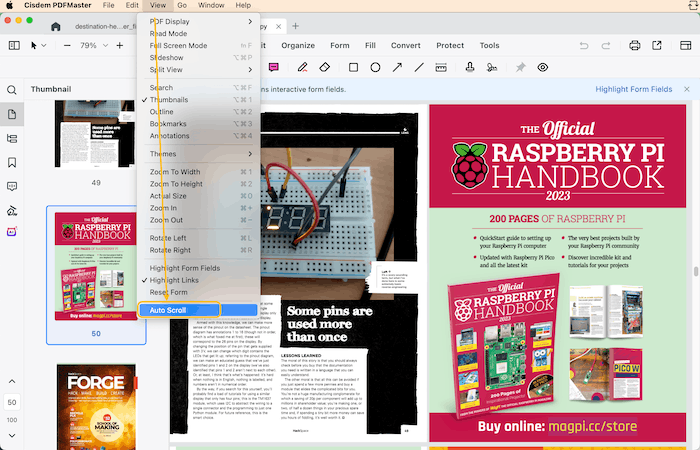
5. Auto Scroll
If you want to sit away from your computer and scroll through documents automatically without keystrokes or mouse actions, you can access the Auto Scroll feature by clicking View> Auto Scroll to turn it on.
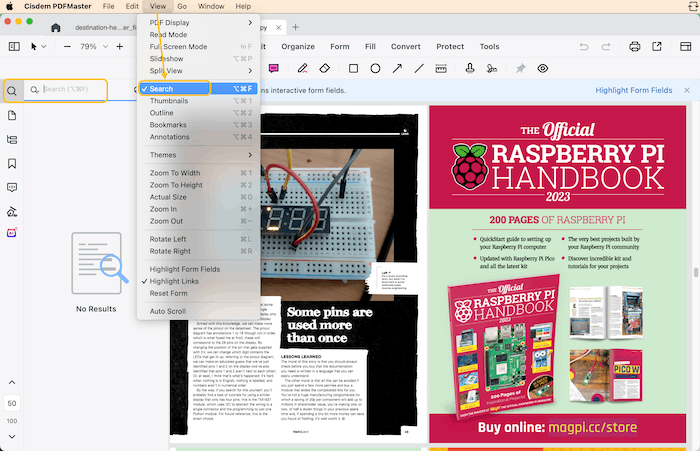
6. Search PDF
If you want to search a target content from your PDF or even click Replace to changes those content, you can directly press Shift+Command+F, click ![]() on the left panel or click View> Search on the top menu bar to enable the search function.
on the left panel or click View> Search on the top menu bar to enable the search function.
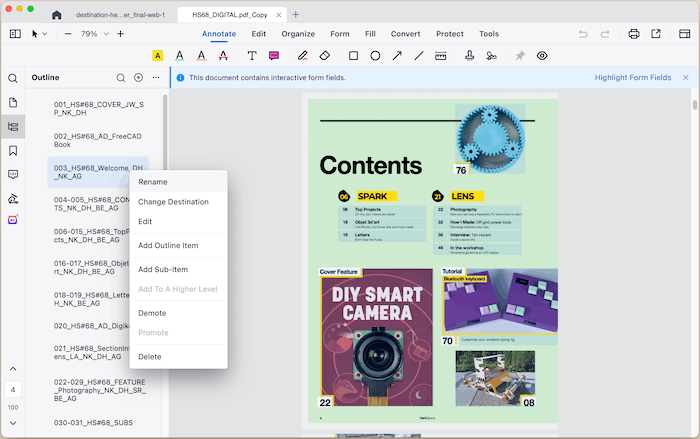
7. Outline
Click  on the left side panel, it will display the outlines of your PDF if there it is. You can also add, edit or delete the outlines to better organize your ideas, visualize and paper structures.
Click  , you can add an outline to the current page. You can also right click the existing outline and choose "Add Outline Item" or "Add Sub-Item" to add an outline or sub-outline.
You can also edit, rename and delete the outines by right clicking.
Annotate and Comment PDF
When you want to share a PDF file to others, and it is much more effective to directly add comments in the PDF file compared with writing the comments in email or a paper. Cisdem PDFMaster provides a vaious kinds of annotate tools for you to add comments in PDF files with the great convenience.
Click Annotate on the tool bar, you will see all the annotate tools on the sub tool bar.
a. Text Markup  : The simplest types of markup annotations are text markup annotations for marking up page text. These include text highlight, underline, squiggle or strikeout annotations.
To markup a PDF file with Cisdem PDFMaster, you can just select a markup tool on the sub toobar, then drag your mouse to cover a region of texts.
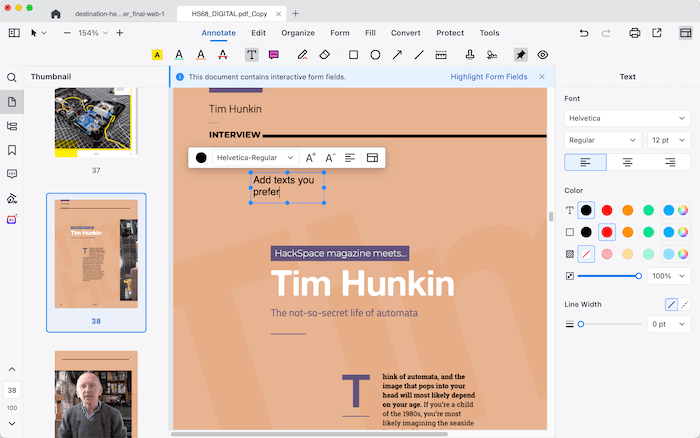
b. Text box  :click at the target place in your PDF file, type in the texts content in the box, you can adjust the text box size by draging.
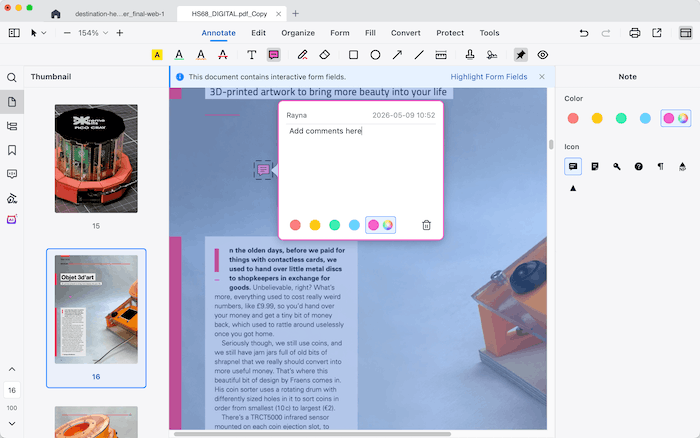
c. Note  :Click at the target place in your PDF file, a note icon will appear there, double click the note icon, you can enter the texts comment in the pop-up window.
d. Freehand drawing and Eraser  : Click to select it, then you can move your mouse to draw anything on your PDF like using a pen. And you can change to Eraser to erase your drawing as will.
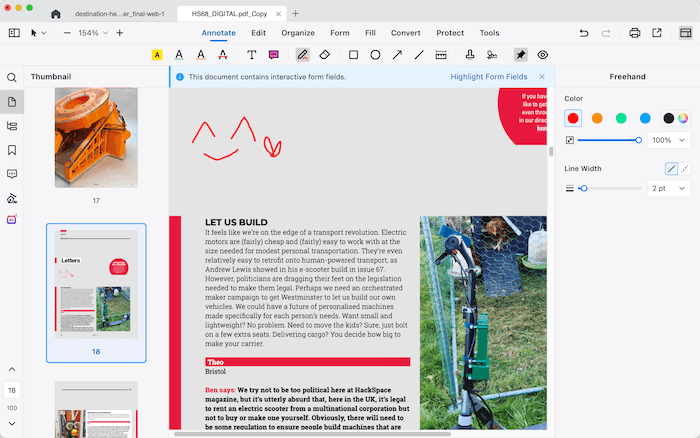
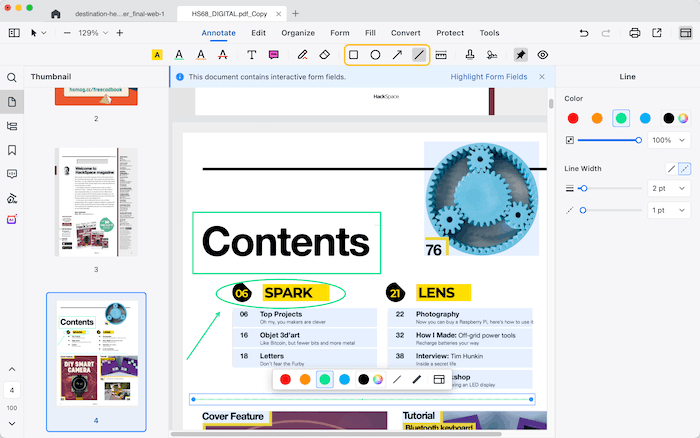
e. Drawing shapes  : To draw attention to some certain parts of your PDF file, you can use drawing tools to add different graphic elements, such as rectangle, circle, arrow and line into your PDF file. Just pick your shape, click and drag on the targee place.
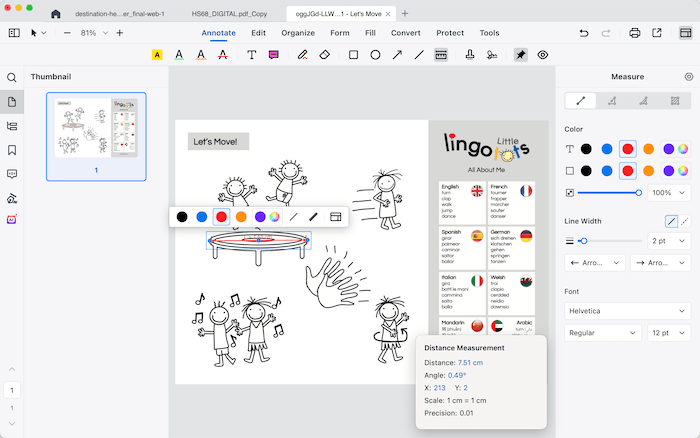
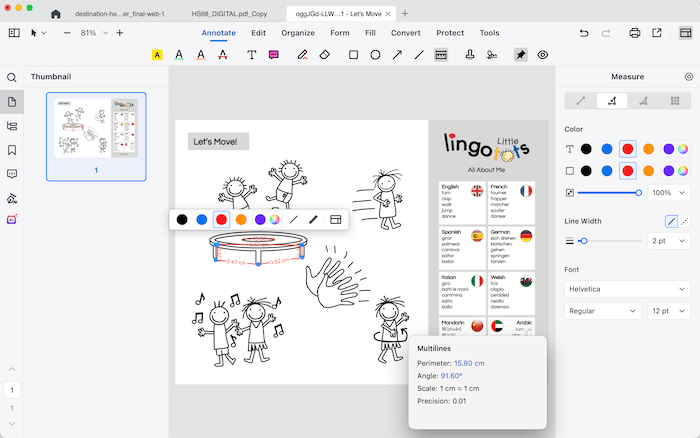
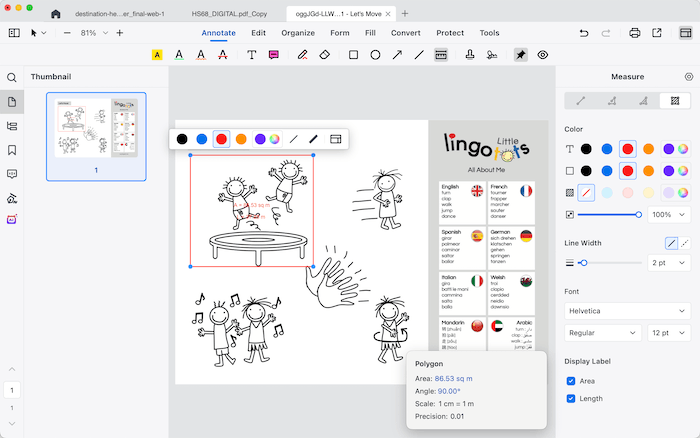
f. Measure  : The Measure tool can help you to measure distance, Perimeter and area of objects in your PDF file.
Line: It is used to measure the distance between two points, just click the first point, then click on the second point, the distance of those two points will be displayed.
Multilines: It is used to measure the distance spanning multiple points.
Polygon: It is used to measure the perimeter and area of the closed shape.
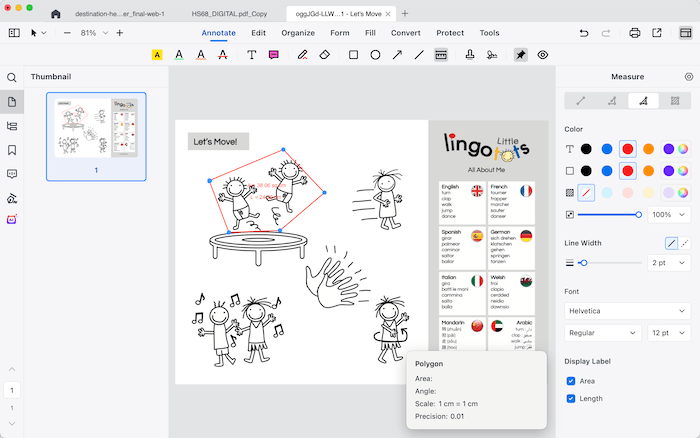
Rectangle: It is used to measure the perimeter and area of a complete rectangle.
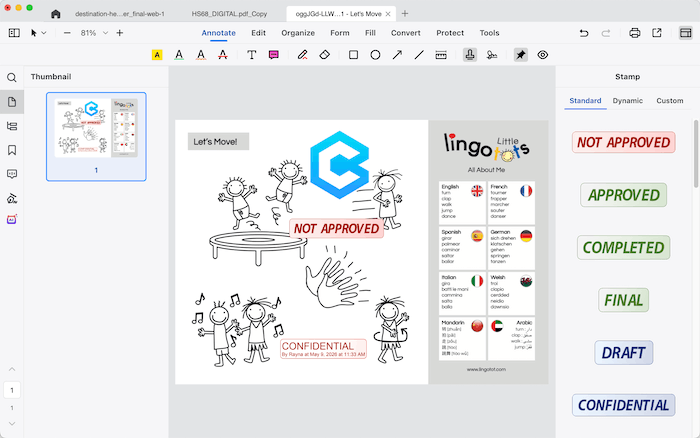
g. Stamp : A stamp annotation is a simple way for you to add text with drawings in a PDF file, you are allowed to add Standard, Custom and Dynamic stamps as you prefer.
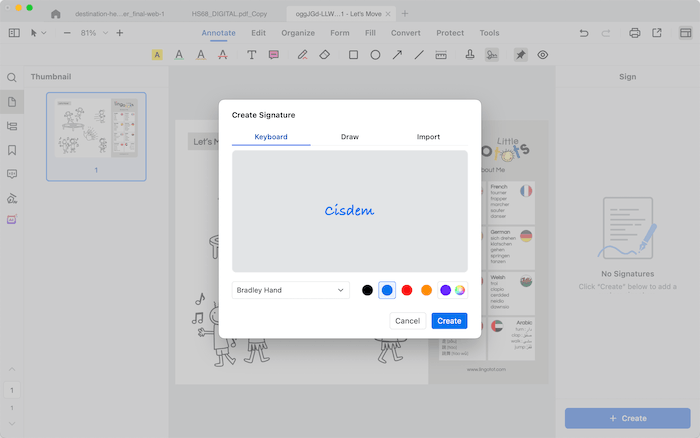
h. Signature : You can select a signature style and type in the content, manually draw a signature, or upload a signature picture and add it on your PDF file.
j. Hide/Show : Click it to show or hide all the added annotations.
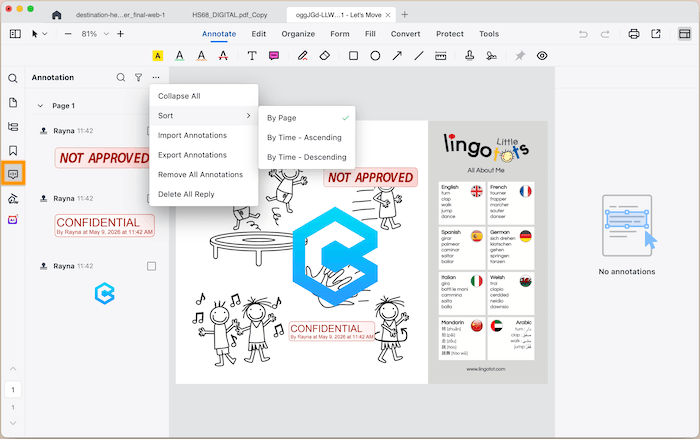
k. Manage annotations
Click  on the left side panel, you can view and manage all the annotations here.
Edit PDF Texts and Images
As we all know, you cannot directly change the text or image content in a PDF file. However, if you want to do so, Cisdem PDFMaster can help you. Additionally, you can add hyperlink, watermark, header & footer, batesnumber and crop your PDF.
1. Edit text
Navigate to Edit tab, you can highlight the existing texts and directly change them. All the texts are framed by dotted line and you can directly edit the texts within the frame. Additionally, you can change the font size and color, copy, cut, paste the delete the texts. You can also click the black space to add texts there.
If you want to add texts, tap  , click on the place where you want to add texts and then type in the text box.

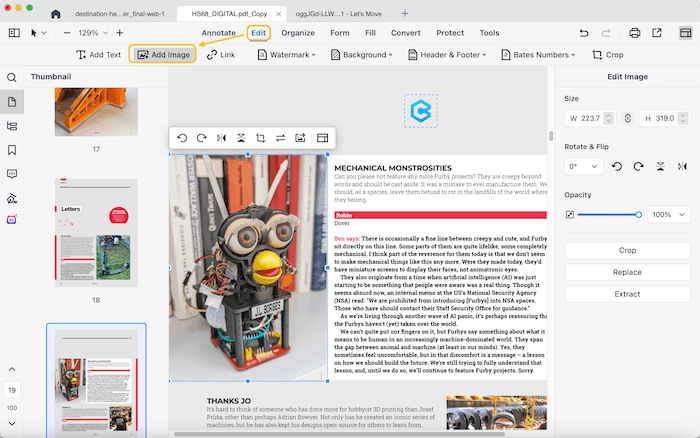
2. Edit image
Click the existing images on your PDF file, the images will be framed by dotted line as well. You can change the image size or move it to anywhere you want by dragging, you can also rotate, copy, paste, delete and export them. Besides that, you can also click  to add images into your PDF file.
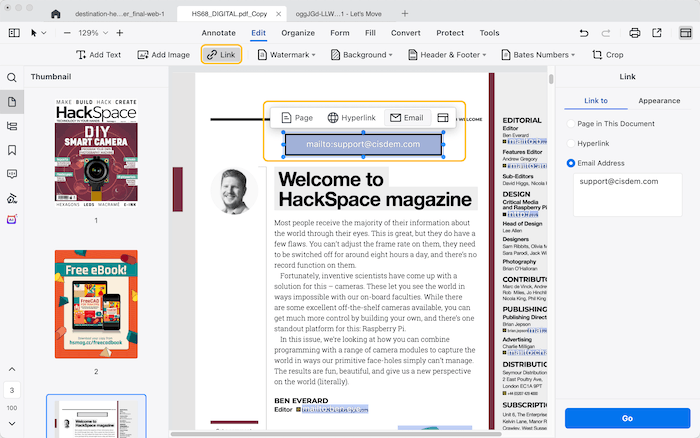
3. Add Link
Click  , select an area or texts on your PDF and then you can insert a link to jump to a target page, a website or an email address.
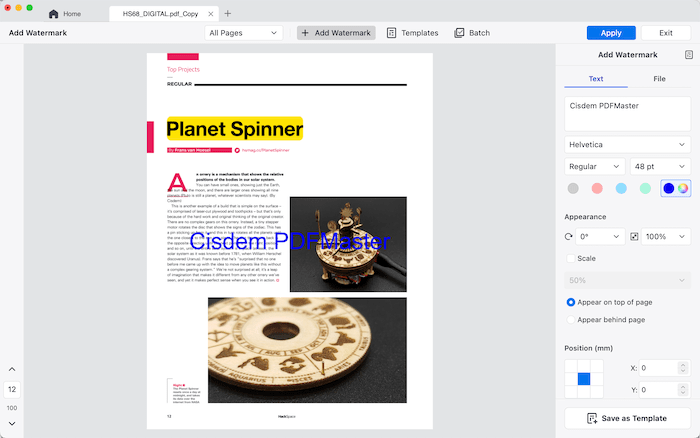
4. Add Watermark
Add watermark to PDF is also one of the ways to protect your PDF files from being used without authorization.
Click  on the tool bar, choose Add Watermark, you can customize the watermark as you like, you can also save it as a template so that you can directly use it next time.
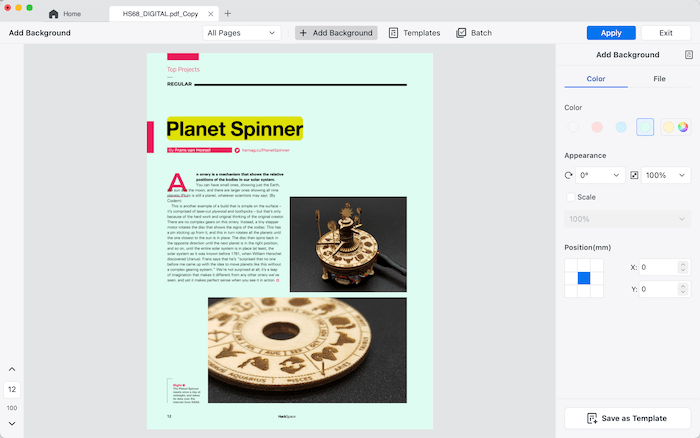
5. Add Background
Backgrounds can increase the appearance factor of your PDF document, you can add or remove background with Cisdem PDFMaster with a few steps.
Click  on the tool bar, choose Add Background, you can add pure color or upload an image as the background, also you can do other settings as you like.
6. Header & Footer  : Headers and footers generally contain additional information such as page numbers, dates or an author's name, which can help keep longer documents organized and make them easier to read.
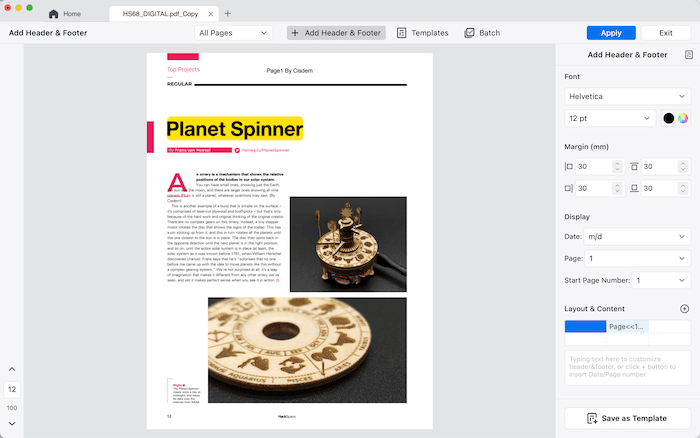
Click on the tool bar, choose Add Header & Footer, you can set font and the format of Page number and Date Format if you want to add page number or date as header or footer. Then choose to add the header/footer on the left, center or right of the page, enter the text content and click  to insert page number or date number if you need. You can preview the effect on the left thumbnail.
7. Bates Number  : You may need to add bates numbers to a PDF file if you have a document with a large number of pages, so everyone who view the document can easily track and identify the documents.
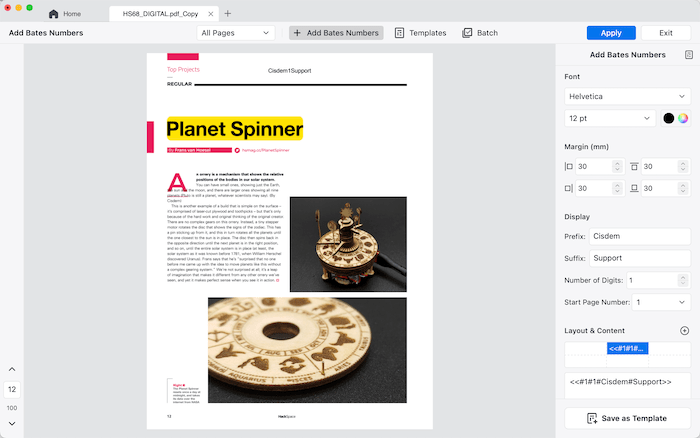
Click on the tool bar, choose Add Bates Number, you can add a unique prefix or suffix to help viewer easily identify this document, it can be case number, firm number, date or others.
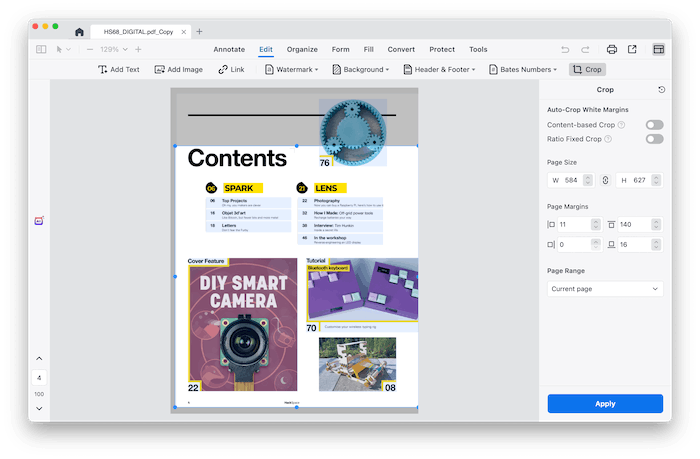
8. Crop
You can easily remove the unneeded contents or trim the margins automatically with the Crop feature of Cisdem PDFMaster.
Click  , you can manually drag the wireframe to crop the area and content that you don't need, or you can directly use the Auto-Crop functions by sliding on "Content-based Crop" or "Ratio fixed Crop"
Organize PDF Pages
Want to manage or organize the PDF pages, like inserting pages, extracting pages or replacing pages? Just click  on the tool bar, then you will see all the page edit tools on the following sub tool bar. Please note that you can either hold down CMD key and click multiper pages or directly drag your mouse to highlight multipler pages, and then select a tool to edit those pages.
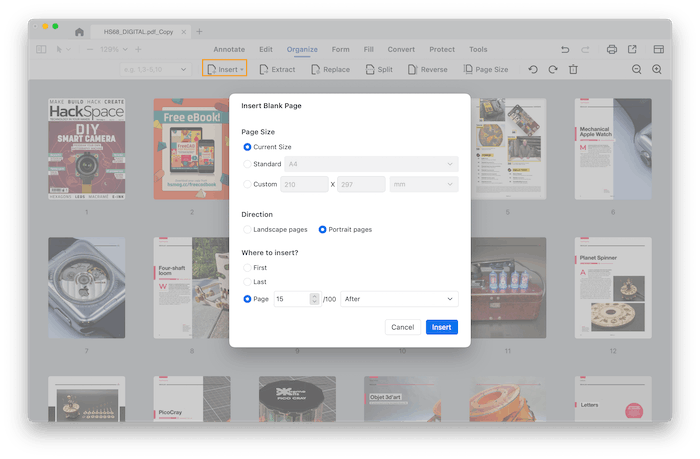
1. Insert Page  : Add a blank page or pages from another PDF. For blank pages, you can set the page size and orientation before adding.
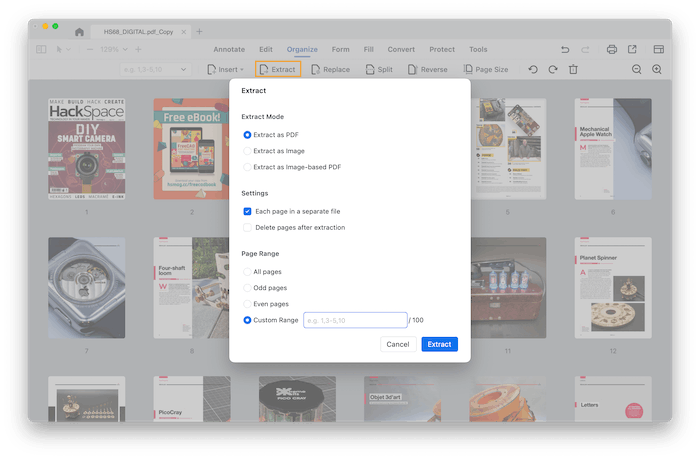
2. Extract ![]() : Highlight the pages that you want to extract, click it, choose extract mode, settings and page range, click Extract.
: Highlight the pages that you want to extract, click it, choose extract mode, settings and page range, click Extract.
3. Replace 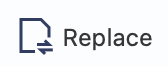 : Highlight the pages that you want to replace, click it to load a PDF file, then those highlighted pages will be repleaced with the pages from that loaded PDF file.
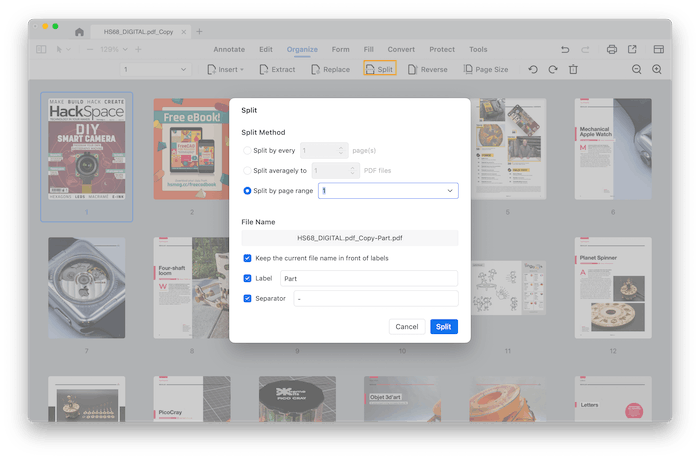
4. Split  : If you want to split your PDF files into some seperate PDF files, click it, select a split method and name the splitted files.
5. Reverse  : Highlight the pages that you want to invert and click Reverse.
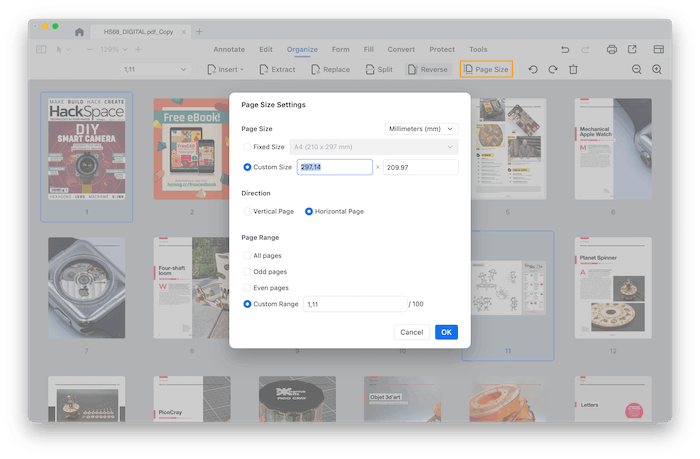
6. Page Size  : You can resize your PDF pages to standard or custom dimensions to fit different needs.
7. Rotate  : Highlight the target pages, click to rotate then left or right.
8. Zoom in/out : You can click to zoom in/out to display your PDF pages as your needs.
9. Except the tools above, you can also copy, paste and delete the pages.
Fill Out and Create PDF Forms
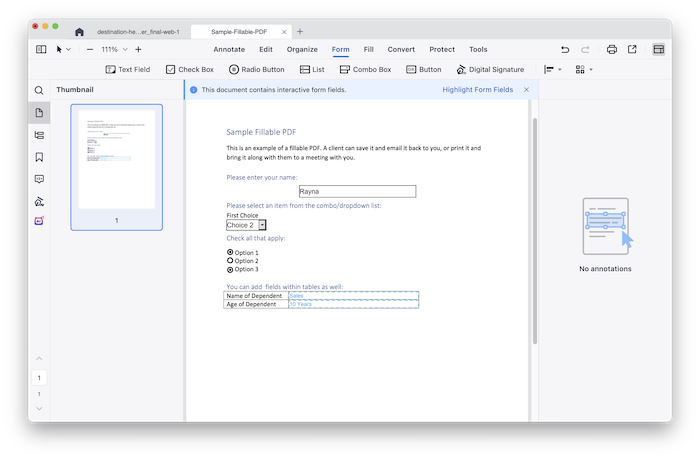
Instead of printing the PDF file and then filling in the form by hand writing, you may fill these forms directly with Cisdem PDFMaster. Before filling a PDF form with Cisdem PDFMaster, you need to know if your form is fillable or not. A fillable form is an interactive form, which contains fields that you can select or fill in; A non-fillable form is a non-interactive form, you can only fill in the form with the tools under Form.
1 Fill out interactive form
When you import a PDF form that contains interactive form fields, a banner will display on the top of the document to notify you it contains interactive form fields. You can directly input content in those fields.
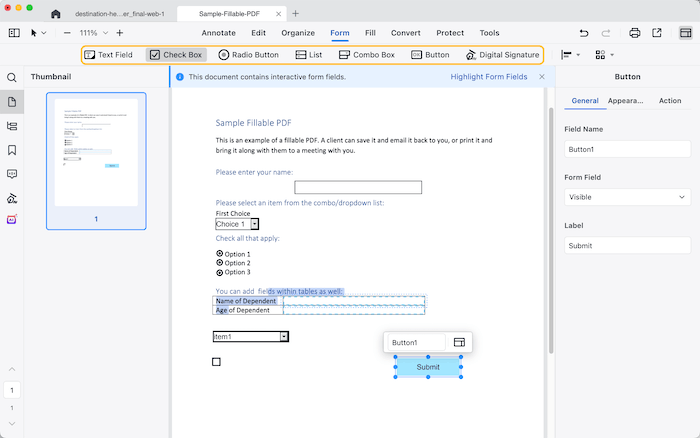
2 Fill in non-interactive form
Since a non-interactive form doesn't contains interactive form fields, you need to make a fillable PDF file with blank form fields to allow people to fill it out on a digital device.
Click  on the main tool bar, then all the form tools shows on the following sub tool bar. You can customize the forms as you like, also you can align and distribute those fields with a click.
3. Digital Signature
A digital signature is a digital record that helps businesses and authorities to identify documents and protect them from being tampered with, forged or replicated in some way.
You can reference the steps below to know how to use a digital sign with Cisdem PDFMaster.
Step 1 Add a Digital Signature Field
Click  on the tool bar, drag and draw a signature field on the place where you want to sign.
Step 2 Sign in with a Digital ID
Click the added Digital Signature Field, it will ask you to choose an existing digital ID to sign. If there is no existing digital ID, you can create a new one by clicking Configure New Digital ID> Create a New Digital ID, fill in the information
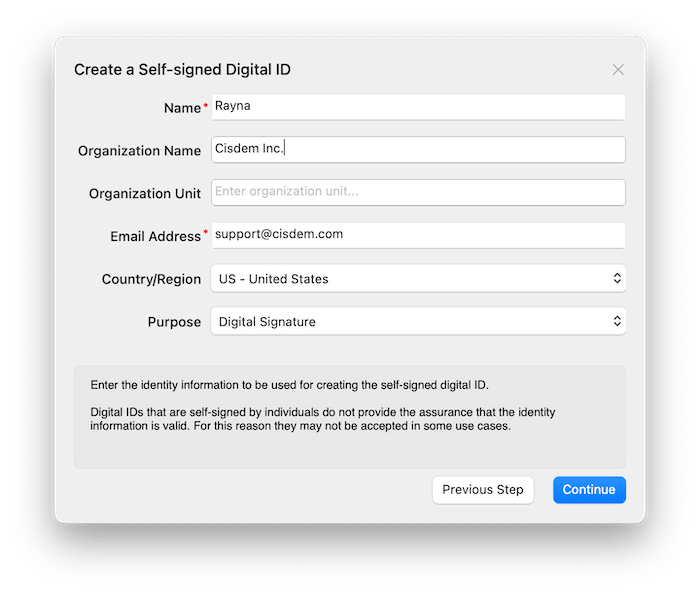
Choose a location to save the created digital ID( If you chose save to Apple Keychain with the 3rd step, then skip this step);
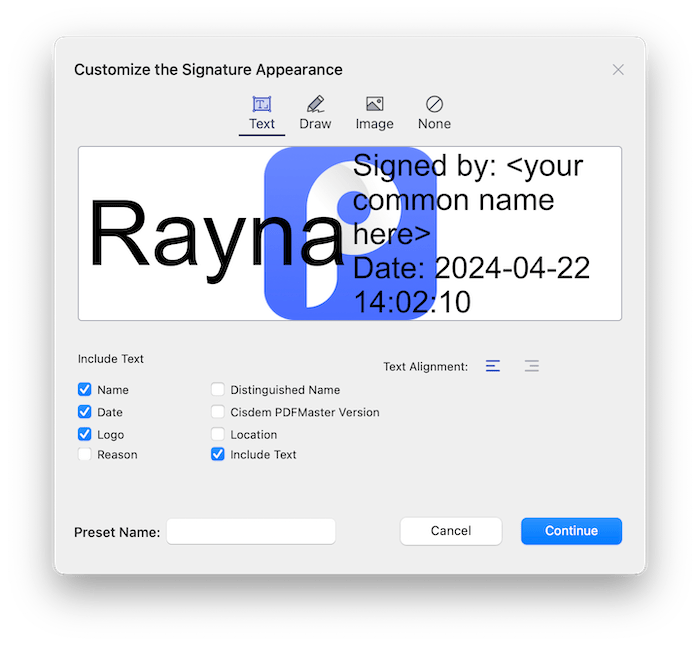
Click Continue to apply the digital ID to your PDF, before that you can also click  to customize signature's appearance.
Fill PDF
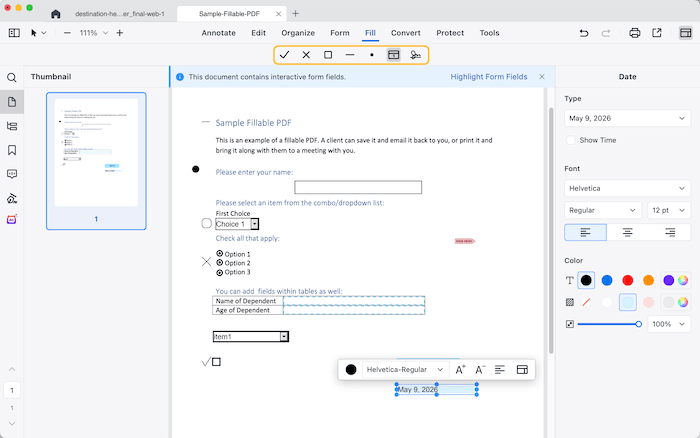
If you want to fill or sign in a PDF form, Cisdem PDFMaster offers you several commenly used shapes/symbols so that you can easily custimoze your PDF.
Shapes/Symbols : You can use these shapes/symbols to fill in check boxes, radio buttons, and use the Circle to circle text or the line to strike out text.
Date  : You can click it to add a date on your document, you can change the time, font, size, color, etc.
Signature  : You can click it to add a signature into your PDF.
Convert PDF to Editable Formats with OCR
Cisdem PDFMaster also supports converting PDF to a majority of file formats, such as Microsoft office, image, txt, html, markdown, json and rtf.
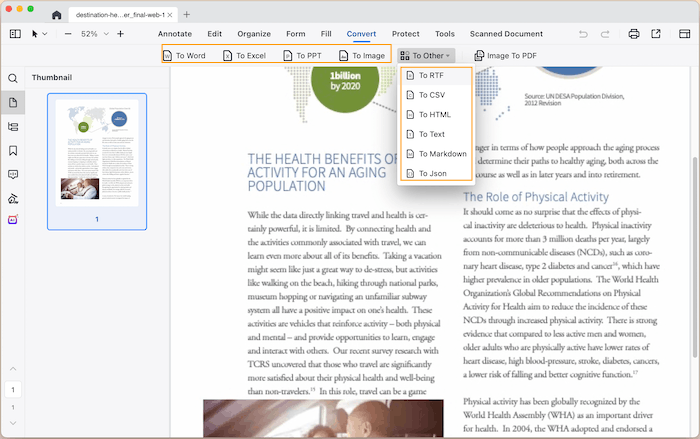
1. Convert PDF to MS office formats
Step 1 Open your PDF file with Cisdem PDFMaster, click  on the tool bar;
Step 2 Click your desired format (To Word, To Excel or To PPT), select the layout settings and page range as you prefer.
You can also Click File> Convert to on the top menu bar and select a format that you want to convert to.
Tips: If the PDF that you want to convert is a scanned PDF, Don't forget to check the OCR Recognition Option and select a proper language.
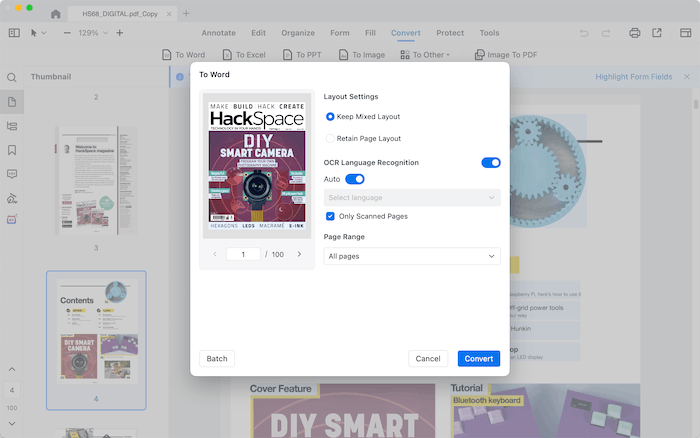
Step 3 Click Convert to select a save location of the converted file.
2 Create PDF from images
Step 1 Click 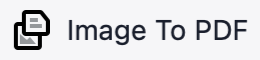 , click "Add Files" or directly drag and drop files into the following window.
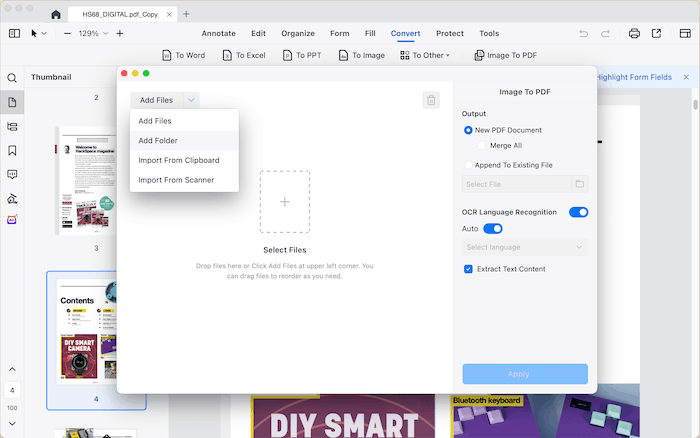
Step 2 You can choose to merge all the images into one PDF file or append those images into an existing file, you can also select to OCR those images
Step 3 Click Apply to save those images as PDF.
Protect PDF Documents
To protect your PDFs, Cisdem PDFMaster offers differenct types of protections depending on your needs.
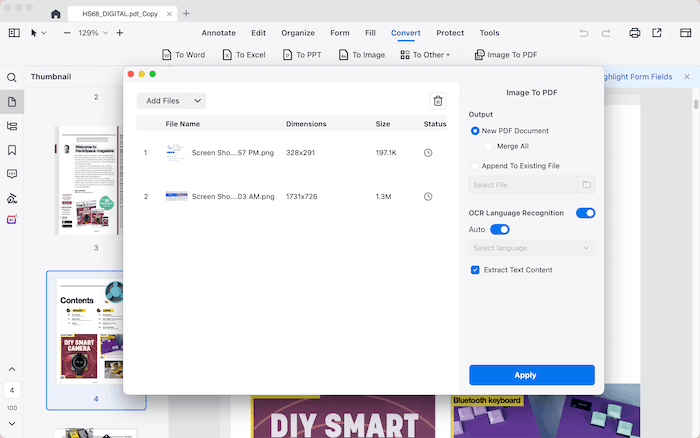
1. Redact : it can permanently remove sensitive information from your PDF files and you can make a redaction with two steps.
Step 1. Click  under Protect on the menu bar.
Step 2. Move your mouse to cover the texts that you want to redact.
Tips:
1. Click  , you can change the color of the redaction mark and area, and choose whether you want to use text overlay or not;
2. right click the readacted text, you can choose to delete the redact, change the color for this specific redaction only, make current properties default,etc.
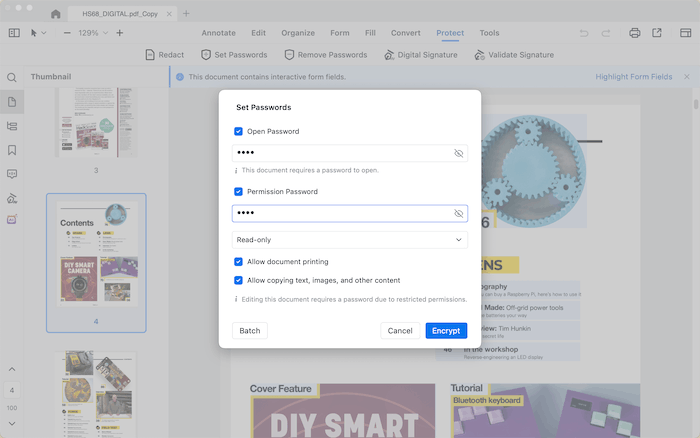
2. Set Passwords: PDF restrictions enable you to prevent someone opening your PDF file from making changes, which include a majority of restrictions, such as opening, copying, printing, etc. You can use Cisdem PDFMaster to protect your PDF by adding a password.
You can add open password or permission password on your PDF files, just click  on the menu bar, tick the password type you want to add on your PDF file and enter the password。
3. Remove Passwords: Cisdem PDFMaster can remove the permission password from your PDF files, so that you can edit your PDF file without any registrictions.
To remove the permission password, you can click ![]() on the tool bar, enter your permission password, then click "Remove Password" and save the password removed PDF file.
on the tool bar, enter your permission password, then click "Remove Password" and save the password removed PDF file.
4. Digital Signature: A digital signature protects a PDF by ensuring authenticity, integrity and non-repudiation. You can know how does it work from here.
Extract Texts from PDF with OCR
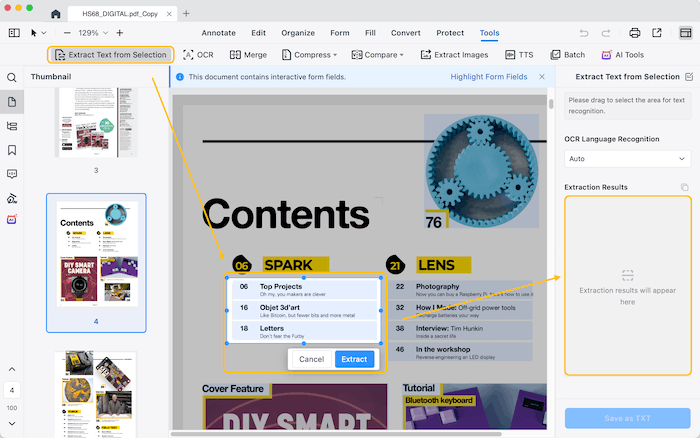
1. Extract Text from Selection: It allows you to quickly extract text from a specific area of your PDF document. This is particularly useful when you only need certain paragraphs, tables, or text blocks without copying the entire document. Just click  , drag to select the area that you want to extract texts from, click "Extract", the extract texts will display on the right panel.
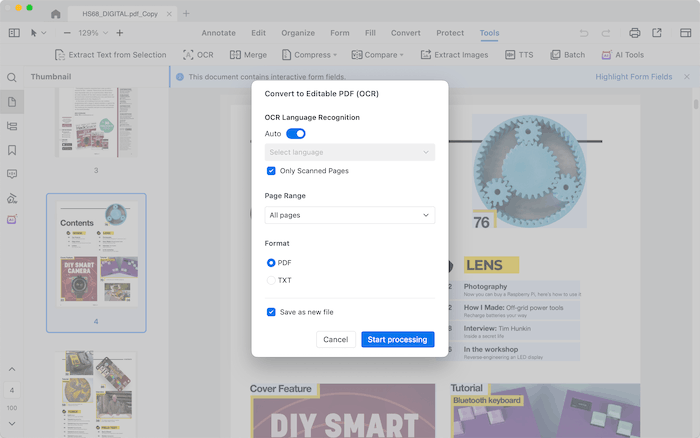
2. OCR: OCR helps a lot to make our work be more productivity, which can easily extract the texts you need from a scanned PDF file. With Cisdem PDFMaster, you can ocr specific pages or full pages from your PDF file. And you can choose to save the ocred texts in a PDF or TXT file.
Merge, Compress and Compare PDFs
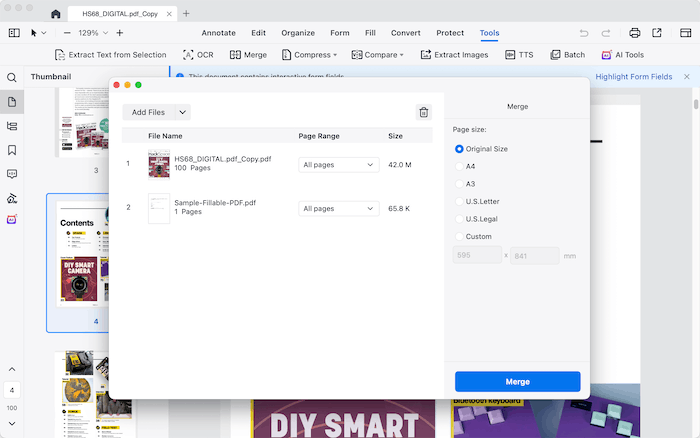
1. Merge: You can use this tool to merge the currently opend PDF and another PDF file, please note that the pages of the another PDF file will be added after the last page of the current PDF file.
Just click on  on the tool bar , select one or more PDF files you want to merge, select the pages that you want to merge into, and then select a PDF size and click Merge.
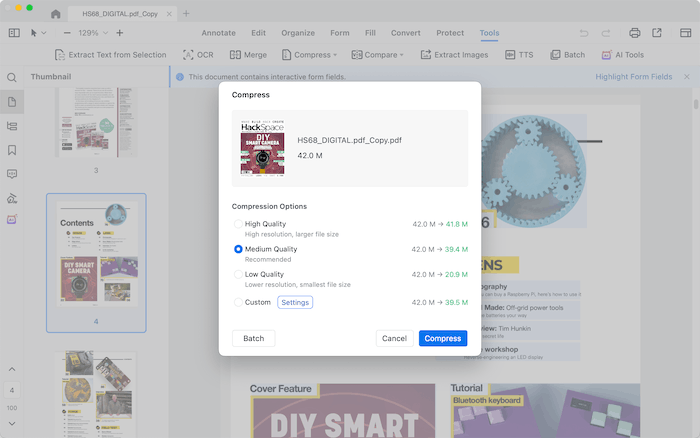
2. Compress: If you have a large-size PDF file, and you want to upload or send it as an attachment in email, the easist way is to use Cisdem PDFMaster to compress your PDF file into a smaller size.
Just click  > Compress, select a compression option and Compress it. It calculates the file size in real time, helping you choose the most suitable compression option.
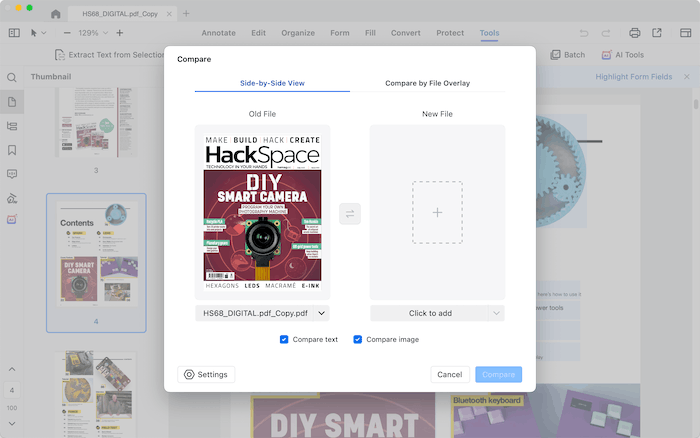
3. Compare: You can use Cisdem PDFMaster to compare the content of two PDF files, find and mark any differences easily.
Click  on the tool bar, you are allowed to choose compare side-by-side or file overlay. You can also select the page ranges you want to compare and select to compare text only, image only or both text and image.
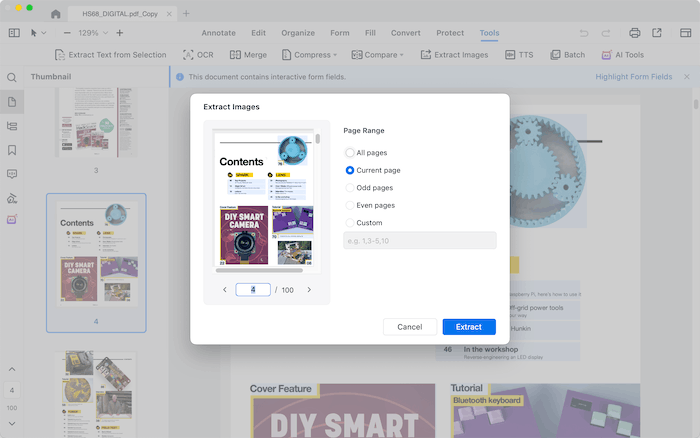
4. Extract Images: If you want to extract images from your PDF file for sharing, reusing or other purposes, using Cisdem PDFMaster is a good choice.
Just click  , select the page range that you want to extract images from, click Extract
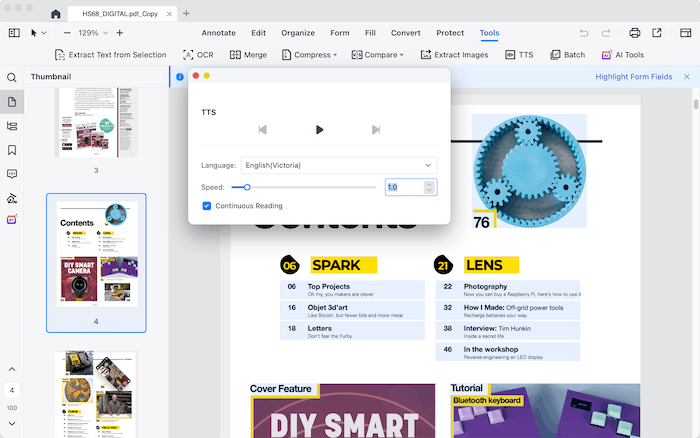
5. TTS: If you want to listen to a document instead of viewing, using TTS is especially helpful.
Just click  and then you can control the playback of the spoken audio on the following window.
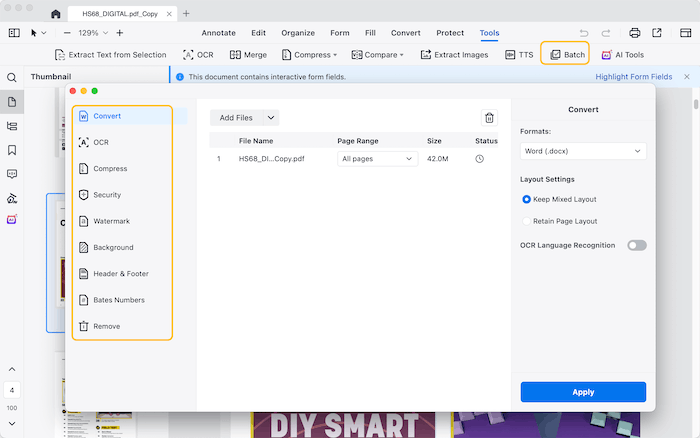
6. Batch process PDF: In some cases that you may need to apply the same action on multiple documents, you can click into the Batch process window and batch process multiple PDFs.
Click  to get into the Batch window, you can add multiple PDF files into the window and batch convert, OCR, compress, security, add watermark, add background, add header & footer, add bates number on PDF files.
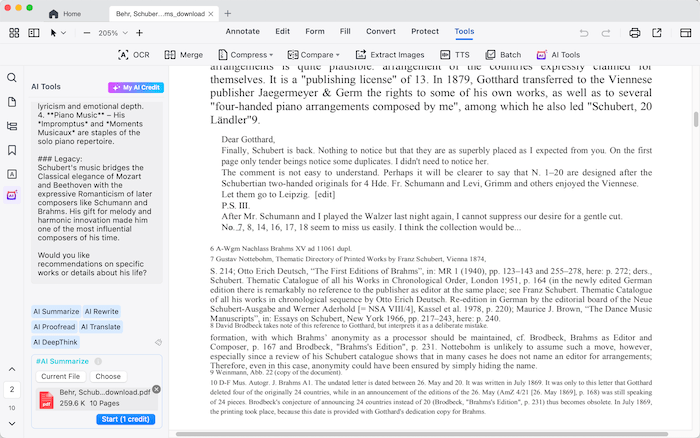
Use AI Tools for PDFs
Cisdem PDFMaster integrates Chatgtp and DeekSeek to help you process your PDF more intelligently.
Click  , all the AI tools will be displayed on the left panel. You are allowed to click to highlight AI Summarize, AI Rewrite, AI Proofread, AI Translate and AI Deepthink, choose Current file or upload a new file and click Start
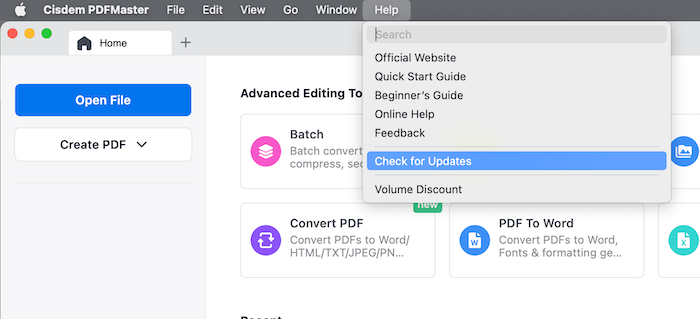
Update Cisdem PDFMaster
We always suggest users to use the latest version of the program.
When you launch Cisdem PDFMaster, Cisdem will auto check for updates and prompts you to download the latest version package.
Also, you can click Help > Check for Updates on the left top menu bar to manually check for updates.

Traci Gordon has worked as a tester in a software company for 8 years, she believes that the best software should be a tool that can help users accomplish what they need with the simplest steps.

Liam Liu takes charge of the entire PDF product line at Cisdem and serves as the technical approver for all related editorial content. He has deep expertise in PDF and document management technologies and nearly a decade of development experience.