

5 Easy Ways on How to Organize Gmail to be More Effective
 3.6K
3.6K
 0
0


Many of us may spend hours every day handing emails. Of course we want to keep our emails neat and well organized, which is however not as easy as it seems. If you are a Gmail user like me, this article on how to organize Gmail will be worth reading. It will show you the best ways to organize your Gmail emails, including the existing ones and the incoming ones.
Get started: See the "right" emails first
Before we dig deeper into how to organize Gmail emails, let’s take a look at these settings options to organize Gmail as to how they land in and appear in your inbox.
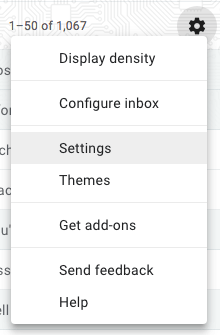
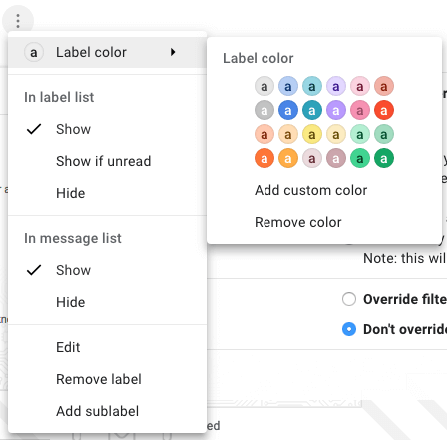
Gmail provides five different inbox types. Click the gear icon in the upper right corner. Go to Settings > Inbox.
- Default It organizes and shows emails in different tabs (or categories) including Primary, Social, Promotions, Updates and Forums. You can turn on/off a tab by selecting/unselecting the checkbox before it.
- Important first Based on a number of factors, Gmail is able to analyze an incoming email and decide whether it’s important to you or not. It will place the important emails at the top of the inbox. You can find the other emails of yours under Everything else.
- Unread first It allows you to see the unread emails first.
- Starred first With this option, the starred email will appear first.
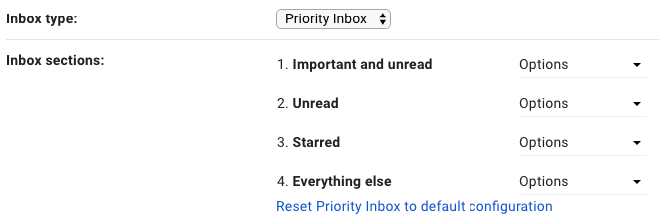
- Priority Inbox It allows you to easily organize and prioritize emails by importance, status, labels and other options. You can customize the inbox sections according to your need
![organize Gmail by inbox type]()
How to organize Gmail by labels
This part will talk about how to organize your Gmail emails by using labels. With some email service providers such as Outlook, users can organize emails by folder. This is not how Gmail works. Gmail is all about labels.
| System labels | Categories labels | Custom labels |
|---|---|---|
| Starred, Snoozed, Important, Chats, Sent, Drafts, All Mail, Spam and Trash | Social, Updates, Forums and Promotions | Create your own labels |
Labels are like folders in many ways but they come with more flexibility. For example, an Outlook email can only exist and appear in one folder, but an email in Gmail can have multiple labels.
Step 1Create a label or sublabel
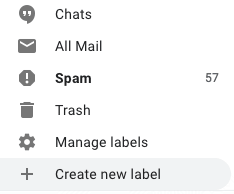
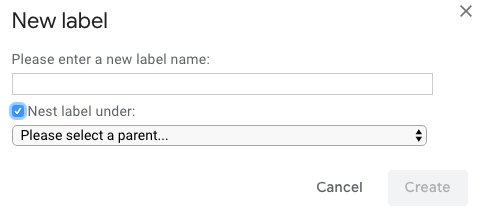
In the left-hand panel, scroll down, find the More dropdown list and click to expand it. Click Create new label and name it.
You can create a sublabel by nesting it under an existing label.
Step 2Select label color
In the same panel, hover your mouse over a label and a three-dot button will appear. Click the button. Click Label Color and select a color.
This is optional but recommended since it can help you organize Gmail emails better.
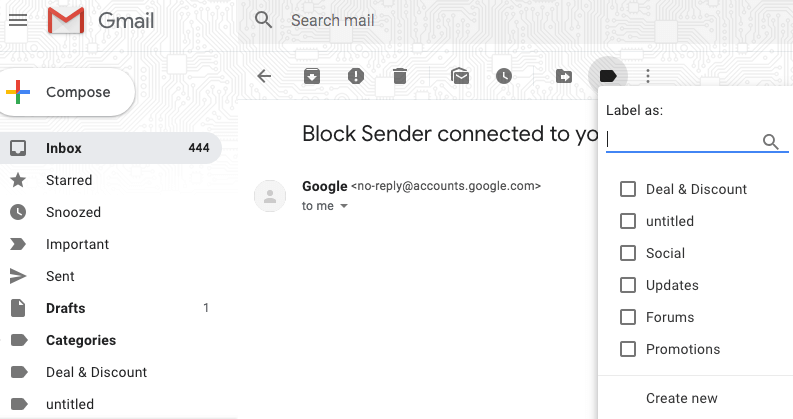
Step 3Label emails
Now you can organize Gmail emails by applying labels to them. Open an email. Click the label button in your Gmail toolbar. Select one or multiple labels. Click Apply.
Tip 1: How to edit and manage Gmail labels
Gmail labels are easily editable and manageable. On the left hand side of your Gmail window, place your mouse over the label you want to edit and click the three-dot menu button. Here you can change color, edit name, remove it or add sublabels. You can also choose to hide or show it. To batch manage labels, just go to Settings > Labels.
Tip 2: How to organize Gmail into folders
You can also use Gmail labels as folders and organize your emails like you would do with, say, Outlook.
Select or open an email, and the Gmail toolbar will show up. Click the Move to button and select a label. In this case, you can only choose one label. The email will be moved, and the destination label will be the only location for this email to be placed. To organize more than one Gmail emails into folders (or more precisely labels), just select and move multiple emails at once.

How to organize Gmail by filters
It’s easy to organize Gmail by labels. Gmail makes it even easier by providing the filtering feature. Gmail filters are powerful, allowing users to organize the incoming emails (as well as existing emails) by sender, recipient, subject, size and date range.
In the search box, click the down arrow button. Enter your search criteria according to your need.
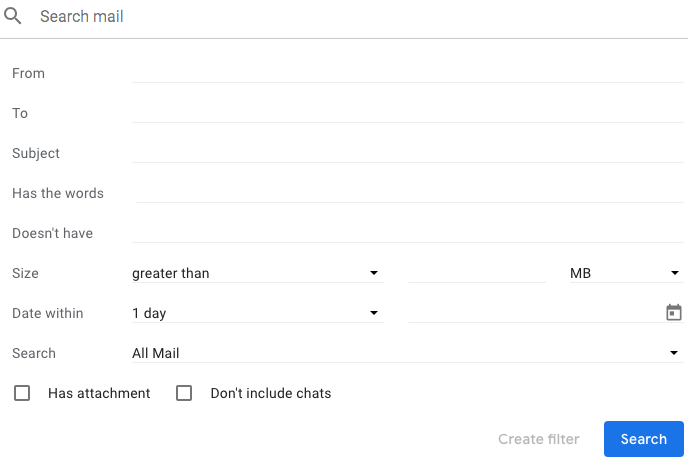
| Criteria | Scenario | Tip | Example |
|---|---|---|---|
| From | Filter and organize emails by sender | To filter emails sent from A or B or C, use operator OR | "karen robertson" "quora.com" "example.com OR google.com" |
| To | Filter and organize sent emails by recipient | To organize emails sent to A or B or C, use operator OR | "karen robertson" "henry@example.com OR example@mail.com" |
| Subject | Organize emails by subject | Use operator OR is needed | "christmas" "deal OR discount OR off" |
| Has the words | Filter Gmail emails that contain specific words | Use operator " " for exact match | "templates" ""new templates" " |
| Doesn't have | Filter Gmail emails that don't have specific words | Use operator " " if needed | "confirm" ""confirm your email address" " |
| Size | Filter and organize emails larger or smaller than a specific size | You can select units of measurements (MB, KB or Bytes) | "greater than 5MB" |
| Date within | Filter emails older or newer than a time period | You can filter by time length or calendar | "date within 1 month" |
| Search | Filter and organize emails by labels and status | / | "Inbox" "Unread Mail" |
| Has attachment | Filter emails with or without attachment | / | "√ Has attachment" |
To make sure that the filter criteria work correctly, you can click the Search button to see what emails show up.
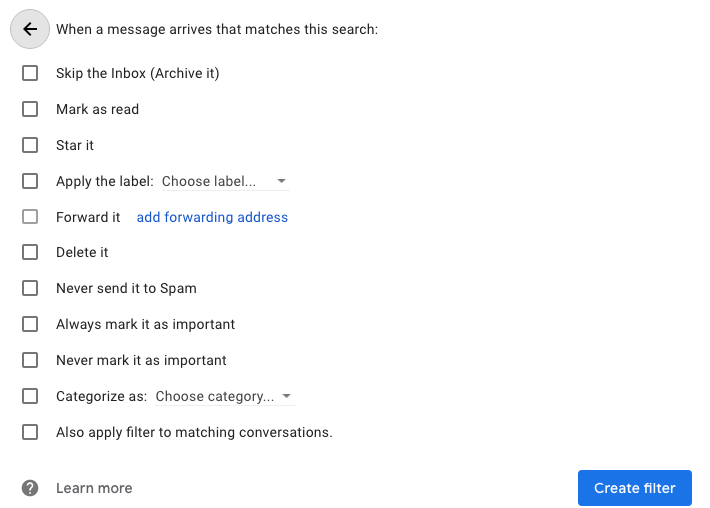
If everything is right, click Create filter. You will see a box titled "When a message arrives that matches this search". Now you can choose how to organize your Gmail emails that match the filter that you have created.
How to organize Gmail by blocking, (mass) deleting and archiving
You can organize Gmail better by blocking unwanted emails from landing in your inbox or mass deleting or archiving emails.
Block unwanted emails
Web app
There are two common methods. One is to use Gmail’s built-in spam function, which can automatically identify junk emails and send them to Spam. If a spam email goes to your inbox, you can report and move it to Spam.
If you want to prevent emails that contain certain words being delivered to your Gmail inbox, you can use the above mentioned filter feature and choose the option "Skip the Inbox (Archive it)".
iPhone app
To organize Gmail messages on iPhone and stop unwanted messages, you can use JunkMail Stop, a lightweight useful app to prevent any unwanted emails from going to your inbox. It can block spam and help organize Gmail into folders.
Open JunkMail Stop on your iPhone. Sign in with your Gmail account. Suppose you find a PR email in your inbox, toggle the blocking feature to the ON position and select a label, say, Press release. The future emails from the sender won’t show up in your inbox. Instead, they will be placed in the Press release folder, or more precisely label. This way, you can directly organize Gmail messages and keep inbox more neat and tidy on iPhone.
Android app
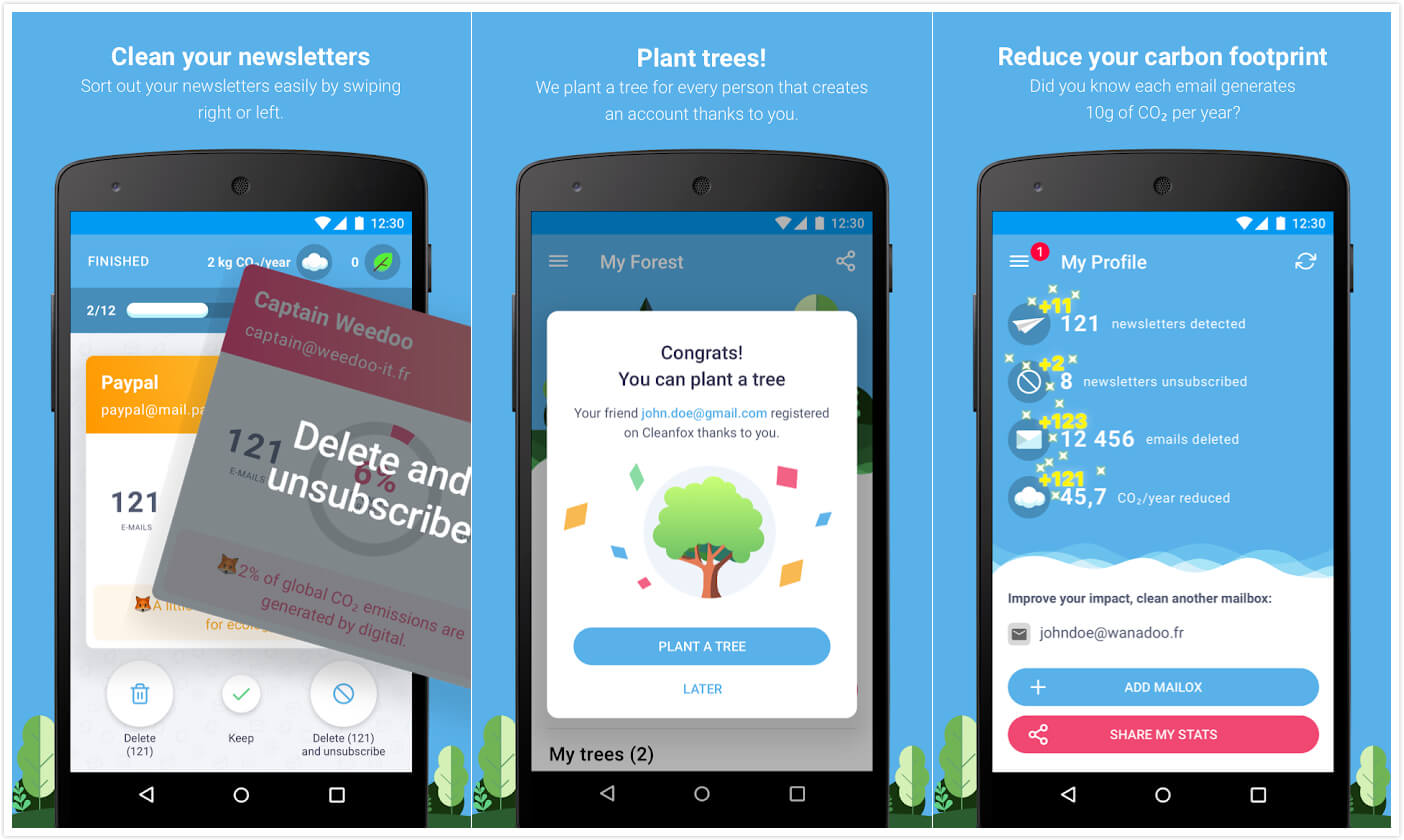
Cleanfox can help Android users better organize Gmail inbox by blocking and removing unwanted messages. With each sender, you have a few options. You can delete the old useless emails and unsubscribe, or delete the older emails but stay subscribed. It works with Gmail, Outlook and a few other popular email services. It’s easy to use with a simple interface. You can easily block and delete emails by swiping.
Mass delete or archive
Bulk deleting useless emails can not only keep your Gmail more organized but can also free up storage space. The key is to batch select the right emails to delete or archive. As for how to select, there are two ways.
One is mentioned in the “How to organize Gmail by filters” part. Just enter your search criteria and click Search. It’s that easy. Another way is to use Gmail search operators. The first method is recommended due to its ease of use.
Once the emails are selected, click the deletion or archive button in the toolbar. With deletion, the selected emails will be moved to Trash. With archive, an email will be moved to the label All Mail. Once someone replies to the email, it will be moved back to Inbox again.

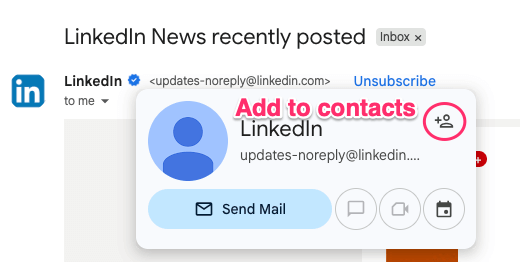
Add contacts to your Google Contacts
If you want, you can add contacts from Gmail to your Google Contacts for better management. This way, you can easily maintain an updated contact list and share contacts easily across devices.
It's very easy to do. In your Gmail, open an email of your choice. Hover your mouse on the sender's name until you see a dialog. In the dialog that appears, click the Add to contacts icon.
To sum things up
Gmail is one of the most powerful and sophisticatedly designed email services. Thanks to its useful features such as filtering and labeling, a well-organized inbox is just clicks away. In addition, there are third-party tools such as JunkMail Stop for iPhone that can help make it even easier to manage emails. Hopefully the tips and tricks in the article can help you organize Gmail like a boss and become more effective.
With a passion for tech and writing, Sarah joined Cisdem, where she focuses on creating articles about using utility tools to enhance file management and simplify contact management.