


Cisdem Duplicate Finder for Windows Advanced Guide
 555
555
 0
0


01 How to Customize the Duplicate Removal Rule
Cisdem Duplicate Finder can automatically select duplicate files for removal based on your preferences. By default, the app keeps one copy in each duplicate group and marks the other copies for deletion.
If you want to control which locations are prioritized when duplicates are selected, you can use the Priority Removal Rule.
Set a Priority Removal Rule
- Click the Settings icon to open Preferences.
- Find the Duplicate Files settings.
- Select Select duplicates for removal from prioritized location.
- Click Add to add a folder or location.
- Assign a priority value to the location.
What Do the Priority Values Mean?
The priority value determines which location is preferred when Cisdem Duplicate Finder automatically selects duplicates for removal.
Among folders with assigned positive values, the folder with the higher value has a higher removal priority. If only one folder is assigned a positive value, folders without a configured value are prioritized over that folder. A value of -1 always excludes the folder from automatic removal.
Example 1: Remove Duplicates from a Specific Folder
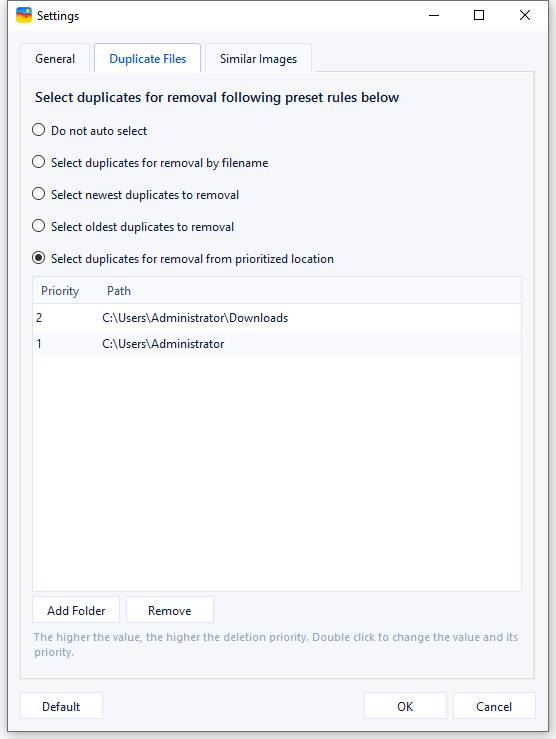
Suppose you have several folders under the same parent directory, but you only want to remove duplicate files from one specific folder.
For example, if your folders are organized like this:
-
Administrator — parent folder
- Project A
- Project B
- Downloads — the specific folder you want to remove duplicates from
- Project C
Add both the Administrator folder and the Downloads folder to the Priority Removal Rule.
Assign a lower value to the parent folder and a higher value to the specific folder. For example:
-
Administrator: 1
-
Downloads: 2
When Duplicate Finder automatically selects duplicates for removal, it will prioritize files in Downloads because it has the higher priority value. As a result, duplicate files will be selected for removal from Downloads, while copies in the other folders under Documents will be kept.
This allows you to target a specific folder for duplicate removal without having to manually select the files in each duplicate group.
Example 2: Keep a Specific Folder Untouched
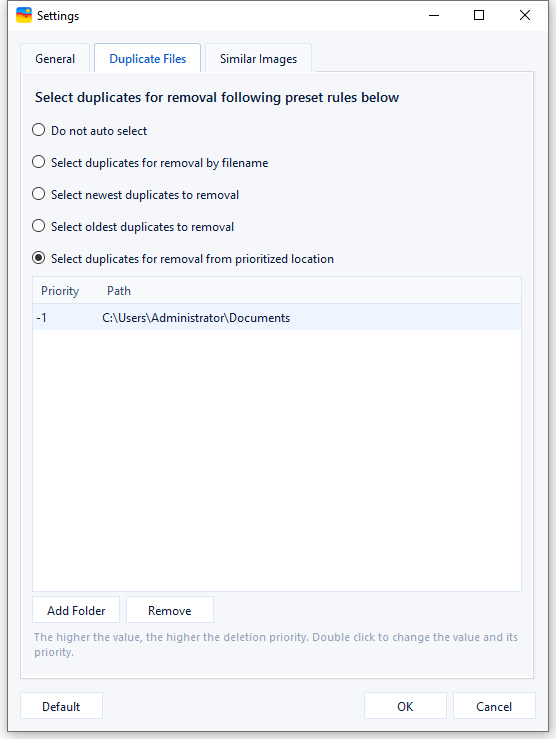
If you want to keep all files in a particular folder, add the folder to the priority list and assign it a value of -1.
Cisdem Duplicate Finder will not select duplicates from that location for removal.
Use Different Priorities for Different Locations
You can also assign different priority values to multiple folders. A higher value gives a location a higher priority when the app selects duplicates for removal.
This is useful when you want to control which copies are kept and which copies are removed across multiple locations.
02 How Does Cisdem Duplicate Finder Identify Duplicate Music and Videos?
Cisdem Duplicate Finder can find duplicate music and video files. However, it is important to understand what the app considers a duplicate.
What Is a Duplicate Music or Video File?
At the technical level, a file is a sequence of digital data. Two music or video files are considered exact duplicates when their underlying data is identical.
This means that two files may look or sound the same to you but still be different files if their data differs.
For example, two copies of the same song may have different:
- File formats
- Bit rates
- Sample rates
- Encodings
- Metadata
- Audio or video streams
In these cases, they may not be considered exact duplicates.
Why Doesn't Duplicate Finder Find Some Files That Look Like Duplicates?
If two music or video files have different technical properties, they may not be exact duplicates even if they contain the same content.
You can make an initial comparison by checking properties such as:
- File extension
- File size
- Duration
- Bit rate
- Sample rate
If any of these properties differ, the files are not necessarily exact duplicates.
If two files appear to be identical but are not detected as duplicates, you can contact Cisdem Support and provide sample files for further analysis.
03 What to Do When Duplicate Finder Doesn't Find All Duplicates
Cisdem Duplicate Finder can scan duplicate files and similar images on local drives, external drives, NAS devices, and supported cloud storage locations.
If the app doesn't find as many duplicates as expected, check the following settings.
1. Check the General Scan Settings
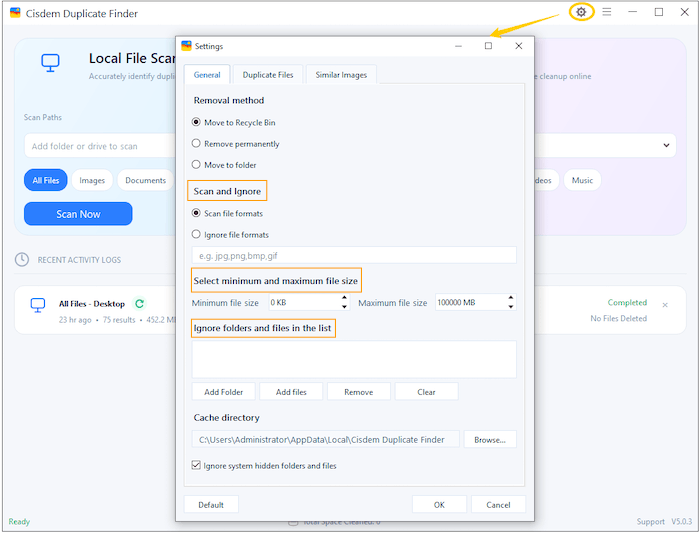
Open Settings and review the file types, file size range, and folders included in the scan.
Check the File Extension Settings
If you have configured Duplicate Finder to scan only specific file extensions, files with other extensions will not be included.
If you want to scan files of all supported types, leave the extension field empty.
Check the Minimum and Maximum File Size
Make sure the file size range includes the files you want to scan.
If you want to find more duplicates, use a wider file size range.
Check the Included or Excluded Locations
Review the ignore list and remove any locations or files that you want Duplicate Finder to scan.
You can also add files or folders that you don't want to scan to the ignore list.
The unwanted duplicate groups that were ignired directly from the scan results will be displayed here as well.
2 Check the Similar Images Settings
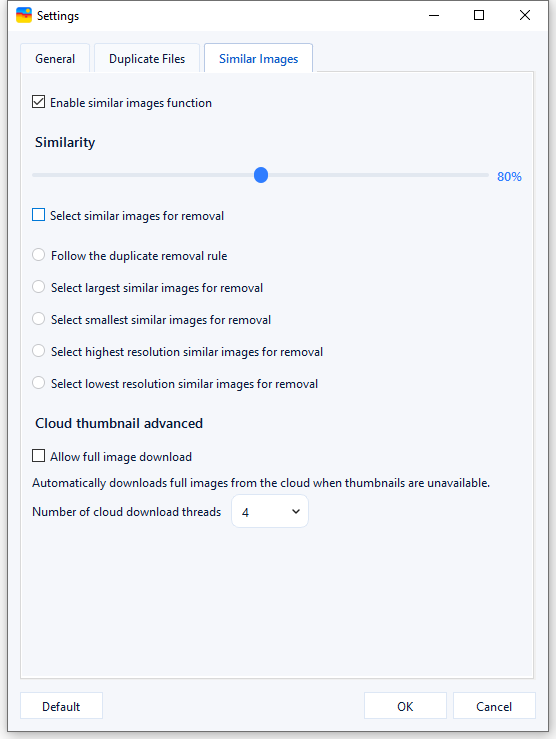
If Cisdem Duplicate Finder doesn't find similar images, open Settings > Similar Images and make sure the Enable similar images function option is checked.
- Enable similar images function: Turn this on to scan for similar images. If it is disabled, Cisdem Duplicate Finder will not scan for similar images.
- Similarity: Adjust the slider to set how similar images need to be to be detected. A higher percentage means the images need to be more similar to be detected as a similar-image group.
If you also want Cisdem Duplicate Finder to automatically select similar images for removal after scanning, check Select similar images for removal and choose a selection rule.
The available rules include:
- Smart selection: This is the default selection rule. It analyzes similar photos based on both aesthetic and technical quality, considering factors such as composition, overall visual appeal, sharpness, exposure, blur, and other visible image-quality issues. Each photo receives a quality score from 0 to 10, helping you quickly compare similar photos and identify the best ones to keep.
- Follow the duplicate removal rule: Selects similar images according to the Duplicate Removal Rule configured under the Duplicate Files tab.
- Select highest resolution similar images for removal: Selects the similar images with the highest resolution.
- Select lowest resolution similar images for removal: Selects the similar images with the lowest resolution.
- Select largest similar images for removal: Selects the similar images with the largest file size.
- Select smallest similar images for removal: Selects the similar images with the smallest file size.
Note: These settings only control automatic selection for removal. You can still review and manually change the selected images before deleting them.

Traci Gordon has worked as a tester in a software company for 8 years, she believes that the best software should be a tool that can help users accomplish what they need with the simplest steps.

Adrian Li is Cisdem’s Chief Engineer and serves as the editorial advisor for Duplicate Finder and ContactsMate. His work and insights have been featured in leading tech publications such as Fossbytes, TUAW, Redmond Pie, SafetyDetectives, and BestForAndroid.